Ryobi P795 Operation Manual - Page 6
Operation
 |
View all Ryobi P795 manuals
Add to My Manuals
Save this manual to your list of manuals |
Page 6 highlights
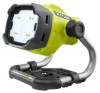
OPERATION INSTALLING/REMOVING BATTERY PACK See Figure 1, page 8. Insert the battery pack into the product as shown. Make sure the latches on each side of the battery pack snap into place and the battery pack is secured before beginning operation. Depress the latches to remove the battery pack. For complete charging instructions, refer to the Operator's Manuals for your battery pack and charger models. WARNING: Always remove battery pack or disconnect power cord from the product when you are assembling parts, making adjustments, cleaning, or when not in use. Removing battery pack or disconnecting power cord will prevent accidental starting that could cause serious personal injury. INSTALLING/REMOVING POWER CORD See Figure 2, page 8. WARNING: Do not route cord under carpets, rugs, runners, furniture, or appliances and always route cord away from traffic areas to prevent a tripping hazard. Remove the battery pack. Insert the female end of the power cord into the product as shown. Connect the male end of the power cord to the power source. Make sure the power cord is secured before beginning operation. WARNING: Keep light away from combustible materials. If wrapped or in contact with fabrics, the work light lens can produce sufficient heat to melt some fabrics. To avoid serious personal injury, never allow the work light lens to come in contact with anything. ADJUSTABLE HEAD See Figure 3, page 8. CAUTION: Do not place hands or fingers between adjustable head and frame when positioning work light to avoid pinching your fingers or hands. To adjust the direction of the light, twist the adjustment knob counterclockwise. Rotate the light head to the desired position and turn the adjustment knob clockwise to tighten. POWER BUTTON See Figure 4, page 9. The light will be in the OFF position until the power button is pressed. Connect the product to an AC or DC power supply. Press and release the power button three times to turn the light on and cycle through high, medium, and low brightness levels. Pressing and releasing the power button a fourth time turns the light OFF. NOTE: This light is equipped with a low voltage indicator. If the light flashes 3 times while a battery pack is installed, this indicates a low charge condition. Three additional flashes indicate that shutdown will follow quickly. Install a charged battery pack and resume operation. CORRELATED COLOR TEMPERATURE (CCT) See Figure 5, page 9. Correlated color temperature (CCT) defines the color appearance of a white LED. This light allows you to select the color appearance by rotating the power button. Turn the power button all the way counterclockwise to select the coolest lighting temperature. Turn the power button gradually clockwise to select light- ing in the neutral temperature range. Continue to turn the power button clockwise and the color temperature will become warmer. At any point in color temperature selection, you can select a high, medium, or low light intensity. 6 - English
-
 1
1 -
 2
2 -
 3
3 -
 4
4 -
 5
5 -
 6
6 -
 7
7 -
 8
8 -
 9
9 -
 10
10 -
 11
11 -
 12
12 -
13
-
14
-
15
-
16
-
17
-
18
-
19
-
20
-
21
-
22
-
23
-
24
 |
 |
