Ryobi RTS10 English Manual
Ryobi RTS10 Manual
 |
View all Ryobi RTS10 manuals
Add to My Manuals
Save this manual to your list of manuals |
Ryobi RTS10 manual content summary:
- Ryobi RTS10 | English Manual - Page 1
OPERATOR'S MANUAL 10 in. Table Saw BTS12S Your table saw has been engineered and manufactured to our high standard for dependability, ease of operation, and operator safety. When properly cared for, it will give you years of rugged, trouble-free performance. WARNING: To reduce the risk of injury, - Ryobi RTS10 | English Manual - Page 2
Symbols...6-7 Electrical...8 Glossary of Terms...9 Features...10-12 Tools Needed...13 Loose Parts...14-15 Assembly...16-19 Operation...20-29 Adjustments...30-31 Maintenance...32 Troubleshooting...33 Parts Ordering / Service...Back page INTRODUCTION This tool has many features - Ryobi RTS10 | English Manual - Page 3
in use, before servicing, or when changing attachments, blades, bits, cutters, etc., all tools should be disconnected. AVOID ACCIDENTAL STARTING. Be sure switch is off when plugging in any tool. USE RECOMMENDED ACCESSORIES. Consult the operator's manual for recommended accessories. The use of - Ryobi RTS10 | English Manual - Page 4
manual or addendums. Use of accessories that are not listed may cause the risk of personal injury. Instructions for safe use of accessories are included with the accessory. DOUBLE CHECK ALL SETUPS. Make sure blade is tight and not making contact with saw or workpiece before connecting to power - Ryobi RTS10 | English Manual - Page 5
have any part of your body in line with the path of the saw blade. NEVER reach behind, over, or within three inches of the blade or cutter with either hand for any reason. MOVE THE RIP FENCE out of the way when cross cutting. DO NOT USE THE MITER GAUGE AND RIP FENCE during the same operation - Ryobi RTS10 | English Manual - Page 6
Power manual before using this product. Always wear safety goggles or safety glasses with side shields and, as necessary, a full face shield when operating this product. Safety Alert No Hands Symbol Hot Surface Precautions that involve your safety. Failure to keep your hands away from the blade - Ryobi RTS10 | English Manual - Page 7
in the operator's manual, do not use this product. Call Ryobi customer service for assistance. WARNING: The operation of any power tool can result in foreign objects being thrown into your eyes, which can result in severe eye damage. Before beginning power tool operation, always wear safety goggles - Ryobi RTS10 | English Manual - Page 8
this tool on direct current (DC). A substantial voltage drop will cause a loss of power and the motor will overheat. If the saw does not operate when plugged into an outlet, double check the power supply. SPEED AND WIRING The no-load speed of this tool is approximately 4,800 rpm. This speed is - Ryobi RTS10 | English Manual - Page 9
Pawls (radial arm and table saws) A device which, when properly installed and maintained, is designed to stop the workpiece from being kicked back toward the front of the saw during a ripping operation. Arbor The shaft on which a blade or cutting tool is mounted. Bevel Cut A cutting operation - Ryobi RTS10 | English Manual - Page 10
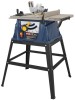
in. Table Size 25-3/4 in. x 16 in. Input 120 V, AC only, 60 Hz, 13 A No Load Speed 4,800 r/min. (RPM) spreader BLADE GUARD ASSEMBLY BLADE RIP FENCE ANTI-KICKBACK PAWLS MITER GAUGE FRONT RAIL LOCKING LEver BEVEL LOCKING LEVER BLADE ADJUSTING HANDLE BEVEL INDICATOR SWITCH assembly trigger - Ryobi RTS10 | English Manual - Page 11
in rip cuts. SPREADER - A metal piece, slightly thinner than the saw blade, which helps keep the kerf open and prevent kickback. SWITCH ASSEMBLY - The saw has an easy access power switch located below the front rail. The switch key must be inserted into the switch before the saw can be operated. To - Ryobi RTS10 | English Manual - Page 12
back toward the operator and result in serious personal injury. Warning: To reduce the risk of accidental starting, Always make sure the switch is in the OFF position before plugging tool into the power source or resetting the overload reset button. SWITCH ON SWITCH OFF SWITCH KEY removed Fig - Ryobi RTS10 | English Manual - Page 13
TOOLS NEEDED The following tools (not included or drawn to scale) are needed for assembly and making adjustments: WRENCH (2) 10 mm, 12 mm PHILLIPS SCREWDRIVER flathead SCREWDRIVER FRAMING SQUARE Fig. 4 13 - Ryobi RTS10 | English Manual - Page 14
LOOSE PARTS LIST 1 17 14 16 15 13 12 11 14 10 9 2 6 3 4 5 7 19 18 8 1 2 3 4 5 6 7 8 9 10 11 12 13 14 15 16 17 18 19 20 Fig. 5 Blade Guard Assembly...1 Lock Nut...1 Blade Adjusting Handle...1 Shoulder Bolt...1 Rip Fence ...1 Flat Washer...1 Miter Gauge ...1 Small Wrench...1 Large - Ryobi RTS10 | English Manual - Page 15
LOOSE PARTS LIST The following items are included with the table saw leg stand: C A G B E D H J F E B E A F C I C J D E I I F C A. Upper Side Brace 2 B. Upper Brace 2 C. Leg 4 D. Lower Side Brace 2 E. Hex Nut 16 I Fig. 3 F. Carriage Bolt (5/16-18 x 5/8 in 16 G. Carriage Bolt - Ryobi RTS10 | English Manual - Page 16
. Do not reach over or across the blade. Failure to heed this warning can result in serious personal injury. WARNING: To avoid serious personal injury, always make sure the table saw is securely mounted to a workbench or an approved leg stand. NEVER operate the saw on the floor. Lower Brace hex nut - Ryobi RTS10 | English Manual - Page 17
stand on the table saw base. Align the holes in the table with the holes in the end braces. Place a bolt in each hole. Secure with a hex nut. Hand tighten. Repeat for three remaining holes. Tighten all hardware securely. Mounting Holes The table saw must be mounted to a firm supporting surface - Ryobi RTS10 | English Manual - Page 18
ASSEMBLY TO remove/replace the THROAT PLATE See Figure 10. Lower the blade by turning the blade adjusting handle clockwise. Loosen the screws in the throat plate. Lift the throat plate and spacers from the saw. To reinstall the throat plate, place the spacers of the holes and align the - Ryobi RTS10 | English Manual - Page 19
must be aligned with the saw blade. See the following section for instructions. TO Check and Align the Saw Blade and Blade Guard Assembly See Figure 14. This saw has been adjusted at the factory and, unless damaged in shipping, should not require adjustments during assembly. After extensive use, it - Ryobi RTS10 | English Manual - Page 20
or accessories not recommended can result in serious personal injury. APPLICATIONS You may use this tool for the purposes listed below: Straight line cutting operations such as cross cutting, ripping, mitering, beveling, and compound cutting. Cabinet making and woodworking. Note: This table saw - Ryobi RTS10 | English Manual - Page 21
cut, 5) the bevel rip cut, and 6) 1 the compound (bevel) miter cut. All other cuts are combina- tions of these basic six. Operating procedures for making each kind of cut are given later in this section. Cross Cut WARNING: Always make sure the blade guard and anti-kickback pawls are in place - Ryobi RTS10 | English Manual - Page 22
before removing the stock. Reset the rip fence and cut spaced rips into the workpiece to allow approximately 1/4 in. fingers and 1/8 in. spaces between the fingers. HOW TO MOUNT A FEATHERBOARD See Figure 18. Completely lower the saw blade. Position the rip fence to the desired adjustment for - Ryobi RTS10 | English Manual - Page 23
operation To change the Blade Depth See Figure 19. The blade depth should be set so that the outer tips of the blade are higher than the workpiece by approximately 1/8 in. to 1/4 in. but the lowest points (gullets) are below the top surface. Raise the blade by turning the blade the saw blade is at - Ryobi RTS10 | English Manual - Page 24
gauge and your hands. The miter gauge can be turned 60° to the right or left. Loosen the lock knob. With the miter gauge in the miter gauge slot, rotate the gauge until the desired angle is reached on the scale. Retighten the lock knob. rip fence rip fence lever SAW TABLE REAR LIP Blade - Ryobi RTS10 | English Manual - Page 25
workpiece. Set the miter gauge to 0° and tighten the lock knob. Place a support (the same height as saw table) behind the saw for the cut work. Make sure the wood is clear of the blade before turning on the saw. Turn the saw ON by lifting the switch button. Let the blade build up to full - Ryobi RTS10 | English Manual - Page 26
is made, turn the saw OFF. Wait for the blade to come to a complete stop before removing any part of the workpiece. MITER cut rip cut Fig. 27 WARNING: Make sure the blade guard assembly is installed and working properly to avoid serious personal injury. Remove the miter gauge by sliding it out - Ryobi RTS10 | English Manual - Page 27
should be placed on the miter gauge lock knob and the hand farthest from the blade should be placed on the workpiece. When the cut is made, turn the saw OFF. Wait for the blade to come to a complete stop before removing any part of the workpiece. To make a bevel rip cut See Figure 30. Remove - Ryobi RTS10 | English Manual - Page 28
stop before removing any part of the workpiece. After the blade has stopped completely, remove the cutoff stock. COMPOUND MITER cut WARNING: Make sure the blade guard assembly is installed and working properly to avoid serious personal injury. Remove the rip fence by depressing the lock - Ryobi RTS10 | English Manual - Page 29
start and finish of every cut to avoid the risk of serious personal injury. WARNING: Never feed wood with your hands when making any nonthrough cut such as rabbets. To avoid personal injury, always use push blocks, push sticks, and featherboards. Unplug the saw. Remove the blade guard assembly - Ryobi RTS10 | English Manual - Page 30
See Figure 33. WARNING: To reduce the risk of injury, always make sure the rip fence is parallel to the blade before beginning any operation. Unplug the saw then remove the blade guard assembly. Unlock the rip fence by depressing the trigger lock and lifting the locking handle. Place a framing - Ryobi RTS10 | English Manual - Page 31
locking lever. Reset the bevel indicator to 0° by loosening the screw holding the indicator. Line up the red line on the indicator with the 0° mark on the bevel scale. To SEt the 45° Positive Stop See Figure 35. Make sure the saw is unplugged from the power source. Raise the blade to the maximum - Ryobi RTS10 | English Manual - Page 32
MAINTENANCE WARNING: When servicing, use only identical Ryobi replacement parts. Use of any other parts may create a hazard or cause product damage. WARNING: Always wear safety goggles or safety glasses with side shields during power tool operation or when blowing dust. If operation is dusty, also - Ryobi RTS10 | English Manual - Page 33
Replace wood. 5. Call Ryobi Technical Service at 1‑800-525-2579. 1. Check and adjust the rip fence. 2. Have blade resharpened. 1. Adjust positive stops. 1. Miter gauge is misaligned. 1. Recheck setting on miter scale. 1. Blade is dull or dirty. 2. Blade is wrong type for cut. 3. Blade is mounted - Ryobi RTS10 | English Manual - Page 34
OPERATOR'S MANUAL 10 in. Table Saw BTS12S WARNING: Some dust created by power sanding, sawing, grinding, drilling, and other list of Authorized Service Centers. • MODEL NO. AND SERIAL NO. The model number of this tool will be found on a plate attached to the motor housing. Please record the model
-
 1
1 -
 2
2 -
 3
3 -
 4
4 -
 5
5 -
 6
6 -
 7
7 -
8
-
9
-
10
-
11
-
12
-
13
-
14
-
15
-
16
-
17
-
18
-
19
-
20
-
21
-
22
-
23
-
24
-
25
-
26
-
27
-
28
-
29
-
30
-
31
-
32
-
33
-
34
 |
 |

OPERATOR’S MANUAL
10 in. TABLE SAW
BTS12S
SAVE THIS MANUAL FOR FUTURE REFERENCE
You
r table saw h
as been engineered and manufactured to our high standard for dependability, ease of operation, and
operator safety. When properly cared for, it will give you years of rugged, trouble-free performance.
WARNING:
To reduce the risk of injury, the user must read and understand the operator's manual before using
this product.
Thank you for your purchase.