Ryobi RTS30 English Manual
Ryobi RTS30 Manual
 |
View all Ryobi RTS30 manuals
Add to My Manuals
Save this manual to your list of manuals |
Ryobi RTS30 manual content summary:
- Ryobi RTS30 | English Manual - Page 1
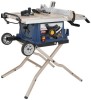
OPERATOR'S MANUAL 10 in. Table Saw BTS21 Your table saw has been engineered and manufactured to our high standard for dependability, ease of operation, and operator safety. When properly cared for, it will give you years of rugged, trouble-free performance. WARNING: To reduce the risk of injury, the - Ryobi RTS30 | English Manual - Page 2
Symbols...6-7 Electrical...8 Glossary of Terms...9 Features...10-13 Tools Needed ...13 Loose Parts...14 Assembly...15-19 Operation...19-34 Adjustments...35-37 Maintenance...38 Troubleshooting...39-40 Parts Ordering/Service...Back Page INTRODUCTION This tool has many features - Ryobi RTS30 | English Manual - Page 3
. Keep tools sharp and clean for better and safer performance. Follow instructions for lubricating and changing accessories. DISCONNECT TOOLS. When not in use, before servicing, or when changing attachments, blades, bits, cutters, etc., all tools should be disconnected. AVOID ACCIDENTAL STARTING - Ryobi RTS30 | English Manual - Page 4
off immediately if blade binds or stalls. USE RIP FENCE. Always use a fence or straight edge guide when ripping. SUPPORT LARGE PANELS. To minimize risk of blade pinching and kickback, always support large panels. Remove all fences and auxiliary tables before transporting saw. Failure to do - Ryobi RTS30 | English Manual - Page 5
"freehand" which means using only your hands to support or guide the workpiece. Always use either the rip fence or miter fence to position and guide the work. NEVER stand or have any part of your body in line with the path of the saw blade. NEVER reach behind, over, or within three inches - Ryobi RTS30 | English Manual - Page 6
's manual before using this product. Always wear safety goggles or safety glasses with side shields and, as necessary, a full face shield when operating this product. Safety Alert No Hands Symbol Hot Surface Precautions that involve your safety. Failure to keep your hands away from the blade will - Ryobi RTS30 | English Manual - Page 7
parts. WARNING: To avoid serious personal injury, do not attempt to use this product until you read thoroughly and understand completely the operator's manual. If you do not understand the warnings and instructions in the operator's manual, do not use this product. Call Ryobi customer service - Ryobi RTS30 | English Manual - Page 8
grounding conductor to a live terminal. Check with a qualified electrician or service personnel if the grounding instructions are not completely understood, or if in doubt as to whether the tool is properly grounded. Repair or replace a damaged or worn cord immediately. This tool is intended for use - Ryobi RTS30 | English Manual - Page 9
back toward the front of the saw during a ripping operation. Arbor The shaft on which a blade or cutting tool is mounted. Bevel Cut A cutting operation made with the blade at any angle other than 90° to the table surface. Chamfer A cut removing a wedge from a block so the end (or part of the end) is - Ryobi RTS30 | English Manual - Page 10
support LOCK knob anti-kickback pawls BLADE GUARD RIP FENCE table extension SCALE MITER FENCE miter scale STORAGE BRACKET(S) BEVEL INDICATOR LOCKING lever TABLE TILT HANDLE SWITCH ASSEMBLY BEVEL LOCKING LEVER HEIGHT/bevel ADJUSTING HANDWHEEL FRONT RAIL BEVEL SCALE leg stand Fig. 2 10 - Ryobi RTS30 | English Manual - Page 11
lower and raise the blade for height adjustments or blade replacement. This handwheel also makes the adjustment for bevel angles. LEG STAND - Attached to the table saw base, the leg stand opens and closes with ease making transportation simple. MITER FENCE WITH LOCK KNOB - The fence attaches to the - Ryobi RTS30 | English Manual - Page 12
called the throat plate. The height of the blade is set with a handwheel on the front of the cabinet. To accommodate wide panels, the saw table has rails on each side. Detailed instructions are provided in the Operation section of this manual for the basic cuts: cross cuts, miter cuts, bevel cuts - Ryobi RTS30 | English Manual - Page 13
performance, it is recommended that you use the 36-tooth, 10 in. carbide-tipped combination blade provided with your saw. Additional blade styles of the same high quality are available for specific operations such as ripping. Your local dealer can provide you with complete information. WARNING - Ryobi RTS30 | English Manual - Page 14
LOOSE PARTS The following items are included with your table saw: B C A H D E G F I Fig. 5 A. Rip Fence...1 B. Large Blade Wrench...1 C. Small Blade Wrench...1 D. Elbow...1 E. Dust Bag...1 F. Handle Assembly...1 G. Miter Fence with Lock Knob...1 H. Blade Guard with Spreader and Anti-Kickback Pawls - Ryobi RTS30 | English Manual - Page 15
from between the saw's housing and the motor by first beveling the blade (see page 23). The saw is factory set for accurate cutting. After assembling it, check for accuracy. If shipping has influenced the settings, refer to specific procedures explained in this manual. If any parts are damaged - Ryobi RTS30 | English Manual - Page 16
to pull the leg stand latch towards you. Step 2: Once the leg stand is released from the table saw base, ease the legs of the stand down. Steps 3 and 4: Grasp the upper leg support below the saw cabinet. Keeping your left hand clear of the leg stand, pull the leg stand up until it - Ryobi RTS30 | English Manual - Page 17
the holes in the throat plate with the holes in the saw table. Retighten the screws, being careful not to overtighten, which can cause the throat plate to bow or bend. blade wrenches riP FENCE STORAGE HOOK Fig. 9 miter fence STORAGE HOOK SAW table Fig. 8 17 Fig. 10 SCREW THROAT PLATE Fig. 11 - Ryobi RTS30 | English Manual - Page 18
to do so could cause damage to the saw blade, the saw, or the workpiece. NOTE: Arbor shaft has left hand threads. Lower the saw blade and remove the throat plate. Make sure the bevel locking lever is securely pushed to the left. Raise the saw blade to its full height by turning the height - Ryobi RTS30 | English Manual - Page 19
the back of the table saw. Slide the dust bag into the elbow. NOTE: For efficient operation, empty the dust bag before it is half full. This will permit better air flow through the bag. anti-kickback pawls spreader WING NUT MOUNTING PLATE Fig. 14 DUST CHUTE ELBOW DUST BAG OPERATION Fig. 15 - Ryobi RTS30 | English Manual - Page 20
instructed to do so. APPLICATIONS You may use this tool for the purposes listed below: Straight line cutting operations such as cross cutting, ripping, mitering, beveling, and compound cutting Dado or molding cuts with optional accessories Cabinet making and woodworking NOTE: This table saw - Ryobi RTS30 | English Manual - Page 21
rip cuts, bevel cuts, and miter cuts before trying a compound miter cut. CUTTING TIPS Dado and rabbet cuts are non-through cuts which can be either rip cuts or cross cuts. Carefully read and understand all sections of this operator's manual before attempting any operation. WARNING: Do not use blades - Ryobi RTS30 | English Manual - Page 22
in., 10 in., and 12 in. Drill a 3/8 in. hole at the 8 in., 10 in., and 12 in. marks. Prepare the saw for ripping as discussed on page 29. Set the rip fence to the bolt in the miter table slot but do not tighten. Completely lower the saw blade. Position the rip fence to the desired adjustment for - Ryobi RTS30 | English Manual - Page 23
the front scale. When the arrows on both the saw table and sliding table are aligned, this bolt slides through the holes in both tables locking them into a fixed position. The sliding table has three positions providing additional front support when working with larger workpieces. Always lock the - Ryobi RTS30 | English Manual - Page 24
the end of the miter table as shown in figure 24. Note: Front of miter base is on infeed side of saw. Place a reference mark on one of the blade teeth (D) and rotate the blade (E) so that the reference mark on the blade is at the front of the throat plate. Place a framing square (G) against the - Ryobi RTS30 | English Manual - Page 25
and loosen the right-front screw from beneath the table saw cabinet. Loosen the nylock nut beneath the front left eccentric screw. Place one side of a framing square firmly against the miter fence and the other side against the saw blade. Using a flathead screwdriver, turn the eccentric screw - Ryobi RTS30 | English Manual - Page 26
. Check for a smooth gliding action. If adjustments are needed, see To Check the Alignment of the Rip Fence to the Blade in the Adjustment section of this manual. Scale indicator locking lever SAW TABLE 2 in. 2 in. mark Locking lever rip fence Scale Front rail Fig. 28 REAR LIP Fig. 29 26 - Ryobi RTS30 | English Manual - Page 27
operation to use OUTFEED SUPPORT See Figure 30. The outfeed support slides to give the operator additional support for cutting long workpieces. With the table saw in the off position, stand behind the saw. Grasp the outfeed support with both hands and pull it until it is fully extended. to use - Ryobi RTS30 | English Manual - Page 28
risk of injury from kickback, align the rip fence to the blade following any blade adjustments. Always make sure the rip fence is parallel to the blade before beginning any operation. (3) (2) (1) adjusting bolts (3) FRAMING SQUARE Fig. 32 FRAMING SQUARE Saw blade out of alignment Fig. 33 use - Ryobi RTS30 | English Manual - Page 29
make test cuts on scrap wood. Remove the rip fence by lifting the locking handle. Set the blade to the correct depth for the workpiece. Set the miter fence to 0° and tighten the lock knob. Place a support (the same height as saw table) behind the saw for the cut work. Make sure the wood - Ryobi RTS30 | English Manual - Page 30
to avoid serious possible injury. Position the rip fence the desired distance from the blade for the cut and securely lock the handle. Adjust the scale to zero at the cutting edge of the blade. Place a support (the same height as saw table) behind the saw for the cut work. Make sure the - Ryobi RTS30 | English Manual - Page 31
the bevel angle to the desired setting. Set the blade to the correct depth. Position the rip fence the desired distance from the left side of the blade and lock down the handle. If ripping a piece larger than 36 in. long, place a support the same height as the table surface behind the saw for - Ryobi RTS30 | English Manual - Page 32
closest to the rip fence to guide it. Make sure the edge of the workpiece remains in solid contact with both the rip fence and the surface of the table. If ripping a narrow piece, use a push stick to move the piece through the cut and past the blade. When the cut is made, turn the saw off. Wait - Ryobi RTS30 | English Manual - Page 33
the blade guard assembly is installed and working properly to avoid possible serious injury. Place a support the same height as the top of the saw table behind the saw for the cut work. Add supports to the sides as needed. Depending on the shape of the panel, use the rip fence or miter fence. If - Ryobi RTS30 | English Manual - Page 34
dado throat plate (part number 0134010313) is required for this procedure. Do not use blades rated less than the speed of this tool. This saw is designed for use with a 6 in. stack dado (up to width of 5/8 in.). Do not use an adjustable dado on this saw. NOTE: This saw cannot be used to make a bevel - Ryobi RTS30 | English Manual - Page 35
cuts to be sure adjustments are needed. TO REPLACe THE BLADE See Figures 46 - 48. Unplug the saw. Lower the saw blade, raise the blade guard, and remove the throat plate. Make sure the bevel locking lever is securely pushed down. Raise the saw blade to its full height by turning the height - Ryobi RTS30 | English Manual - Page 36
to insure the adjustment has not moved. TO CHECK THE ALIGNMENT OF THE RIP FENCE TO THE BLADE See Figure 50. Unplug the saw. Raise the locking lever to permit the rip fence to be moved. Place a framing square beside the blade and move the rip fence up to the square. Take the dimension on the - Ryobi RTS30 | English Manual - Page 37
your saw have been set at the factory and, unless damaged in shipping, should not require setting during assembly. After extensive use, they may need to be checked. Raise the blade and the blade guard. If the blade is not perfectly vertical (0°), loosen the adjustment bolt and the bevel locking - Ryobi RTS30 | English Manual - Page 38
cloths to remove dirt, dust, oil, grease, etc. Periodically check all clamps, nuts, bolts, and screws for tightness and condition. Make sure the throat plate is in good condition and in position. Check the blade guard assembly. To maintain the table surfaces, fence, and rails, periodically - Ryobi RTS30 | English Manual - Page 39
TROUBLESHOOTING Problem Excess vibration. Rip fence does not move smoothly. Rip fence does not lock at rear. Cutting binds or burns work. Wood edges away from rip fence when ripping. Sliding miter table assembly does not move smoothly. Cause Blade is out of balance. Blade is damaged. Saw is not - Ryobi RTS30 | English Manual - Page 40
Troubleshooting Problem Saw does not make accurate 90˚ or 45˚ cuts. Height/bevel adjusting handwheel is hard to turn. Saw does not start. Blade makes poor cuts. Blade does not lower when turning height/bevel adjusting handwheel. Motor labors in rip cut. Cause Solution Positive stops inside - Ryobi RTS30 | English Manual - Page 41
NOTES 41 - Ryobi RTS30 | English Manual - Page 42
equipment, such as those dust masks that are specially designed to filter out microscopic particles. • Parts and Service Prior to requesting service or purchasing replacement parts, please obtain your model and serial number from the product data plate. • MODEL NUMBER BTS21 • SERIAL NUMBER
-
 1
1 -
 2
2 -
 3
3 -
 4
4 -
 5
5 -
 6
6 -
 7
7 -
8
-
9
-
10
-
11
-
12
-
13
-
14
-
15
-
16
-
17
-
18
-
19
-
20
-
21
-
22
-
23
-
24
-
25
-
26
-
27
-
28
-
29
-
30
-
31
-
32
-
33
-
34
-
35
-
36
-
37
-
38
-
39
-
40
-
41
-
42
 |
 |

OPERATOR’S MANUAL
10 in. TABLE SAW
BTS21
SAVE THIS MANUAL FOR FUTURE REFERENCE
You
r table saw h
as been engineered and manufactured to our high standard for dependability, ease of operation, and
operator safety. When properly cared for, it will give you years of rugged, trouble-free performance.
WARNING:
To reduce the risk of injury, the user must read and understand the operator’s manual before using
this product.
Thank you for your purchase.