Ryobi RTS30 English Manual - Page 24
To Check Miter Base Parallelism
 |
View all Ryobi RTS30 manuals
Add to My Manuals
Save this manual to your list of manuals |
Page 24 highlights
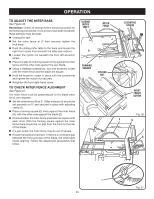
operation To Check Miter Base Parallelism See Figures 24 - 25. Unplug the saw. Set saw up as if you were preparing to make a cut. Tighten rail clamps, miter locking clamps, lock knob, etc. Slide miter table (A) to the front of miter base (B) as far as it will go. Place a reference mark (C) near the end of the miter table as shown in figure 24. Note: Front of miter base is on infeed side of saw. Place a reference mark on one of the blade teeth (D) and rotate the blade (E) so that the reference mark on the blade is at the front of the throat plate. Place a framing square (G) against the blade and align with reference mark on miter table. Measure the distance between the blade and the edge of miter table. Note: Place framing square between carbide teeth and measure from blade. This step will insure framing square is square against blade from the front to back of blade. Remove framing square and slide miter table to the rear of miter base as far as it will go. Rotate the blade so the reference mark on the blade is at the rear of the throat plate. Measuring from the same mark on the blade at the rear will eliminate the effect of blade wobble. Place framing square against the blade and align with the same reference mark on the miter table. Measure the distance between the blade and the edge of the miter table at the rear. Compare whether the front and rear measurements are the same. If they are the same, proceed with checking the miter fence alignment. If not, this indicates the miter base needs aligning. Miter base must then be adjusted before checking miter fence alignment. See To Adjust the Miter Base section that follows. e b d c g Fig. 23 d c a g Fig. 24 e f b Fig. 25 24
-
 1
1 -
2
-
3
-
4
-
5
-
6
-
7
-
8
-
9
-
10
-
11
-
12
-
13
-
14
-
15
-
16
-
17
-
18
-
 19
19 -
 20
20 -
 21
21 -
 22
22 -
 23
23 -
 24
24 -
 25
25 -
 26
26 -
 27
27 -
 28
28 -
 29
29 -
30
-
31
-
32
-
33
-
34
-
35
-
36
-
37
-
38
-
39
-
40
-
41
-
42
 |
 |
