Ryobi TR45K English Manual
Ryobi TR45K Manual
 |
View all Ryobi TR45K manuals
Add to My Manuals
Save this manual to your list of manuals |
Ryobi TR45K manual content summary:
- Ryobi TR45K | English Manual - Page 1
OPERATOR'S MANUAL LAMINATE TRIMMER DOUBLE INSULATED TR45 Your laminate trimmer has been engineered and manufactured to Ryobi's high standard for dependability, ease of operation, and operator safety. When properly cared for, it will give you years of rugged, trouble-free performance. WARNING: To - Ryobi TR45K | English Manual - Page 2
date of purchase, you may either request service under this warranty or you may exchange any RYOBI® power tool which does not work properly sale). We will repair any faulty workmanship, and either repair or replace any defective part, at our option. We will do so without any charge to you. We will - Ryobi TR45K | English Manual - Page 3
INSTRUCTIONS and support the parts, breakage of parts, and any other condition that may affect the tool's operation. If damaged, have the tool serviced before using. Many accidents are caused by poorly maintained tools. n Use only accessories that are recommended by the manufacturer for your model - Ryobi TR45K | English Manual - Page 4
servicing a tool, use only identical replacement parts. Follow instructions in the Maintenance section of this manual. Use of unauthorized parts or failure to follow Maintenance Instructions examples of these chemicals are: • lead from lead-based paints, • crystalline silica from bricks and cement - Ryobi TR45K | English Manual - Page 5
., per minute Wet Conditions Alert Do not expose to rain or use in damp locations. Read The Operator's Manual To reduce the risk of injury, user must read and understand operator's manual before using this product. Eye Protection Safety Alert No Hands Symbol No Hands Symbol No Hands Symbol No - Ryobi TR45K | English Manual - Page 6
servicing, use only identical replacement parts. WARNING: To avoid serious personal injury, do not attempt to use this product until you read thoroughly and understand completely the operator's manual. Save this operator's manual and review frequently for continuing safe operation and instructing - Ryobi TR45K | English Manual - Page 7
of the system and should be performed only by a qualified service technician. For service, we suggest you return the tool to your nearest authorized service center for repair. Always use original factory replacement parts when servicing. ELECTRICAL CONNECTION This tool has a precision-built electric - Ryobi TR45K | English Manual - Page 8
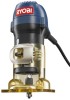
Hz, AC only, 4.5 Amps Net Weight 3 lbs. (1.36 kg) Cord Length 10 ft. (3 m) WRENCHES ON-OFF SWITCH DEPTH OF CUT SCALE DEPTH ADJUSTMENT LATCH SUB-BASE HANDLES �� �� � � �� COLLET NUT WOODWORKING SUB-BASE Page 8 MOTOR HOUSING BASE LAMINATE SUB-BASE Fig. 1 - Ryobi TR45K | English Manual - Page 9
or missing, please call 1-800-525-2579 for assistance. PACKING LIST Laminate Trimmer with Laminate Sub-base Woodworking Sub-base Sub-base Handles (2) Ball Bearing Flush Trim Bit Carrying Case Wrenches Operator's Manual WARNING: If any parts are missing do not operate this tool until the missing - Ryobi TR45K | English Manual - Page 10
Tighten the screws securely. Do not overtighten. WRENCH ON COLLET NUT CUTTER WRENCH ON SPINDLE FLATS Fig. 2 LAMINATE TRIMMER HANDLE(S) R3 R2 1 2 R2 WOODWORKING SUB-BASE 1 3/14/12/4 SUB-BASE SCREW(S) Fig. 3 n Turn the trimmer upright and thread the handles provided into the threaded holes - Ryobi TR45K | English Manual - Page 11
recommended by the manufacturer of this TRIMMER See Figure 5. Before starting the trimmer, unplug it and make sure the cutter is securely tightened in the collet and that the depth of cut is properly set. Never start the trimmer of trimmer base. Fingers entering the opening in the trimmer base can - Ryobi TR45K | English Manual - Page 12
of the cutter continuously biting straight into new (uncut) wood. TRIM END GRAINS FIRST TRIMMER FEED DIRECTION BIT ROTATION TRIMMER FEED DIRECTION GUIDE OUTSIDE BIT ROTATION Fig. 6 THRUST ROTATION GUIDE GUIDE INSIDE ROTATION GUIDE FEED FEED TRIMMER FEED DIRECTION THRUST Fig. 7 Page 12 - Ryobi TR45K | English Manual - Page 13
cut on a scrap piece of the workpiece wood or laminate before you begin. Always grasp and hold the trimmer firmly with both hands when trimming. If you are rate may be determined by the speed at which you can travel the trimmer along the guide line. If the cutter is a large one, the cut is deep - Ryobi TR45K | English Manual - Page 14
Using the proper depth of cut can lessen the possibility of damage to the trimmer motor and cutter. A deeper cut requires a slower feed than a shallow too deep may result in a rough cut, and may make it difficult to guide and control the cutter as desired. It is recommended that you do not exceed - Ryobi TR45K | English Manual - Page 15
Do not attempt to operate the trimmer without the base installed. WARNING: Always use the laminate sub-base for laminate trimming. Always use the woodworking sub-base for trim routing operations. Use of the trimmer without a sub-base or using the incorrect base can result in serious personal injury - Ryobi TR45K | English Manual - Page 16
handles allow you to grasp and hold the trimmer with two hands, similar to grasping and holding a router. ROUTING GROOVES IN A CIRCLE See Figure 12. n There are three holes marked R2", R2-1/2", and R3" on the sub-base. Each number - Ryobi TR45K | English Manual - Page 17
as a straight edge must be 1/4 in. (6.4 mm) thick or less to prevent contact with the trimmer base. It must also be at least as long as the workpiece in order to be a guide. n The thrust is from the trimmer against the straight edge. n Do not make a cut that is too heavy in one pass - Ryobi TR45K | English Manual - Page 18
servicing, use only identical Ryobi replacement parts. Use of any other parts latch and adjust it when necessary. n Unplug the trimmer n Open the depth adjustment latch. n Using a small and assure the latch is securely tightened by checking the sub-base. It should not move. WARNING: Do not at any - Ryobi TR45K | English Manual - Page 19
loose wires. n Replace the brush tube clamps and clamp screws. n Replace the top cover. n Replace the screws on the top cover of the trimmer. n Tighten all screws securely. Do not overtighten. SCREWS TOP COVER LEADTRAP LEADTRAP CLAMP SCREWS BRUSH TUBE CLAMPS BLACK LEAD BRUSH ASSEMBLY RED LEAD - Ryobi TR45K | English Manual - Page 20
OPERATOR'S MANUAL LAMINATE TRIMMER DOUBLE INSULATED TR45 • SERVICE Now that you have purchased your tool, should a need ever exist for repair parts or service, simply contact your nearest Authorized Service Center. Be sure to provide all pertinent facts when you call or visit. Please call 1-800-525
-
 1
1 -
 2
2 -
 3
3 -
 4
4 -
 5
5 -
 6
6 -
 7
7 -
8
-
9
-
10
-
11
-
12
-
13
-
14
-
15
-
16
-
17
-
18
-
19
-
20
 |
 |

Your laminate trimmer has been engineered and manufactured to Ryobi’s high standard for dependability, ease of operation,
and operator safety. When properly cared for, it will give you years of rugged, trouble-free performance.
WARNING:
To reduce the risk of injury, the user must read and understand the operator's manual before using
this product.
Thank you for buying a Ryobi product.
OPERATOR'S MANUAL
LAMINATE TRIMMER
DOUBLE INSULATED
TR45
SAVE THIS MANUAL FOR FUTURE REFERENCE