Ryobi YN200BND Operation Manual
Ryobi YN200BND Manual
 |
View all Ryobi YN200BND manuals
Add to My Manuals
Save this manual to your list of manuals |
Ryobi YN200BND manual content summary:
- Ryobi YN200BND | Operation Manual - Page 1
DE FINITION CALIBRE 18, Clavadora de PUNTILLAS YN200BND Your brad nailer has been engineered and manufactured to our high standard for dependability, ease of operation, and operator safety. When properly cared for, it will give you years of rugged, trouble-free performance. WARNING: To reduce the - Ryobi YN200BND | Operation Manual - Page 2
or materials in your RYOBI® power tool for a period of two years from the date of purchase. With the exception of batteries, power tool accessories are warranted for ninety (90) days. Batteries are warranted for two years. HOW TO GET SERVICE: Just return the power tool, properly packaged and postage - Ryobi YN200BND | Operation Manual - Page 3
by unqualified personnel may result in a risk of injury. When servicing a tool, use only identical replacement parts. Follow instructions in the Maintenance section of this manual. Use of unauthorized parts or failure to follow Maintenance instructions may create a risk of injury. 3 - English - Ryobi YN200BND | Operation Manual - Page 4
, possibly causing injury. Choice of triggering method is important. Check manual for triggering options. Pneumatic tools are designed for single-hand use. Do not hold the tool by the front of the magazine. Do not put hands, head, or other parts of your body near the bottom of the magazine where - Ryobi YN200BND | Operation Manual - Page 5
hand or any part of body in fastener discharge area of tool. Never point tool at anyone. Do not pull the trigger or depress the workpiece contact as accidental actuation may occur, possibly causing injury. Save these instructions Refer to them frequently and use them to instruct others who may - Ryobi YN200BND | Operation Manual - Page 6
with hearing and head protection. Keep Hands Away Read The Operator's Manual Hot Surface Keep hands and body away from the discharge area of the tool. To reduce the risk of injury, user must read and understand operator's manual before using this product. To reduce the risk of injury or damage - Ryobi YN200BND | Operation Manual - Page 7
fitting. Fastener A staple, pin, brad, nail, or other fastening device which is designed and manufactured for use in the tools within the scope of this standard. a tool. Operating control A control that separately, or as part of an actuation system, can cause the actuation of a tool. Single - Ryobi YN200BND | Operation Manual - Page 8
on operator preference. depth of drive adjustment The tool-free depth of drive adjustment lets the operator select precise driving LIST Brad Nailer Oil Sample Fasteners Hex Keys (3 mm and 4 mm) Operator's Manual WARNING: Do not use this product if it is not completely assembled or if any parts appear - Ryobi YN200BND | Operation Manual - Page 9
Do not use oxygen, combustible gases or bottled gases as a power source for this tool. The tool will explode and cause death or serious injury. WARNING: Always Wainscoting Window Beading Chair Rail Furniture Frames Lattice Strip Molding Nailable Plastic Parts Crafts 9 - English - Ryobi YN200BND | Operation Manual - Page 10
AIR SUPPLY See Figure 5, page 15. DANGER: Do not use oxygen, combustible gases or bottled gases as a power source for this tool. The tool will explode and cause death or serious injury. This tool is designed to operate on clean, dry compressed air at regulated pressures between 70 and 120 psi . The - Ryobi YN200BND | Operation Manual - Page 11
the work. Restriction to the recoil can result in a second fastener being driven from the nailer. Grip the handle firmly, let the tool do the work, and do not place second hand on top of tool or near exhaust at any time. Failure to heed this warning can result in serious personal injury - Ryobi YN200BND | Operation Manual - Page 12
MAINTENANCE WARNING: When servicing use only identical replacement parts. Use of any other parts may create a hazard or cause a slow operation or reduced driving power. Before evaluating tool problems for these symptoms, trace the air supply from the tool to the supply source for restrictive - Ryobi YN200BND | Operation Manual - Page 13
depth of drive according to the Drive Depth Adjustment section in this manual. Repeat this checklist before using the tool each day, or if the tool is dropped or damaged in any way. ACCESSORIES To order parts and maintenance kits, call 1-800-525-2579. Overhaul Maintenance Kit...079023001059 Driver - Ryobi YN200BND | Operation Manual - Page 14
TROUBLESHOOTING PROBLEM POSSIBLE CAUSE Air leak near the top of the tool or in the trigger area Loose screws Worn or damaged O-rings or seals SOLUTION Tighten screws Install Overhaul Kit Air leak near the bottom of the Worn or damaged O-rings or bumper Install Overhaul Kit tool Tool does - Ryobi YN200BND | Operation Manual - Page 15
TABLE DES MATIÈRES Introduction...2 Garantie...2 Règles de Figure numéros (illustrations)...15-16 Service après-vente...Page arrière INTRODUCTION Cet outil cet outil motorisé Ryobi®, pour une période de deux ans, à compter de la date d'achat. À l'exception des batteries, les accessoires sont - Ryobi YN200BND | Operation Manual - Page 16
avertissement pourrait entraîner des BLESSURES GRAVES ou MORTELLES. CONSERVER CES INSTRUCTIONS LIEU DE TRAVAIL Garder le lieu de travail propre et bien est recommandé. Ne pas utiliser l'outil sur une échelle ou un support instable. Une bonne tenue et un bon équilibre permettent de mieux contrô - Ryobi YN200BND | Operation Manual - Page 17
RÈGLES DE SÉCURITÉ PARTICULIÈRES Apprendre à pneumatique l'outil. Lire attentivement le manuel d'utilisation. Apprendre les applications et les limites de l'outil, ainsi que les risques spécifiques relatifs à son utilisation. Le respect de cette règle réduira les risques d'incendie, de choc é - Ryobi YN200BND | Operation Manual - Page 18
Ne pas appuyer sur la gâchette ou sur le mécanisme de contact, car l'outil pourrait éjecter un clou, risquant blesser quelqu'un. CONSERVER CES INSTRUCTIONS Les consulter fréquemment et les utiliser pour instruire les autres utilisateurs éventuels. Si cet outil est prêté, il doit être accompagné de - Ryobi YN200BND | Operation Manual - Page 19
SYMBOLES Les termes de mise en garde suivants et leur signification ont pour but d'expliquer le degré de risque associé à l'utilisation de ce produit. SYMBOLE SIGNAL SIGNIFICATION DANGER : Indique une situation extrêmement dangereuse qui, si elle n'est pas évitée, aura pour conséquences des - Ryobi YN200BND | Operation Manual - Page 20
GLOSSAIRE Activer (commandes de l'outil) Mettre une commande sur une position déclenchant ou permettant de déclencher l'outil. Actionner (outil) Causer le mouvement des pièces conçues pour chasser le clou Orifice d'entrée d'air Sur un outil pneumatique, l'ouvreture sur laquelle la source d'air est - Ryobi YN200BND | Operation Manual - Page 21
CARACTÉRISTIQUES FICHE TECHNIQUE Pression de service 70 à 120 psi Type de pièces de fixation....Clous de finition de calibre 18 Longueur des attaches 15,87 mm (5/8 po) à 50,8 mm (2 po) - Ryobi YN200BND | Operation Manual - Page 22
UTILISATION DANGER : AVERTISSEMENT : Ne pas utiliser de l'oxygène ou des gaz combustibles ou en bouteille pour alimenter l'outil. L'outil exploserait, causant des blessures graves ou mortelles. AVERTISSEMENT : Ne pas laisser la familiarité avec l'outil faire oublier la prudence. Ne pas oublier qu - Ryobi YN200BND | Operation Manual - Page 23
ée dans le magasin ou se trouver dans la partie supérieure du magasin. Si les pointes des clous ne se trouvent pas à l'intérieur du guide sans reposer de façon incorrecte sur un épaulement, déplacez la bande de clous légèrement vers le haut jusqu'à ce que les têtes reposent sur - Ryobi YN200BND | Operation Manual - Page 24
UTILISATION ENFONCER UN CLOU Voir les figure 8, page 16. AVERTISSEMENT : Ne jamais caler ou bloquer le mécanisme de sûreté de déclenchement par contact pendant que l'outil est en fonctionnement. Cela pourrait entraîner des blessures graves. DÉCLENCHEMENT PAR SÉQUENCE UNIQUE Le mode de déclenchement - Ryobi YN200BND | Operation Manual - Page 25
ENTRETIEN AVERTISSEMENT : Utiliser exclusivement des pièces d'origine pour les réparations. L'usage de toute autre pièce pourrait créer une situation dangereuse ou endommager l'outil. AVERTISSEMENT : Toujours porter une protection oculaire certifiée conforme à la norme ANSI Z87.1, ainsi qu'une - Ryobi YN200BND | Operation Manual - Page 26
rification, il peut être utilisé. Charger les agrafes qui conviennent le mieux au travail à effectuer. Régler la profondeur de clouage selon les instructions de la section Régler la profondeur de clouage du manuel. Suivre cette liste de contrôle avant chaque utilisation quotidienne ou si l'outil - Ryobi YN200BND | Operation Manual - Page 27
DÉPANNAGE PROBLÈME Fuite d'air dans le haut de l'outil ou près de la gâchette CAUSE POSSIBLE Vis desserrées Joints ou joints toriques usés SOLUTION Serrer les vis Installer le kit de remise à neuf Fuite au bas de l'outil Joints, joints toriques ou butoir usés Installer le kit de remise à neuf - Ryobi YN200BND | Operation Manual - Page 28
al amparo de esta garantía o puede intercambiar cualquier herramienta eléctrica RYOBI® que no funcione correctamente debido a defectos en los materiales o en los defectos en material y en mano de obra empleados en la herramienta eléctrica RYOBI® por un período de dos años a partir de la fecha de - Ryobi YN200BND | Operation Manual - Page 29
los anteojos de seguridad que ofrecen protección frontal y lateral contra partículas que salen disparadas. Siempre póngase protección ocular con la Siga las instrucciones señaladas en la sección "Mantenimiento" de este manual. El empleo de piezas no autorizadas o el incumplimiento de las - Ryobi YN200BND | Operation Manual - Page 30
posibles lesiones. Es importante el método de disparo elegido. Estudie el manual, en el cual se describen las diferentes formas de disparar. Las lado de la pieza de trabajo. Mantenga las manos y todas las partes del cuerpo lejos del área de trabajo inmediata. Sujete firmemente la pieza de - Ryobi YN200BND | Operation Manual - Page 31
la herramienta cuando esté activado cualquiera de los controles de operación de la misma. Al cargar la herramienta: Nunca coloque las manos ni ninguna parte del cuerpo en el área de la herramienta donde sale disparado el sujetador (clavo o grapa, según sea el caso). Nunca apunte la herramienta - Ryobi YN200BND | Operation Manual - Page 32
del área de la herramienta por donde sale disparado el sujetador. Para reducir el riesgo de lesiones, el usuario debe leer y comprender el manual del operador antes de usar este producto. Para reducir el riesgo de lesiones corporales o daños materiales evite tocar toda superficie caliente. 6 - Esp - Ryobi YN200BND | Operation Manual - Page 33
, según las especificaciones del fabricante para la utilización de una herramienta. Control de accionamiento Es un control que, por separado o como parte de un sistema de accionamiento de una herramienta, sirve para accionarla. Accionamiento secuencial sencillo Es un sistema de accionamiento en el - Ryobi YN200BND | Operation Manual - Page 34
1, pàgina 15. Para usar este producto con la debida seguridad se debe comprender la información indicada en la herramienta misma y en este manual, y se debe comprender también el trabajo que intenta realizar. Antes de usar este producto, familiarícese con todas las características de funcionamiento - Ryobi YN200BND | Operation Manual - Page 35
la almohadilla protectora, acomódela en su lugar en la disparador de contacto de la herramienta y empújela hacia arriba por la parte de atrás para asentarla. Paneles Molduras de umbrales y bases Ajuste del escape Vea la figura 4, pàgina 15. Escaleras Paneles ornamentales para tapicer - Ryobi YN200BND | Operation Manual - Page 36
las cabezas de los clavos en el centro de una costilla. La tira de clavos no debe centrarse en el cargador ni colocarse en la parte superior del cargador. Si las puntas de los clavos no apoyan dentro del riel, sin apoyar incorrectamente sobre una costilla, mueva la tira de clavos - Ryobi YN200BND | Operation Manual - Page 37
pàgina 16. Desconecte la herramienta del suministro de aire. Para retirar una tira de clavos de la herramienta, oprima el pestillo situado en la parte posterior del cargador y abra éste con un movimiento de deslizamiento. Retire la tira de clavos. Para cerrar el cargador, oprima el pestillo - Ryobi YN200BND | Operation Manual - Page 38
lubricación frecuente, pero no excesiva. El aceite para herramientas neumáticas de clavar vertido por la conexión del conducto de aire lubrica las partes internas. No utilice aceite con detergente ni aditivos, ya que estos lubricantes propician un desgaste rápido de los sellos y parachoques de la - Ryobi YN200BND | Operation Manual - Page 39
sujetadores adecuados para la aplicación deseada. Ajuste la profundidad de introducción según la sección Ajuste de la profundidad de Introducción de este manual. Recorra esta lista de verificación antes de usar la herramienta cada día, o si se cayó o se dañó de alguna manera. ACCESORIOS Para - Ryobi YN200BND | Operation Manual - Page 40
Juntas tóricas o sellos gastados o dañados SOLUCIÓN Apriete los tornillos Instale el juego de mantenimiento general Fuga de aire cerca de la parte Juntas tóricas o tope gastados Instale el juego de mantenimiento general inferior de la herramienta o dañados La herramienta no hace nada o funciona - Ryobi YN200BND | Operation Manual - Page 41
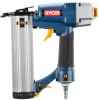
Fig. 1 A B E F Fig. 2 D H G Fig. 4 A C I A A - Adjustable exhaust (échappement réglable, escape ajustable) B - Trigger (gâchette, gatillo) C - Quick-connect air fitting (connecteur rapide raccord d'air, conexión de aire de conexión rápida) D - Depth of drive adjustment (réglage de profondeur - Ryobi YN200BND | Operation Manual - Page 42
Fig. 7 A Fig. 10 A A - Nail track (guide, riel de los clavos) Fig. 8 A - Latch (loquet, pestillo) Fig. 11 A B A - Trigger (gâchette, gatillo) B - Workpiece contact (contact de déclenchement, disparador de contacto) Fig. 9 A B A B C A - Jam release (déblocage, - Ryobi YN200BND | Operation Manual - Page 43
NOTES / NOTES / NOTAS 17 - Ryobi YN200BND | Operation Manual - Page 44
OPERATOR'S MANUAL MANUEL D'UTILISATION MANUAL DEL OPERADOR 18 GAUGE BRAD NAILER CALIBRE 18, CLOUEUSE DE FINITION CALIBRE 18, Clavadora de PUNTILLAS YN200BND WARNING: The engine exhaust from this product contains chemicals known to the State of California to cause cancer, birth defects, or other
-
 1
1 -
 2
2 -
 3
3 -
 4
4 -
 5
5 -
 6
6 -
 7
7 -
8
-
9
-
10
-
11
-
12
-
13
-
14
-
15
-
16
-
17
-
18
-
19
-
20
-
21
-
22
-
23
-
24
-
25
-
26
-
27
-
28
-
29
-
30
-
31
-
32
-
33
-
34
-
35
-
36
-
37
-
38
-
39
-
40
-
41
-
42
-
43
-
44
 |
 |

Your brad nailer has been engineered and manufactured to our high standard for dependability, ease of operation, and
operator safety. When properly cared for, it will give you years of rugged, trouble-free performance.
WARNING:
To reduce the risk of injury, the user must read and understand the operator’s manual before using this
product. If you do not understand the warnings and instructions in the operator’s manual, do not use this product.
Cette cloueuse de finition a été conçue et fabriquée conformément
à nos strictes normes de fiabilité, simplicité d’emploi et sécurité
d’utilisation. Correctement entretenue, elle vous donnera des années
de fonctionnement robuste et sans problème.
AVERTISSEMENT :
Pour réduire les risques de
blessures, l’utilisateur doit lire et veiller à bien comprendre
le manuel d’utilisation avant d’employer ce produit. Si tous
les avertissements et toutes les consignes de sécurités et
instructions du manuel d’utilisation ne sont pas bien compris,
ne pas utiliser ce produit.
Su clavadora de puntillas ha sido diseñada y fabricada de
conformidad con las estrictas normas para brindar fiabilidad,
facilidad de uso y seguridad para el operador. Con el debido cuidado,
le brindará muchos años de sólido y eficiente funcionamiento.
ADVERTENCIA:
Para reducir el riesgo de lesiones,
el usuario debe leer y comprender el manual del operador antes
de usar este producto. Guarde este manual del operador y
estúdielo frecuentemente para lograr un funcionamiento seguro
y continuo de este producto
CONSERVER CE MANUEL POUR
FUTURE RÉFÉRENCE
GUARDE ESTE MANUAL PARA
FUTURAS CONSULTAS
SAVE THIS MANUAL FOR FUTURE REFERENCE
OPERATOR’S MANUAL
MANUEL D’UTILISATION
MANUAL DEL OPERADOR
18 GAUGE BRAD NAILER
CALIBRE 18, CLOUEUSE DE FINITION
CALIBRE 18, CLAVADORA DE PUNTILLAS
YN200BND