Samsung 320MP-2 Quick Guide (ENGLISH)
Samsung 320MP-2 - SyncMaster - 32" LCD Flat Panel Display Manual
 |
UPC - 729507807997
View all Samsung 320MP-2 manuals
Add to My Manuals
Save this manual to your list of manuals |
Samsung 320MP-2 manual content summary:
- Samsung 320MP-2 | Quick Guide (ENGLISH) - Page 1
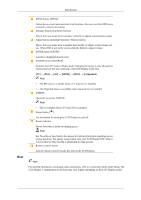
LCD MONITOR quick start guide 320MP-2 ii - Samsung 320MP-2 | Quick Guide (ENGLISH) - Page 2
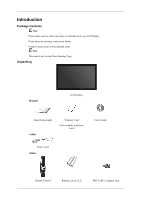
contact your dealer. Contact a local dealer to buy optional items. Note This stand is not for the Floor Standing Type. Unpacking Manuals LCD Display Quick Setup Guide Cables Warranty Card (Not available in all locations) User's Guide Power Cord Others Remote Control Batteries (AAA X 2) BNC - Samsung 320MP-2 | Quick Guide (ENGLISH) - Page 3
Wall Mount KIT LAN Cable TV tuner box NetWork Box Semi Stand KIT BNC Cable D-Sub Cable Note • You can purchase and connect a separate network box or TV tuner box. For information on how to use these, refer to their respective user manuals. • You can only connect one external box. Your LCD - Samsung 320MP-2 | Quick Guide (ENGLISH) - Page 4
connected to the LCD Display at the time. [PC] → [DVI] → [AV] → [HDMI] → [BNC] → [Component] Note • The TV menu is available when a TV tuner box is described in the manual for further information regarding power saving functions. For energy conservation, turn your LCD Display OFF when it - Samsung 320MP-2 | Quick Guide (ENGLISH) - Page 5
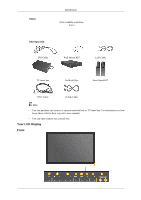
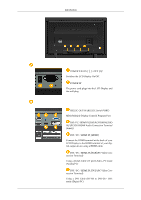
Introduction POWER S/W ON [ │ ] / OFF [O] Switches the LCD Display On/Off. POWER IN The power cord plugs into the LCD Display and the wall plug. RS232C OUT/IN (RS232C Serial PORT) MDC(Multiple Display Control) Program Port DVI / PC / HDMI IN [DVI/PC/HDMI AUDIO IN] (PC/DVI/HDMI Audio Connection - Samsung 320MP-2 | Quick Guide (ENGLISH) - Page 6
to the authorized TV-Tuner Box[SBB-DT*]. Otherwise, this may result in damage to the product. AV IN [VIDEO] (VIDEO Connection Terminal) Connect the [ VIDEO ] terminal of your monitor to the video output terminal of the external device using a VIDEO cable. AV AUDIO IN [L-AUDIO-R](LCD Display Audio - Samsung 320MP-2 | Quick Guide (ENGLISH) - Page 7
depending on the manufacturer. Refer to the manual provided with the Kensington Lock for proper use its model. Using the Anti-Theft Kensington Lock 1. Insert the locking device into the Kensington slot on the Monitor and by a TV or other electronic device operating near the LCD Display , causing - Samsung 320MP-2 | Quick Guide (ENGLISH) - Page 8
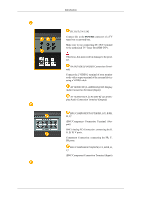
1. POWER 2. Off 3. Number Buttons Introduction POWER OFF Number Buttons DEL + VOL - button MUTE TV/DTV MENU INFO COLOR BUTTONS TTX/MIX STILL AUTO S.MODE MDC LOCK SOURCE ENTER/PRE-CH CH/P D.MENU GUIDE RETURN Up-Down Left-Right buttons EXIT SRS MagicInfo P.MODE DUAL/MTS PIP SWAP Turns the - Samsung 320MP-2 | Quick Guide (ENGLISH) - Page 9
SOURCE. Changing the SOURCE is only allowed for external devices that are connected to the monitor at the time. This button is used to return to the immediately previous channel. In TV mode, selects TV channels. DTV menu display Electronic Program Guide (EPG) display. Returns to the previous menu. - Samsung 320MP-2 | Quick Guide (ENGLISH) - Page 10
watching TV. MTS- You can select MTS (Multichannel Television Stereo) mode. FM Stereo Audio Type Mono Stereo SAP MTS/S_Mode Mono Mono ↔ Stereo Mono ↔ SAP Default Manual Change Mono Every time you press the button, a PIP screen appears. - This fuction does not work for this LCD Display. Swaps - Samsung 320MP-2 | Quick Guide (ENGLISH) - Page 11
bracket. • At least 2 persons are needed in order to move the LCD Display. • SAMSUNG is not responsible for any product damage or any injury caused by installation at customer's discretion. Dimensions Notice For securing the bracket on a wall, use only machine screws of 6 mm diameter and 8 to 12 mm - Samsung 320MP-2 | Quick Guide (ENGLISH) - Page 12
Bracket Installation • Contact a technician for installing the wall bracket. • SAMSUNG Electronics is not responsible for any damages to the product or harm to customers when the installation is done by the customer. • This product is for installing on cement walls. The product may not stay in place - Samsung 320MP-2 | Quick Guide (ENGLISH) - Page 13
the brackets and hinge holes to the corresponding anchor holes and insert and tighten the 11 screws A. To mount the product on the wall bracket The shape of the product may vary depending on the model. (The assemblies of the plastic hanger and the screw are the same) 1. Remove the 4 screws on the - Samsung 320MP-2 | Quick Guide (ENGLISH) - Page 14
B into the plastic hanger. Notice • Mount the product on the wall bracket and make sure it is properly fixed to the left and right plastic hangers. • Be careful when installing the product on the bracket as fingers can be caught in the holes. • Make sure the wall bracket is securely fixed to the - Samsung 320MP-2 | Quick Guide (ENGLISH) - Page 15
Introduction A - LCD Display B - Wall Bracket C - Wall Wall Bracket Angle Adjustment Adjust the bracket angle to -2° before installing it on the wall. 1. Fix the product to the wall bracket. 2. Hold the product at the top in the center and pull it forward (direction of the arrow) to adjust - Samsung 320MP-2 | Quick Guide (ENGLISH) - Page 16
the following: Using the D-sub (Analog) connector on the video card. • Connect the D-sub to the 15-pin, RGB port on the back of your LCD Display and the 15 pin D-sub Port on the computer. Using the DVI (Digital) connector on the video card. • Connect the DVI Cable to the DVI - Samsung 320MP-2 | Quick Guide (ENGLISH) - Page 17
to the audio port on the back of your computer. Note • Turn on both your computer and the LCD Display. • The DVI cable is optional. • Contact a local SAMSUNG Electronics Service Center to buy optional items. Connecting to Other devices Using a Power cord with Earth • In the event of failure, the - Samsung 320MP-2 | Quick Guide (ENGLISH) - Page 18
has AV connection terminals to connect AV input devices like DVDs, VCRs or Camcorders. You may enjoy AV signals as long as the LCD Display is turned on. Connecting to a Camcorder 1. Locate the AV output jacks on the camcorder. They are usually found on the side or back of the - Samsung 320MP-2 | Quick Guide (ENGLISH) - Page 19
optional. For an explanation of Component video, consult your DVD manual. Connecting a DTV Set Top Box Note • The connections for a typical Set Top Box are shown below. 1. Connect a Component cable between the BNC/COMPONENT IN- PR, Y, PB port on the LCD Display and the PR, Y, PB jacks on the Set Top - Samsung 320MP-2 | Quick Guide (ENGLISH) - Page 20
Connections Note • For an explanation of Component video, see your Set Top Box owner's manual. Connecting Using a HDMI Cable Note • Input devices such as digital DVD are connected to the HDMI terminal of the LCD Display using the HDMI cable. • You cannot connect a PC to the HDMI terminal. Connecting - Samsung 320MP-2 | Quick Guide (ENGLISH) - Page 21
Connections Note • Connect a set of audio cables between the AUX L, R jacks on the AUDIO SYSTEM and AUDIO OUT [L-AUDIO-R] on LCD Display. - Samsung 320MP-2 | Quick Guide (ENGLISH) - Page 22
will see the black screen because the LCD Display does not support over 85Hz. Note Refer to Specifications > Preset Timing Modes for the resolutions or frequencies supported by the LCD Display. Maintenance and Cleaning 1) Maintaining the LCD Display Case. Clean with a soft cloth after disconnecting - Samsung 320MP-2 | Quick Guide (ENGLISH) - Page 23
with the computer or the video card, this can cause the LCD Display to become blank, have poor coloring, become noisy, and video mode not supported, etc. In this case, first check the source of the problem, and then contact a Service Center or your dealer. 1. Check if the power cord and the video - Samsung 320MP-2 | Quick Guide (ENGLISH) - Page 24
The picture image is unstable and shakes. A: Check if the resolution and frequency set for the computer video card falls in the range supported by the LCD Display. If not, reset them referring to the current Information under the LCD Display menu and Preset Timing Modes. Q: Ghost images are shown in - Samsung 320MP-2 | Quick Guide (ENGLISH) - Page 25
Troubleshooting blank and the power indicator light blinks every 0.5 or 1 seconds. A: The LCD Display is using its power management system. A: Press any key on the keyboard. too low. A: Adjusts the Treble and Bass to the appropriate levels. Problems related to the Remote Control Note Problems related - Samsung 320MP-2 | Quick Guide (ENGLISH) - Page 26
. Note That video card support can vary, depending on the version of the driver used. (Refer to the computer or the video card manual for details.) Q: How can I Adjusts the resolution? A: Windows XP: Set the resolution in the Control Panel → Appearance and Themes → Display → Settings. A: Windows ME - Samsung 320MP-2 | Quick Guide (ENGLISH) - Page 27
Troubleshooting Set the resolution at the Control Panel → Display → Screen Saver. Set the function in the BIOS-SETUP of the computer. (Refer to the Windows / Computer Manual). Q: How can I clean the outer case/LCD Panel? A: Disconnect the power cord and then clean the LCD Display with a soft cloth,
-
 1
1 -
 2
2 -
 3
3 -
 4
4 -
 5
5 -
 6
6 -
 7
7 -
8
-
9
-
10
-
11
-
12
-
13
-
14
-
15
-
16
-
17
-
18
-
19
-
20
-
21
-
22
-
23
-
24
-
25
-
26
-
27
 |
 |
±±
LCD MONITOR
quick start guide
320MP-2