Samsung DV419AEU/XAA User Manual (user Manual) (ver.1.0) (English) - Page 14
Connecting The Inlet Hose - parts
 |
View all Samsung DV419AEU/XAA manuals
Add to My Manuals
Save this manual to your list of manuals |
Page 14 highlights
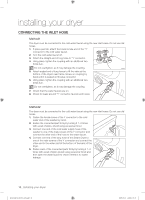
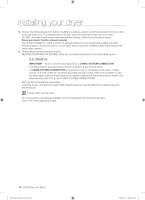
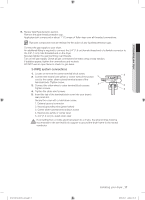
installing your dryer CONNECTING THE INLET HOSE Method1 The dryer must be connected to the cold water faucet using the new inlet hoses. Do not use old hoses. 1. If space permits, attach the brass female end of the "Y" connector to the cold water faucet. 2. Turn the cold water faucet off. 3. Attach the straight end of long hose to "Y' connector. 4. Using pliers, tighten the coupling with an additional two- thirds turn. Do not overtighten, as it may damage the coupling. 5. Attach angled end of long hoses to fill the valve at the bottom of the dryer's rear frame. Screw on coupling by hand until it is seated on fill valve connector. 6. Using pliers, tighten the coupling with an additional twothirds turn. Do not overtighten, as it may damage the coupling. 7. Check that the water faucets are on. 8. Check for leaks around "Y" connector, faucets and hoses. Method2 The dryer must be connected to the cold water faucet using the new inlet hoses. Do not use old hoses. 1. Fasten the female screw of the Y connector to the cold water inlet of the washer by hand. 2. Fasten the connected part firmly by turning it 1~2 times with a pair of pliers. (Avoid using excessive force.) 3. Connect one end of the cold water supply hose of the washer to one of the male screws of the Y connector and connect the other end of the hose to the water faucet. 4. Connect one end of the long hose of the Steam Dryer to one of the male screws of the Y connector and connect the other end to the water inlet at the bottom of the back of the dryer. 5. Fasten each of the connected parts firmly by turning it 1~2 times with a pair of pliers (avoid using excessive force) and then open the water faucet to check if there is no water leakage. 14_ Installing your dryer DV419AEW-02656A_EN.indd 14 2009-03-13 ¿ÀÈÄ 4:53:17
-
 1
1 -
2
-
3
-
4
-
5
-
6
-
7
-
8
-
 9
9 -
 10
10 -
 11
11 -
 12
12 -
 13
13 -
 14
14 -
 15
15 -
 16
16 -
 17
17 -
 18
18 -
 19
19 -
20
-
21
-
22
-
23
-
24
-
25
-
26
-
27
-
28
-
29
-
30
-
31
-
32
-
33
-
34
-
35
-
36
-
37
-
38
-
39
-
40
-
41
-
42
-
43
-
44
-
45
-
46
-
47
-
48
-
49
-
50
-
51
-
52
-
53
-
54
-
55
-
56
-
57
-
58
-
59
-
60
-
61
-
62
-
63
-
64
-
65
-
66
-
67
-
68
-
69
-
70
-
71
-
72
-
73
-
74
-
75
-
76
 |
 |