Samsung HG46NA590LB Installation Guide User Manual Ver.1.0 (English) - Page 2
Wall Mount Kit Specifications VESA, Specifications
 |
View all Samsung HG46NA590LB manuals
Add to My Manuals
Save this manual to your list of manuals |
Page 2 highlights
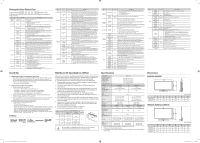
Setting the Hotel Option Data To Enter: Press the MUTE → 1 → 1 → 9 → ENTER buttons in order. To Exit from this menu : AC Power off, and then turn on again. Any changes you made are saved. Menu Hospitality Mode SI Vendor Power On Channel Menu OSD Operation Item initial Value Description Hospitality Mode Select the Hospitality mode. Standalone • Standalone • Interactive Available in the Interactive menu only. SI Vendor Samsung • Select the SI Vendor. • Samsung / OCC / MTI / Nstreams / Enseo / Cardinal /Guestek / SeaChange Set the default values, which will be applied when the TV is turned on. Power On Channel EN Last Saved • User Defined : Refers to the settings configured for Power On Channel, Channel Type. • Last Saved : Refers to the last saved settings. Power On Channel 3 When the TV is turned on, it switches automatically to this channel when in Stand Alone Hospitality mode. Channel Type Channel search CABLE and AIR. ... • ATV, DTV : ON-AIR • CATV (Cable Analog TV), CDTV (Cable Digital TV) : CABLE TV Power On Volume EN Last Saved Set the default volume values which will be applied when the TV is turned on. • User Defined : Uses the settings configured for Power On Volume. • Last Saved : Uses the last saved settings. Power On Volume ... TV will switch on at this Volume Level in Stand Alone Hospitality mode. Min Volume 0 Minimum Volume Level user can set in Stand Alone Hospitality mode. Max Volume 100 Maximum Volume Level user can set in Stand Alone Hospitality mode. Power On Source TV Select the input source the TV displays when it is turned on. Power On Option Determines the TV's state when power returns after a power failure or Last Option after you have unplugged the TV and then plugged it in again. - LAST OPT: Returns to its last Power state. If it was in Stand-by, it returns to Stand-by. If it was on, it turns on. Channel Setup You can use the Channel menu option in the OSD. Channel Editor Edit Channel Number and Name. Dynamic SI • On : Check the DTV Program channel number. (DTV channel editor is inaccessible) ON • Off : No check of the DTV Program channel number. (DTV channel editor is accessible, but additional channel program number update is not supported) Picture Menu Lock OFF Enable or disable the Picture Menu. Menu Display ON • On : Main Menu displays. • Off : Main Menu does not display. Front panel (Local key) operation on/off. Panel Button Lock Unlock • Unlock : Unlock all panel keys • Lock : Lock all panel keys • OnlyPower : Lock all panel buttons except Power • Menu/Source : Lock Menu and Source Menu Clock Music Mode External Device External Source Item Local Time Music Mode AV Music Mode PC Music Mode Comp Music Mode Backlight 7610 Priority AV 7610 Priority PC 7610 Priority HDMI 7610 AV Option RJP HDMI Option HDMI Music Mode Sound Bar Out USB Media Mode External Source Banner initial Value Description Manual Select the way to update clock data. • Manual: Manual clock setting (without updating from TTX data) To get music output from an mp3/audio player through an AV Input Source. When on, you can hear sound from the player through the TV OFF whether there is a video signal or not. Also mutes the video so the TV does not display a picture when a guest is playing music. The TV's backlight, however, remains on. To get music output from an mp3/audio player through a PC Input Source. When on, you can hear sound from the player through the TV OFF whether there is a video signal or not. Also mutes the video so the TV does not display a picture when a guest is playing music. The TV's backlight, however, remains on. To get music output from an mp3/audio player through a Component Input Source. When on, you can hear sound from the player through OFF the TV whether there is a video signal or not. Also mutes the video so the TV does not display a picture when a guest is playing music. The TV's backlight, however, remains on. OFF When set to Off, the TV's backlight is turned off entirely when a guest uses the Music mode. To save energy, set to Off. Lets you set the priority of the 7610 RJP AV jack. You can choose 1, 2, or 3, with 1 being the highest and 3 the lowest. The TV automatically displays the source with the higher priority. For example, lets say AV 1 is set to 1 and HDMI is set to 2. If a guest has attached a device to the HDMI jack, and then plugs a device into the AV jack, the TV will automatically switch to the device plugged into the AV jack (the jack with the higher priority). Note that a guest can also switch devices manually by pushing a button on the 7610 RJP. Lets you set the priority of the 7610 RJP PC jack. You can choose 1, 2, 2 or 3, with 1 being the highest and 3 the lowest. The TV automatically displays the source with the higher priority. See above for a more detailed explanation. Lets you set the priority of the 7610 RJP HDMI jack. You can choose 1, 3 2, or 3, with 1 being the highest and 3 the lowest. The TV automatically displays the source with the higher priority. See above for a more detailed explanation. AV1 Select RJP AV Source. (AV1/AV2) HDMI1/DVI Select RJP HDMI Source. (HDMI1/HDMI2/HDMI3) To get music output from an mp3/audio player through a HDMI Input OFF Source. When on, you can hear sound from the player through the TV whether there is a video signal or not. (This option is only compatible with the Guest link RJP.) OFF ON/OFF sound bar out. Defalut ON When a USB device is connected to the TV: • Default : Popup window appears. • Automatic : Enters the USB contents menu automatically. • Disable : Neither the pop-up window or nor the menu appears. Displays the External Source information when you change the TV source to external input. Press the info key and the TV turns on. • On : The External Source information is displayed on the TV screen. • Off : The External Source information is not displayed on the TV screen. Menu External Source Bathroom Speaker Eco Solution Logo/ Message Cloning SIRCH Item Auto Source Anynet+ Return Source Sub AMP mode Sub AMP volume Energy Saving Welcome Message Edit Welcome Message Hospitality Logo Hospitality Logo DL Logo Display Time Clone TV to USB Clone USB to TV Setting Auto Initialize SIRCH update Time SIRCH Update Immediate Manual SIRCH SIRCH Channel SIRCH Version SIRCH Group ID REACH IPG Room Type initial Value OFF Power On Src 2 6 OFF OFF OFF ... ... OFF 1 hour OFF 87 0000 ALL Off Default Description • On : In stand-by mode, when an external source is connected to the TV, the TV automatically goes to AC Power On and Auto Ident external input mode. • PC : Auto Ident PC Input only. • Off : Auto Source is Off. Select Return Source for Guest-Link RJP (HDMI-CEC). Determines the Sub AMP operation mode. • 0: Turns the Sub AMP function off (PWM off). • 1: Determines the Sub volume according to the main volume control. That is, the sub volume is determined according to the Power On Volume, the Min Volume, and the Max • 2: Determines the volume according to the bathroom control panel setting. Sub AMP Volume level at power on initial condition. This feature adjusts the brightness of the TV to reduce power consumption. • Off: Turns off the energy saving function. • Low: Sets the TV to low energy saving mode. • Medium: Sets the TV to medium energy saving mode. • High: Sets the TV to high energy saving mode. Display the Welcome Message for 5 seconds when the TV turns On. Edit Welcome Message. Turns the Hospitality logo feature on/off. The Logo is shown during the initial turn on for the amount of time set in "Logo Display Time" Hospitality Logo Download. (File name required: samsung.bmp/avi, Max file size: BMP 960 x 540 / AVI 30MB, File Type: BMP/AVI) Hospitality Logo Display Time (3/5/7 seconds). Clone the current TV option values to a USB memory device. Clone the saved TV option values in a USB memory device to the TV. If you set Setting Auto Initialize to On, and the TV's power is turned off and on, guest side menu items are restored to their cloned values. Available in the Standalone menu only. SIRCH (Samsung Interactive Remote Control for Hospitality) is a professional interactive remote controller for DTV that lets you deliver TV firmware updates, cloning data, and channel mapping changes to several hundred hospitality TVs simultaneously. SIRCH is sold separately. • On : Whenever TV goes to Stand-By mode, always runs SIRCH Update. • Off : Only runs SIRCH Update on selected SIRCH Update Time. Upgrade SIRCH Clone / Binary by manual. Select SIRCH Update Channel. Display the current SIRCH Clone version. Select SIRCH Group ID. REACH Display On/Off. Select IPG Room Type. Menu Network Widget Service Item initial Value Description Network Setup ... Set an IP address to establish an Internet connection. Hotel ID Setting ... Set a Hotel ID. Smart Hub ... Enter Smart Hub. Widget Mode OFF Widget Mode On/Off. Solution Type H.Browser Select type of solution (H.Browser/CMS). Server IP Setting ... Setting server IP. Server URL Setting ... Setting server URL. External Source Browser On Source Menu On/Off. Virtual Standby Off Virtual Standby mode On/Off. IPTV Mode Off IPTV mode On/Off. CAS Pro:idiom Select CAS. PI AES DATA 0x0000 Displays the state of Pro:Idiom operation. Self Diagnosis Enter Self Diagnosis Menu. • Picture Test: Use to check for picture problems. If the problem appears in the test picture, select Yes and follow the directions on the screen. • Sound Test: Use the built-in melody sound to check for sound problems. If the problem occurs during the test, select Yes and follow the directions on the screen. PI AES Log OFF Displays the state of Pro:Idiom AES operation. View PI AES Log ... Display/Save Pro:idiom AES log. SW Upgrade Upgrade the TV software. Service Pattern Off Display SVC pattern. ATV Calble AGC Gain 0 Control AGC Gain for ONLY SVC. DTV OpenCalble AGC Gain 0 Control AGC Gain for ONLY SVC. TV Reset Reset the TV. Same as Factory Reset in Factory option. Sound Bar ♦♦ Samsung Sound-Bars and Hospitality TVs in 2012 -- Samsung Sound-Bars and hospitality TVs support the ARC feature in HDMI 1.4. If you connect a compatible Samsung Sound-Bar to a compatible Samsung hospitality TV using a single HDMI cable, guests can listen to theTV's sound through the Sound-Bar. -- Models supporting the ARC function are listed below: • Sound-Bars: HW-E350/E450/E550 ♦♦ Setting the Sound-Bars to Hotel Mode. 1. Set the following Hotel menu options: -- Hotel option > External Device > Sound Bar Out = On. -- Hotel option > Power On > Power On Volume EN = User Defined. -- Hotel option > Power On > Power On Volume > Set greater than 0. -- Hotel option > Power On > Max Volume > Set greater than 0. 2. Connect an HDMI cable from the HDMI OUT jack on the back of Sound-Bar to the HDMI2 port (supporting ARC) on the hospitality TV. 3. After the Sound-Bar is connected to the hospitality TV, when the TV turns on, the SoundBar automatically detects the TV, and then automatically switches to Hotel Mode. Sound Bar Hotel mode functional characteristics: • Power On/Off is synchronized with the TV • HDMI_CEC defaults to On • Functions through the "HDMI OUT" port only • Disables the "Input mode" key on the VFD to prevent unexpected audio-source changes. • Acquires adjustable Power On and Max Volume settings from the TV's Hotel option menu. The Sound-Bar's Power On Volume and Max Volume values, however, are ½ of the Power On Volume and Max Volume settings in the TV's Hotel option menu. Example: If the TV's Power On Volume=20 and Max Volume=90, then the Sound Bar's Power On Volume=10 and Max Volume=45. Licence Wall Mount Kit Specifications (VESA) Install your wall mount on a solid wall perpendicular to the floor. When attaching to other building materials, please contact your nearest dealer. If installed on a ceiling or slanted wall, TV may fall and result in severe personal injury. ➣➣ Standard dimensions for wall mount kits are shown in the table below. ➣➣ Samsung wall mount kits contain a detailed installation manual. All parts necessary for assembly are provided. ➣➣ Do not use screws that do not comply with the VESA standard screw specifications. ➣➣ Do not use screws that are longer than the standard dimension or do not comply with the VESA standard screw specifications. Screws that are too long may cause damage to the inside of the TV set. ➣➣ For wall mounts that do not comply with the VESA standard screw specifications, the length of the screws may differ depending on the wall mount specifications. ➣➣ Do not fasten the screws too firmly. This may damage the product or cause the product to fall, leading to personal injury. Samsung is not liable for these kinds of accidents. ➣➣ Samsung is not liable for product damage or personal injury when a non- VESA or non-specified wall mount is used or the consumer fails to follow the product installation instructions. ➣➣ Do not mount the TV at more than a 15 degree tilt. ➣➣ Always have two people mount the TV on a wall. Product Family TV size in inches VESA screw hole Standard Screw specs (A * B) in (Length* Quantity millimeters Pitch in mm) 19 ~ 22 LED-TV 26 32 ~ 40 46 75 X 75 100 X 100 M4 (10~15 * 0.7) 4 200 X 200 M6 (10~15 * 1.0) 400 X 400 M8 (10~15 * 1.25) Do not install your Wall Mount Kit while your TV is turned on. It may result in personal injury due to electric shock. Specifications Display Resolution 1920 x 1080 Environmental Considerations Operating Temperature Operating Humidity Storage Temperature Storage Humidity 50°F to 104°F (10°C to 40°C) 10% to 80%, non-condensing -4°F to 113°F (-20°C to 45°C) 5% to 95%, non-condensing Stand Swivel (Left / Right) -20˚ ~ 20˚ Model Name HG40NA590 HG46NA590 Screen Size (Diagonal) 40" Class (40.0" measured diagonally) 46" Class (45.9" measured diagonally) Power Consumption Normal operation 89W 99W Standby Sound (Output) Dimensions (WxDxH) Body With stand 36.5 X 3.6 X 21.6 inches (927.6 X 93.0 X 551.0 mm) 36.5 X 8.9 X 23.8 inches (927.6 X 227.6 X 607.0 mm) 10W x 2 41.7 X 3.7 X 24.6 inches (1059.8 X 94.3 X 625.6 mm) 41.7 X 8.9 X 26.8 inches (1059.8 X 227.6 X 681.2 mm) Weight Without Stand With Stand 19.8 lbs (9.0 kg) 26.2 lbs (11.9 kg) 27.5lbs (12.5 kg) 33.9lbs (15.4 kg) Model Name Screen Size (Diagonal) HG40NA790 40" Class (40.0" measured diagonally) HG46NA790 46" Class (45.9" measured diagonally) HG55NA790 55˝ Class (54.6˝ measured diagonally) Power Consumption Normal operation Standby Sound (Output) 108W 118W 10W x 2 135W Dimensions (WxDxH) Body With stand 36.4 X 1.8 X 21.7 inches (926.8 X 46.9 X 553.4 mm) 36.4 X 9.0 X 23.9 inches (926.8 X 227.7 X 608.1 mm) 41.8 X 1.8 X 24.7 inches (1062.2 X 46.9 X 629.8 mm) 41.8 X 9.0 X 26.9 inches (1062.2 X 227.7 X 684.6 mm) 49.3 X 1.8 X 29 inches (1252.8 X 46.9 X 736.6 mm) 49.3 X 9.0 X 31.1 inches (1252.8 X 227.7 X 791.2 mm) Weight Without Stand With Stand 22.7 lbs (10.3 Kg) 29.0 lbs (13.2 Kg) 28.4 lbs (12.9 kg) 34.8 lbs (15.8 Kg) 35.7 lbs (16.2 kg) 42.0 lbs (19.1 Kg) ➣➣ Design and specifications are subject to change without prior notice. ➣➣ This device is a Class B digital apparatus. ➣➣ For information about the power supply and power consumption, refer to the label attached to the product. Dimensions HG40NA590 / HG46NA590 1 34 2 1 2 3 4 HG40NA590 36.5 20.3 21.6 23.8 HG46NA590 41.7 20.3 24.6 26.8 HG40NA790 / HG46NA790 / HG55NA790 1 34 2 1 2 3 4 HG40NA790 36.4 21.6 21.7 23.9 HG46NA790 41.8 24.7 24.7 26.9 HG55NA790 49.3 24.7 29 31.1 5 6 (unit: inches) 5 6 3.6 8.9 3.7 8.9 5 6 (unit: inches) 5 6 1.8 9.0 1.8 9.0 1.8 9.0 [Hotel-QSG-NA]BN68-04353A-01ENG.indd 2 2012-04-04 오전 10:54:34
-
 1
1 -
 2
2
 |
 |