Samsung HL-P5063W User Manual (ENGLISH) - Page 27
Digital Noise Reduction, Digital Natural Image engine
 |
View all Samsung HL-P5063W manuals
Add to My Manuals
Save this manual to your list of manuals |
Page 27 highlights
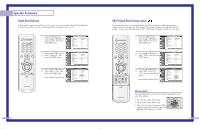
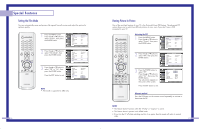
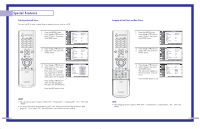
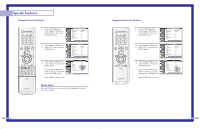
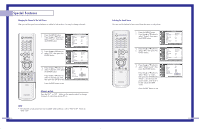
Special Features Digital Noise Reduction If the broadcast signal received by your TV is weak, you can activate the Digital Noise Reduction feature to help reduce any static and ghosting that may appear on the screen. 1 Press the MENU button. Press the ... or † button to select "Picture", then press the ENTER button. Input Picture Sound Channel Setup Picture Mode Color Tone Size Digital NR DNIe MCC Film Mode PIP : Standard √ : Warm1 √ √ : Off √ : On √ √ : Off √ √ Move Enter Return 2 Press the ... or † button to select "Digital NR", then press the ENTER button. Input Picture Sound Channel Setup Picture Mode Color Tone Size Digital NR DNIe MCC Film Mode PIP : Standard √ : Warm1 √ √ : Off √ : On √ √ : Off √ √ Move Enter Return 3 Press the ... or † button to select "Off" or "On", then press the ENTER button. Press the EXIT button to exit. Input Picture Sound Channel Setup Picture Mode Color Tone Size Digital NR DNIe MCC Film Mode PIP : Standard : Warm1 : OOfff : OOnn : Off Move Enter Return 52 DNIeTM (Digital Natural Image engine) This feature brings you more detailed image with 3D noise reduction, detail enhancement, contrast enhancement and white enhancement. New image compensation Algorithm presents brighter, clearer, much detailed image. DNIeTM technology will fit every signals into your eyes. 1 Press the MENU button. Press the ... or † button to select "Picture", then press the ENTER button. Input Picture Sound Channel Setup Picture Mode Color Tone Size Digital NR DNIe MCC Film Mode PIP : Standard √ : Warm1 √ √ : Off √ : On √ √ : Off √ √ Move Enter Return 2 Press the ... or † button to select "DNIe", then press the ENTER button. Input Picture Sound Channel Setup Picture Mode Color Tone Size Digital NR DNIe MCC Film Mode PIP : Standard √ : Warm1 √ √ : Off √ : On √ √ : Off √ √ Move Enter Return 3 Press the ... or † button to select "Off", "Demo" or "On", then press the ENTER button. Press the EXIT button to exit. Input Picture Sound Channel Setup Picture Mode Color Tone Size Digital NR DNIe MCC Film Mode PIP : Standard : Warm1 : Off : OOnff Demo : OOffn Move Enter Return Alternate method Press the DNIe button on the remote control repeatedly to select one of the settings. • On: Switches on the DNIe mode. • Off: Switches off the DNIe mode. • Demo: The screen before applying DNIe appears on the right and the screen after applying DNIe appears on the left. DNIe Demo DNIe On DNIe Off 53
-
 1
1 -
2
-
3
-
4
-
5
-
6
-
7
-
8
-
9
-
10
-
11
-
12
-
13
-
14
-
15
-
16
-
17
-
18
-
19
-
20
-
21
-
 22
22 -
 23
23 -
 24
24 -
 25
25 -
 26
26 -
 27
27 -
 28
28 -
 29
29 -
 30
30 -
 31
31 -
 32
32 -
33
-
34
-
35
-
36
-
37
-
38
-
39
-
40
-
41
-
42
-
43
-
44
-
45
-
46
 |
 |
