Samsung HT-BD7200 User Manual - Page 52
ENTER, Cancel, ProxY, Server, Password, For more information
 |
View all Samsung HT-BD7200 manuals
Add to My Manuals
Save this manual to your list of manuals |
Page 52 highlights
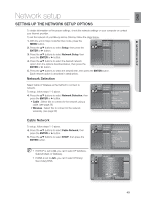
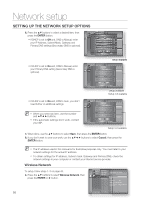
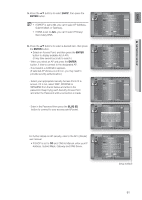
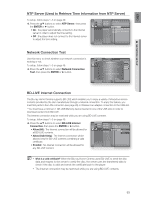
Network setup SETTING UP THE NETWORK SETUP OPTIONS • If DHCP is set to On and, DNS to Manual, enter your DNS Server. Music Audio Setup Display SetWupireless Network Photo HDMI Setup Network Selection : Cable Access Point : Not Selected dVd Setup DNHeCtwPork Setup ◄ : OnCable Network ► IPaAredndtraelsSsetup : 00W0 .ir0e0l0es. s00N0e.t0w0o0rk Subnet Mask : 25P5r.o2x5y5 . 255 . 000 Gateway : 00N0T.P00S0e.r0v0e0r . 000 : Off DNS : MaNneutawl ork Connection Test DNS Server Save : 00B0D.-0L0I0V.E0I0n0te. 0rn0e0t Connection : Allow (Vaild Only) Cancel Select Return Setup available Setup not available • If DHCP is set to On and, DNS to Auto, you don't need further or additional settings. Music Audio Setup Display SetuWpireless Network Photo HDMI Setup Network Selection : Cable Access Point : Not Selected dVd Setup NDeHtwCoPrk Setup ◄ : OCnable Network ► PIPareAndtdarleSsestup : 0W00ir.e0le00ss. 0N0e0t.w0o00rk Subnet Mask : 2P5r5o.x2y55 . 255 . 000 M When you select an item, use the number and buttons. Gateway DNS DNS Server Save : 0N0T0P. 0S0e0r.v0e0r0 . 000 : Off : MNaentuwaol rk Connection Test : 0B0D0-.L0I0V0E. I0n0t0er.n0e0t0 Connection : Allow (Vaild Only) Cancel If the automatic settings don't work, contact your ISP. Select Return Setup not available 7. When done, use the ▲▼ buttons to select Save, then press the ENTER button. 8. If you don't want to save your work, use the buttons to select Cancel, then press the ENTER button. M The IP address used in this manual is for illustrative purposes only. You must refer to the your network settings for the actual IP address. To obtain settings for IP address, Subnet mask, Gateway and DNS Server, check the network settings in your computer or contact your internet service provider. Proxy Setting A proxy server services requests by forwarding them to other servers. If you are required to configure the proxy setting, enter the settings specified by the ISP. To setup, follow steps 1~3 on page 49. 4. Press the ▲▼ buttons to select Proxy, then press the ENTER or ► button. • Server • Port • User • Password Music Audio Setup Photo Display Setup Proxy HDMI Setup Network Selection : Cable Proxy : Off dVd Setup SNeertvweor rk Setup ◄ : Cable Network ► PPoarrtental Setup : 80W80ireless Network User : Proxy Password : NTP Server : Off Network Connection Test BD-LIVE Internet Connection : Allow (Vaild Only) Save Cancel Select Return M For more information, contact your ISP (Internet Service Provider). 52
-
 1
1 -
2
-
3
-
4
-
5
-
6
-
7
-
8
-
9
-
10
-
11
-
12
-
13
-
14
-
15
-
16
-
17
-
18
-
19
-
20
-
21
-
22
-
23
-
24
-
25
-
26
-
27
-
28
-
29
-
30
-
31
-
32
-
33
-
34
-
35
-
36
-
37
-
38
-
39
-
40
-
41
-
42
-
43
-
44
-
45
-
46
-
 47
47 -
 48
48 -
 49
49 -
 50
50 -
 51
51 -
 52
52 -
 53
53 -
 54
54 -
 55
55 -
 56
56 -
 57
57 -
58
-
59
-
60
-
61
-
62
-
63
-
64
-
65
-
66
-
67
-
68
-
69
-
70
-
71
-
72
-
73
-
74
-
75
-
76
-
77
-
78
-
79
-
80
-
81
-
82
-
83
-
84
-
85
-
86
-
87
-
88
-
89
-
90
-
91
-
92
-
93
-
94
-
95
-
96
-
97
-
98
-
99
 |
 |
