Samsung HT-D550 User Manual (user Manual) (ver.1.0) (English) - Page 25
Setup, Before Starting (Initial Setting), Setting the Setup menu
 |
UPC - 036725617469
View all Samsung HT-D550 manuals
Add to My Manuals
Save this manual to your list of manuals |
Page 25 highlights
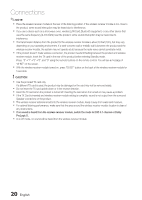
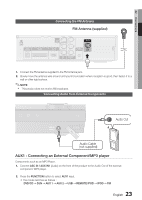
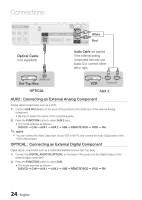
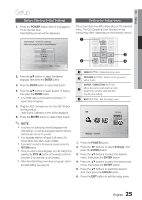
03 Setup Setup 789 DSP /EQ 0 Before Starting (Initial Setting) 1. Press the POWER button when it is plugged in TV for the first time. Initial Setting screen will be displayed. Initial settings > On-Screen Language Select a language for the on-screen displays English 한국어 Nederlands Français Deutsch Italiano >Move " Select 2. Press the ▲▼ buttons to select the desired language, then press the ENTER button. 3. Press the ENTER button to select Start button. 4. Press the ▲▼ buttons to select desired TV Aspect, then press the ENTER button. ` If the HDMI cable is connected to the product, TV aspect does not appear. 5. Plug the ASC microphone into the ASC IN jack on the product. - Auto Sound Calibration screen will be displayed. 6. Press the ENTER button to select Start button. ✎ NOTE ` If you have not selected a preferred language in the initial settings, you will see a language selection window next time you turn on the product. ` Your language selection will apply to all menus: On- Screen Menu, Disc Menu, Audio, Subtitle. ` If you want to move to the previous screen, press the RETURN button. ` Once you select a menu language, you can change it by pressing the STOP (@) button on the remote control for more than 5 seconds with no disc inserted. ` When the Initial Setting screen does not appear, refer to the Initial Setting. (see page 30) Setting the Setup menu The access step may diffeMUrTEdepending on the selected menu. The GUI (Graphical User Interface) in this manual may differ,VdOLepending REPEAT oTnU/NCIHtNhGe firmware version. 1 DISC MENU MENU TITLE MENU TOOLS INFO 3 2 RETURN EXIT 4 A BC D DIMMER GIGA AUDIO S.VOL UPSCALE 1 MENU Button : Display the hPo.BmASSe menu. TUNER S/W LEVEL MEMORY MO/ST USB REC 2 RETURN Button : Return to the previous setup menu. ENTER / DIRECTION Button 3 Move the cursor and select an item. Select the currently selected item. Confirm the setting. 4 EXIT Button : Exit the setup menu. Settings Function DVD/CD 1. Press the POWER button. 2. Press the _+ buttons to select Settings, then press the ENTER button. 3. Press the ▲▼ buttons to select the desired menu, then press the ENTER button. 4. Press the ▲▼ buttons to select the desired sub- menu, then press the ENTER button. 5. Press the ▲▼ buttons to select the desired item, then press the ENTER button. 6. Press the EXIT button to exit the setup menu. 25 English
-
 1
1 -
2
-
3
-
4
-
5
-
6
-
7
-
8
-
9
-
10
-
11
-
12
-
13
-
14
-
15
-
16
-
17
-
18
-
19
-
 20
20 -
 21
21 -
 22
22 -
 23
23 -
 24
24 -
 25
25 -
 26
26 -
 27
27 -
 28
28 -
 29
29 -
 30
30 -
31
-
32
-
33
-
34
-
35
-
36
-
37
-
38
-
39
-
40
-
41
-
42
-
43
-
44
-
45
-
46
-
47
-
48
-
49
-
50
 |
 |