Samsung HT X810 User Manual (ENGLISH) - Page 1
Samsung HT X810 Manual
 |
UPC - 036725616820
View all Samsung HT X810 manuals
Add to My Manuals
Save this manual to your list of manuals |
Page 1 highlights
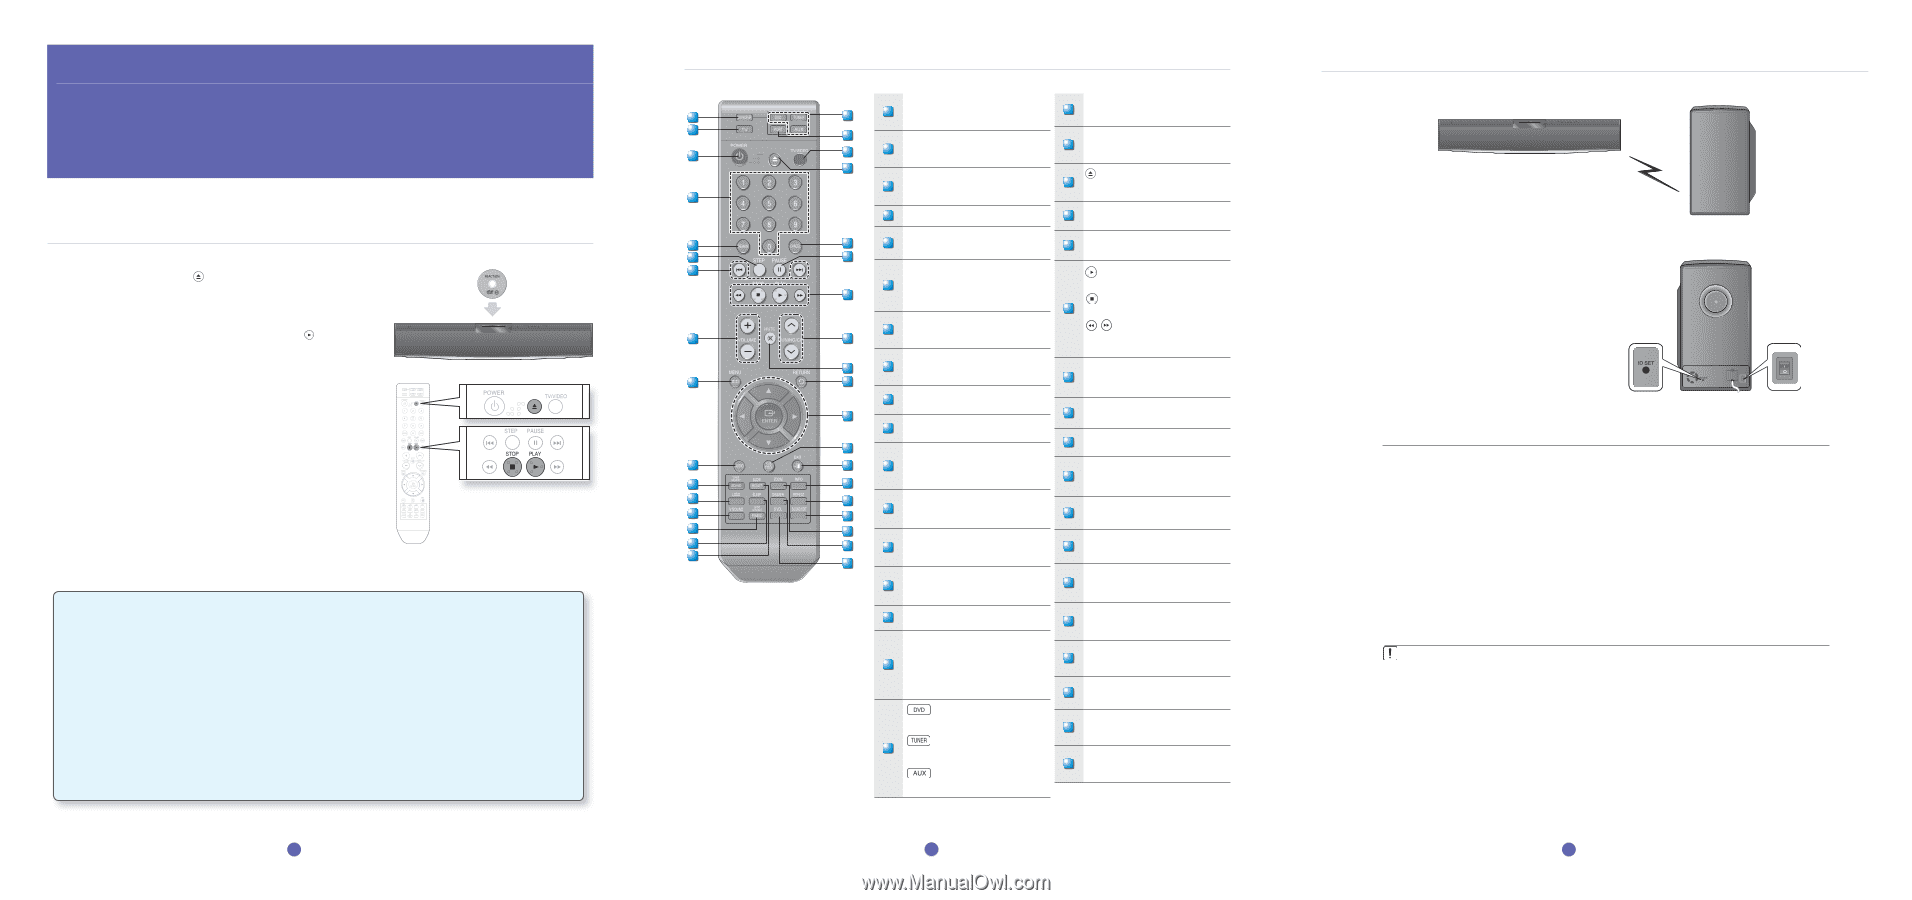
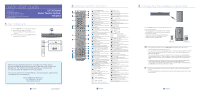
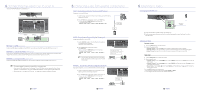
quick start guide 1 disc playback 2 remote control functions 3 connecting the wireless subwoofer 4 connecting the video out to your tv 5 connecting audio from external components 6 listening to radio 2.1CH Digital Home Theater System HT-X810 1 disc playback 1. Press the EJECT ( ) button to open the Disc Slot cover. 2. Load a disc vertically into the Disc Insert Hole. • Place a disc gently into the tray with the disc's label facing up. 3. Close the compartment by pressing the PLAY ( ) button. • Playback starts automatically. Thank you for purchasing this Samsung 2.1CH Digital Home Theater System. We have manufactured this product to provide you with many hours of Audio/Video Entertainment. This "QUICK START GUIDE" guide has been included to get you up and running in the least amount of time as possible. If you have any questions or comments relating to Samsung products, please contact the SAMSUNG customer care center. Samsung Electronics America, Inc. 1-800-SAMSUNG (7267864) www.samsung.com/us 1 - English AH68-02062Y 2 remote control functions 1 17 DVD RECEIVER button 1 You can operate your DVD receiver with the 18 PORT button USB port selection remote control. 2 3 18 19 TV button 2 You can operate your Samsung TV with the remote control. TV/VIDEO button 19 Press TV/VIDEO button to select the Video input on your TV. 20 POWER button 3 Press to turn the Home Theater or your EJECT button 20 Press to move the cover so the Disc Slot is 4 Samsung TV On/Off. exposed. 4 Number (0~9) buttons 21 CANCEL button Used to cancel a wrong entry. 5 6 21 REMAIN button 5 You can check the elapsed or remaining time PAUSE button 22 22 on a disc. Press to pause. 7 STEP button PLAY button 6 The picture moves forward one frame 23 each time the button is pressed during playback. Press to play. STOP button 23 Press to stop. Tuning Preset/CD Skip buttons 7 Tune in radio broadcasting, skip the SEARCH buttons 8 24 song/scene. Fast backward or forward VOLUME button through a song/scene. 25 8 Press + to raise the volume and - to TUNING/CH button 9 26 lower it. 24 Press to select the channel or to tune in radio broadcasting. 9 MENU button Press to see the menu. 27 10 AUDIO button 25 MUTE button Press to mute the sound. 28 Selects the Disc's Audio language. TUNER MEMORY, SD/HD button 26 RETURN button Press to return to the previous menu. 10 11 29 30 11 Press to memorize radio frequencies. Press to select SD or HD(Standard or High Definition ) mode. Cursor/ENTER button 27 Used to select or move up/down, left/ right when setting the menu function. 12 31 LOGO button 13 32 12 You can make your own TV wallpaper (screen saver). 28 SUBTITLE button Selects the disc subtitle language. 14 33 15 16 34 V-SOUND(Virtual Sound) button 13 Makes virtual surround sound with just 29 EXIT button Press to exit the setup screen. 35 2.1 channels. P.BASS/AUDIO UPSCALING button 14 • Provides more powerful bass • Makes your MP3s sound better INFO button 30 View or change disc playback information on screen. 15 SLEEP button Press to set the sleep off time. SLOW button Selects three different slow motion playback speeds. 16 MO/ST button You can listen to radio broadcasts in MONO or STEREO. DVD button Press to select the DVD mode. TUNER button 17 Press to listen to radio broadcasting. AUX button Press to select external audio input. REPEAT button 31 Repeat playback of a chapter, title, group or track. SOUND EDIT button 32 Adjust the speaker sound settings and level. 33 ZOOM button Enlarges the picture during disc playback. DIMMER button 34 The front display brightness will be adjusted. S.VOL(Smart Volume) button 35 Makes the sound more stable during scene transitions. 2 - English 3 connecting the wireless subwoofer Press the POWER button on the rear of the subwoofer to turn it on. • If the main unit is turned on The subwoofer will be automatically connected to the product and the Link LED on its front will blink blue for a few seconds. • If the main unit is turned off The Link LED on the front of the subwoofer will blink blue for about 30 seconds, then will change to red as the subwoofer switches to STANDBY mode. ID SET button POWER button M If the subwoofer is turned off, you will see S/W CHECK on the display panel of the main unit. Place the wireless subwoofer under the main unit. If you use a device such as a microwave oven, wireless LAN Card, Bluetooth equipment, or any other device that uses the same frequency (5.8GHz) near the system, some sound interruption may be heard due to interference. The transmission distance of radio wave is about 32 feet, 9.7 inches, but may vary depending on your operating environment. If a steel-concrete wall or metallic wall is between the main unit and the wireless subwoofer, the system may not operate at all, because the radio wave cannot penetrate metal. If the main unit doesn't make wireless connection, the system needs ID Setting between the main unit and wireless subwoofer. With the main unit turned off, press the remote control's "0""1""3""5" number buttons and the unit will turn on. With the wireless subwoofer turned on, press ID SET button on the back of the unit for 5 seconds. The wireless receiving antenna is built into the wireless subwoofer. Keep the unit away from water and moisture. For optimal listening performance, make sure that the area around the wireless subwoofer location is clear of any obstructions. 3 - English
-
 1
1 -
 2
2
 |
 |