Samsung LT-P266W Quick Guide (easy Manual) (English) - Page 3
Connecting an S-VHS VCR, Connecting a DVI-D Cable - no sound
 |
View all Samsung LT-P266W manuals
Add to My Manuals
Save this manual to your list of manuals |
Page 3 highlights
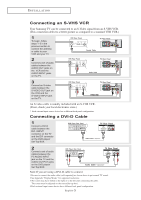
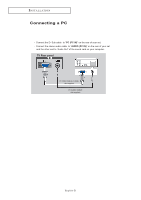
I N S TA L L AT I O N Connecting an S-VHS VCR Your Samsung TV can be connected to an S-Video signal from an S-VHS VCR. (This connection delivers a better picture as compared to a standard VHS VCR.) 1 To begin, follow steps 1-3 in the previous section to connect the antenna or cable to your VCR and your TV. 2 Connect a set of audio cables between the AUDIO OUT jacks on the VCR and the AUDIO INPUT jacks on the TV. 3 Connect an S-video cable between the S-VIDEO OUT jack on the VCR and the S-VIDEO INPUT jack on the TV. An S-video cable is usually included with an S-VHS VCR. (If not, check your local electronics store.) * Each external input source device has a different back panel configuration. Connecting a DVI-D Cable 1 Connect a DVI-D cable between the DVI-I INPUT connector on the TV and the DVI connector on the DVD player/ Set-Top BOX. 2 Connect a set of audio cables between the PC AUDIO INPUT jack on the TV and the AUDIO OUTPUT jacks on the DVD player/ Set-Top BOX. Note:If you are using a DVI-D cable to connect 1.Be sure to connect the audio cable (sold separately)as shown above to get normal TV sound. 2.See Appendix "Display Modes "for supported resolutions. 3.The screen may have shifted to the right or to the left after connecting the cable. The screen must be adjusted on the source(Set-top box). 4.Each external input source device has a different back panel configuration. English-3
-
 1
1 -
 2
2 -
 3
3 -
 4
4 -
 5
5
 |
 |
