Samsung PPM42M8HB User Manual (ENGLISH) - Page 43
Setting up Your PC Software (Windows only), Properties, Display Properties, Settings tab, Advanced
 |
UPC - 729507805030
View all Samsung PPM42M8HB manuals
Add to My Manuals
Save this manual to your list of manuals |
Page 43 highlights
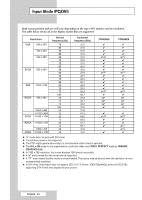
Setting up Your PC Software (Windows only) The Windows display-settings for a typical computer are shown below. But the actual screens on your PC will probably be different, depending upon your particular version of Windows and your particular video card. But even if your actual screens look different, the same, basic set-up information will apply in almost all cases. (If not, contact your computer manufacturer or Samsung Dealer.) 1 Right click the mouse on the Windows Desktop, then click on Properties. The Display Properties will be displayed. 2 Click on Settings tab, then set the Display Mode with reference to the Display Modes Table. You do not need to change the Colours settings. 3 Click on Advanced. A new settings dialog box will be displayed. 4 Click on the Monitor tab, then set the Screen refresh rate with reference to the Display Modes 2 Table. Set the Vertical Frequency and Horizontal Frequency individually if you can do so instead of setting the Screen refresh rate. 3 5 Click on OK to close the window, then Click on OK button to the Display Properties window. Automatic re-booting may commence at this moment. 6 Shutdown the PC, and connect it to your PDP Display. ("Connecting to the PC Input" on page 42) ➢ ◆ The actual screens on your PC may look 4 different, depending on your particular version of Windows and the type of your PC. ◆ When you use your PDP Display as a PC monitor, it supports Colours up to 32 bits. ◆ In this case, the display on the PDP Display may look different depending on your 5 particular version of Windows or the PC manufacturer. ◆ When connecting a PC (including the DVI connection), you must set it to the display settings that are supported by the PDP Display. Otherwise, the message Out of input range will be displayed. English - 43
-
 1
1 -
2
-
3
-
4
-
5
-
6
-
7
-
8
-
9
-
10
-
11
-
12
-
13
-
14
-
15
-
16
-
17
-
18
-
19
-
20
-
21
-
22
-
23
-
24
-
25
-
26
-
27
-
28
-
29
-
30
-
31
-
32
-
33
-
34
-
35
-
36
-
37
-
 38
38 -
 39
39 -
 40
40 -
 41
41 -
 42
42 -
 43
43 -
 44
44 -
 45
45 -
 46
46 -
 47
47 -
 48
48 -
49
 |
 |
