Samsung RF220NCTASP/AA Quick Guide Easy Manual Ver.0.0 (English, French, Spani
Samsung RF220NCTASP/AA Manual
 |
View all Samsung RF220NCTASP/AA manuals
Add to My Manuals
Save this manual to your list of manuals |
Samsung RF220NCTASP/AA manual content summary:
- Samsung RF220NCTASP/AA | Quick Guide Easy Manual Ver.0.0 (English, French, Spani - Page 1
line 4. Compression Nut 5. Compression Sleeve 6. Packing Nut 7. Shut Off Valve 8. Filter Cartridge 9. Cartridge Holder • The water filter must be installed outside the refrigerator. It is not provided with your new refrigerator. The filter cartridge (8) and holder (9) kit can be purchased from the - Samsung RF220NCTASP/AA | Quick Guide Easy Manual Ver.0.0 (English, French, Spani - Page 2
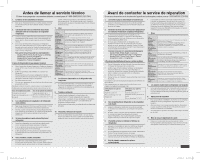
le service de réparation Si vous avez des questions ou si des pièces de l'appareil sont endommagées, contactez nous au 1-800-SAMSUNG est pas fourni avec votre nouveau réfrigérateur. La cartouche du filtre (8) et le support (9) peuvent être achetés dans le magasin où vous avez acheté ce réfrigérateur.
-
 1
1 -
 2
2
 |
 |

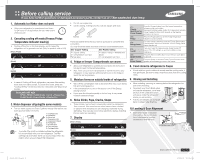
Before calling service
ENGLISH
DA68-02659A
REV(0.0)
If you have further questions or damaged accessory parts, contact us at 1-800-SAMSUNG (726-7864)
1. Automatic Ice Maker does not work
Allow your refrigerator to operate and cool down
•
for 24 hours (1 full day) before the ice maker starts
producing ice.
12
3
6
9
2. Canceling cooling off mode (Freezer/Fridge
Temperature Indicator moving)
Cooling off function is for store display, and it makes the
•
refrigerator not to generate cool air. (Only for product sold in U.S)
In case of Cooling off Mode, refrigerator may seem like working
•
but it does not make cool air. To cancel this mode, press the
“Cooling Off Key” at the same time for 3 seconds until “Ding-dong”
sounds.
COOLING OFF KEY
RF221, RF220, RL225 Model : Ice Off + Freezer Key
-
RL220 Model : Power Freeze + Freezer Key
-
3. Water dispenser dripping(On some models)
Turn on water supply and Flush 3 gallons through filter before use
•
(flush approximately 6 minutes)
•
The water filter must be installed outside the refrigerator.
It is not provided with your new refrigerator. The filter
cartridge (8) and holder (9) kit can be purchased from the
retailer where you purchased this refrigerator.
Do not use copper line.
•
Cut the tubing, making sure the ends are square and clean.
•
There are several items that you need to purchase to complete this
connection.
You may find these items sold as a kit at your local hardware store.
Use Copper Tubing
Use Plastic Tubing
¼” copper tubing
¼” compression nut (1pc)
Ferrule (2pc)
¼” plastic tubing
→
Molded end
(Bulb)
¼” compression nut (1pc)
4. Fridge or freezer Compartments are warm
Allow your refrigerator to operate and cool down for 24 hours (1
•
full day) to reach to the set temperature.
Also, when you put room temperature or warmer food into your
•
refrigerator, it may need an additional 24 hours for the fridge to
reach the set temperature.
5. Moisture forms on outside/inside of refrigerator
Wipe off the condensation with a dry towel (This may occur during
•
hot and humid seasons.)
If the condensation occurs on the doors, turn off the Energy
•
Saving function.
If you open the doors frequently or for too long, it may cause
•
moisture inside the fridge.
6. Noise Clicks, Pops, Cracks, Snaps
These noises may be heard occasionally inside the refrigerator.
•
This is normal. This sound occurs when various items contract
or expand while temperatures are changing; especially during
defrosting. This may also occur when electronic devices including
the ice maker are operating.
7. Display
Incorrect
Incorrect
Correct
Correct
( 1 )
Freezer
(Hold 3 sec for
Power Freeze)
Press the Freezer button to set the freezer temperature
between colder and coldest.
Press and hold the Freezer button for 3 seconds to activate
Power Freezer function which speeds up the freezing
process in the freezer.
( 2 )
Fridge
Press the Fridge button to set the Fridge temperature
between cold and coldest.
( 3 )
Energy Saver
For better energy efficiency, press the Energy Saver button.
If condensation occurs on the doors, turn the Energy Saver
Button function off.
( 4 )
Ice Off
If you don’t want to make more ice, Press the Ice Off
button. The LED will light up and the Ice-Maker stops
making ice.
( 5 )
Alram On/Off
Press the Alarm On/Off button to turn the door open alarm
on and off.
( 6 )
Power Freeze
Press this button to activate Power Freezer function which
speeds up the freezing process in the freezer.
8. Food stored in refrigerator is frozen
If food with too much moisture is stored near the cooling vents, it
•
may get frozen. Be sure to keep moist food away from the cooling
vents.
9. Moving and Installing
When installing, servicing or cleaning behind the refrigerator, be
•
sure of the following:
To protect your floor’s finish when
•
moving the refrigerator, cut a large
section of the cardboard carton
and place under the refrigerator
where you are working.
Pull the unit straight out and push
•
back in straight after finishing.
10. Leveling & Door Alignment
Insert a flat-blade screwdriver
•
into a slot on the control lever,
turn it clockwise or counter-
clockwise to level the door.
[RF221, RF220]
[RF221, RF220]
[RL225]
[RL225]
[RL220]
[RL220]
①
①
①
①
①
①
90 degree
90 degree
1. Cold Water line
1. Cold Water line
2. Pipe Clamp.
2. Pipe Clamp.
3. Plastic line
3. Plastic line
4. Compression Nut
4. Compression Nut
5. Compression Sleeve
5. Compression Sleeve
6. Packing Nut
6. Packing Nut
7. Shut Off Valve
7. Shut Off Valve
8. Filter Cartridge
8. Filter Cartridge
9. Cartridge Holder
9. Cartridge Holder
[RF221, RF220]
[RF221, RF220]
[RL225]
[RL225]
[RL220]
[RL220]
1
2
3
4
6
5
Control Lever
Control Lever
Flat-blade screw driver(-)
Flat-blade screw driver(-)
DA68-02659A.indd 1
DA68-02659A.indd
1
2012.6.27 12:7:25 PM
2012.6.27
12:7:25 PM