Samsung RS264ABSH/XAA Quick Guide (easy Manual) (ver.1.0) (English) - Page 27
Installation Of The Water Dispenser Line
 |
View all Samsung RS264ABSH/XAA manuals
Add to My Manuals
Save this manual to your list of manuals |
Page 27 highlights
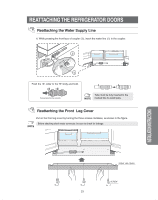
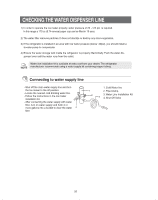
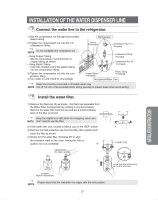
INSTALLATION OF THE WATER DISPENSER LINE Connect the water line to the refrigerator. 1) Slip the compression nut through the provided plastic tubing. 2) Tighten the compression nut onto the 1/4" compression fitting. Refrigerator Ferrule (Purchased) Compression Nut (1/4 (Provided) Do not overtighten the compression nut. NOTE Using Copper Tubing - Slip the compression nut and ferrule on copper tubing as shown. Using Plastic Tubing - Insert the molded end of the plastic tubing into the compression fitting. 3) Tighten the compression nut onto the compression fitting. 4) Turn water on and check for any leakage. Compression Fitting (Provided) Compression Nut (1/4 (Purchased) Copper Tubing (Purchased) Plastic Tubing (Purchased) Household Water Line Water line must be connected to drinkable water only. NOTE Cut off 1/4 inch of the provided plastic tubing squarely to prevent leaks when reconnecting. Install the water filter. 1) Remove the fixed cap (A) as shown. the fixed cap separates from the Water Filter Compartment by rotating it counterclockwise. Remove the water filter from the box and put a month indicator stick on the filter as shown. Keep the cap(A) in a safe place for recapping, when you NOTE don't need to use the filter. 2) If the water filter was installed in March, put on the "SEP" sticker. 3) Remove the Red protective cap from the filter, then position and insert the filter as shown. 4) Slowly turn the water filter clockwise 90º to align the indication mark on the cover, locking the filter in position. Do not overtighten. SEPARATION OF RED CAP (A) COVER FILTER INSTALLATION INSTRUCTIONS STICKER (MONTH INDICATION) Please check that the indication line aligns with the lock position. NOTE 27 ALIGN THE INDICATION MARK WITH LOCK POSITION.
-
 1
1 -
2
-
3
-
4
-
5
-
6
-
7
-
8
-
9
-
10
-
11
-
12
-
13
-
14
-
15
-
16
-
17
-
18
-
19
-
20
-
21
-
 22
22 -
 23
23 -
 24
24 -
 25
25 -
 26
26 -
 27
27 -
 28
28 -
 29
29 -
 30
30 -
 31
31 -
 32
32
 |
 |
