Samsung SMH7185WG User Manual (user Manual) (ver.1.0) (English) - Page 15
setting up your new microwave oven
 |
View all Samsung SMH7185WG manuals
Add to My Manuals
Save this manual to your list of manuals |
Page 15 highlights
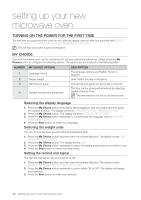
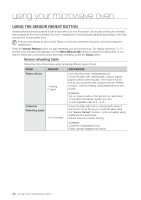
01 Setting up your microwave oven 1 Display The display displays the time when the microwave is not being used, as well as your selected cooking time settings and cooking functions. 2 Sensor Reheat button Use this button to reheat dinner plates, casseroles, and pasta. 3 Power/Auto Defrost button Use this button to defrost food according to its weight. 4 Sensor Cook button Use these buttons to select a preset cooking cycle. 5 Handy Helper, Kids Meals, Snack Bar buttons Press these buttons to cook specific foods. The items are listed under the buttons. 6 Number BUTTONs Use the number buttons to enter the cooking time, power level, quantity, or weight. 7 More/Less BUTTONs The More/Less buttons allow you to adjust the pre-set cooking times once you have started cooking. 8 Power Level BUTTON Press this button to select a cooking power level. 9 Custom Cook button Press this button to store cooking instructions or recall them later from memory. 10 Clock BUTTON Use this button to enter the time. 11 Pause/Cancel button 12 Turntable On/Off BUTTON Use this button to stop/pause the oven or to clear all entries. Use this button to turn the turntable on or off. 13 Light button The Light button allows you to select a light setting for your microwave. 14 Turbo Vent BUTTON 15 Start BUTTON 16 My Choice button The vent removes steam and other vapors from the cooking surface. Press this button to start a selected function. If you open the door after the oven begins to cook, close the door and press the Start button again. Use this button to select your personal preferences such as the language, weight units, and whether to use the remind end signal and the daylight savings time. 17 Help button Use this button to get information on features as well as helpful hints. 18 Kitchen Timer button This microwave allows you to use your microwave oven as a timer. Use the Kitchen Timer button for timing up to 99 minutes 99 seconds. 19 One Minute+ button This simplified control saves you time, letting you quickly start cooking at 100% power without the need to press the Start button. Refer to "Using your microwave oven" below for detailed information on the buttons described in the table above. setting up your new microwave oven _15
-
 1
1 -
2
-
3
-
4
-
5
-
6
-
7
-
8
-
9
-
 10
10 -
 11
11 -
 12
12 -
 13
13 -
 14
14 -
 15
15 -
 16
16 -
 17
17 -
 18
18 -
 19
19 -
 20
20 -
21
-
22
-
23
-
24
-
25
-
26
-
27
-
28
-
29
-
30
-
31
-
32
-
33
-
34
-
35
-
36
-
37
-
38
-
39
-
40
-
41
-
42
-
43
-
44
 |
 |
