Samsung TX-R2765 User Manual (user Manual) (ver.1.0) (English) - Page 3

CONTENTS, Connecting to a Cable Box that Descrambles Some Channels 13 - turns off

Page 3 highlights

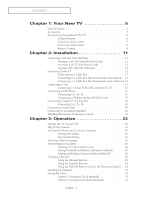
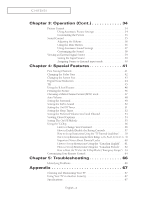
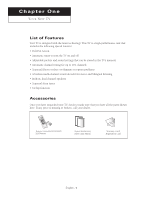
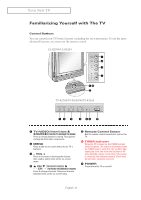
CONTENTS Chapter 1: Your New TV 5 List of Features 5 Accessories 5 Familiarizing Yourself with The TV 6 Control Buttons 6 Connection Jacks (Side 7 Connection Jacks (Rear 8 Remote Control 9 Chapter 2: Installation 11 Connecting VHF and UHF Antennas 11 Antennas with 300-ohm Flat Twin Leads 11 Antennas with 75-ohm Round Leads 12 Separate VHF and UHF Antennas 12 Connecting Cable TV 12 Cable without a Cable Box 12 Connecting to a Cable Box that Descrambles All Channels . . 13 Connecting to a Cable Box that Descrambles Some Channels 13 Connecting a VCR 15 Connecting a Second VCR to Record from the TV 16 Connecting a DVD Player 17 Connecting to Y, PB, PR 17 Connecting to Regular Audio and Video Jacks 17 Connecting a Digital TV Set-Top Box 18 Connecting to Y, PB, PR 18 Connecting a Camcorder 19 Connecting to an Analog Amplifier 20 Installing Batteries in the Remote Control 21 Chapter 3: Operation 22 Turning the TV On and Off 22 Plug & Play Feature 22 Viewing the Menus and On-Screen Displays 24 Viewing the Menus 24 Viewing the Display 24 Selecting a Menu Language 25 Memorizing the Channels 26 Selecting the Video Signal-source 26 Storing Channels in Memory (Automatic Method 27 Adding and Erasing Channels (Manual Method 28 Changing Channels 29 Using the Channel Buttons 29 Using the Number Buttons 29 Using the PRE-CH Button to Select the Previous Channel. . . 29 Labeling the Channels 30 Setting the Clock 31 Option 1: Setting the Clock Manually 31 Option 2: Setting the Clock Automatically 32 English - 3

  • 1
  • 2
  • 3
  • 4
  • 5
  • 6
  • 7
  • 8
  • 9
  • 10
  • 11
  • 12
  • 13
  • 14
  • 15
  • 16
  • 17
  • 18
  • 19
  • 20
  • 21
  • 22
  • 23
  • 24
  • 25
  • 26
  • 27
  • 28
  • 29
  • 30
  • 31
  • 32
  • 33
  • 34
  • 35
  • 36
  • 37
  • 38
  • 39
  • 40
  • 41
  • 42
  • 43
  • 44
  • 45
  • 46
  • 47
  • 48
  • 49
  • 50
  • 51
  • 52
  • 53
  • 54
  • 55
  • 56
  • 57
  • 58
  • 59
  • 60
  • 61
  • 62
  • 63
  • 64
  • 65
  • 66
  • 67
  • 68

C
ONTENTS
English - 3
Chapter 1: Your New TV
. . . . . . . . . . . . . . . . 5
List of Features . . . . . . . . . . . . . . . . . . . . . . . . . . . . . . . . . . . . . . . . . . . 5
Accessories . . . . . . . . . . . . . . . . . . . . . . . . . . . . . . . . . . . . . . . . . . . . . . 5
Familiarizing Yourself with The TV . . . . . . . . . . . . . . . . . . . . . . . . . . . . 6
Control Buttons
. . . . . . . . . . . . . . . . . . . . . . . . . . . . . . . . . . . 6
Connection Jacks (Side)
. . . . . . . . . . . . . . . . . . . . . . . . . . . . . 7
Connection Jacks (Rear) . . . . . . . . . . . . . . . . . . . . . . . . . . . . . 8
Remote Control. . . . . . . . . . . . . . . . . . . . . . . . . . . . . . . . . . . . 9
Chapter 2: Installation . . . . . . . . . . . . . . . . . 11
Connecting VHF and UHF Antennas
. . . . . . . . . . . . . . . . . . . . . . . . . 11
Antennas with 300-ohm Flat Twin Leads
. . . . . . . . . . . . . . . 11
Antennas with 75-ohm Round Leads
. . . . . . . . . . . . . . . . . . 12
Separate VHF and UHF Antennas . . . . . . . . . . . . . . . . . . . . . 12
Connecting Cable TV
. . . . . . . . . . . . . . . . . . . . . . . . . . . . . . . . . . . . . 12
Cable without a Cable Box . . . . . . . . . . . . . . . . . . . . . . . . . . 12
Connecting to a Cable Box that Descrambles All Channels . . 13
Connecting to a Cable Box that Descrambles Some Channels 13
Connecting a VCR. . . . . . . . . . . . . . . . . . . . . . . . . . . . . . . . . . . . . . . . 15
Connecting a Second VCR to Record from the TV. . . . . . . . . 16
Connecting a DVD Player . . . . . . . . . . . . . . . . . . . . . . . . . . . . . . . . . . 17
Connecting to Y, P
B
, P
R
. . . . . . . . . . . . . . . . . . . . . . . . . . . . . 17
Connecting to Regular Audio and Video Jacks
. . . . . . . . . . . 17
Connecting a Digital TV Set-Top Box . . . . . . . . . . . . . . . . . . . . . . . . . 18
Connecting to Y, P
B
, P
R
. . . . . . . . . . . . . . . . . . . . . . . . . . . . . 18
Connecting a Camcorder. . . . . . . . . . . . . . . . . . . . . . . . . . . . . . . . . . . 19
Connecting to an Analog Amplifier . . . . . . . . . . . . . . . . . . . . . . . . . . . 20
Installing Batteries in the Remote Control . . . . . . . . . . . . . . . . . . . . . . 21
Chapter 3: Operation
. . . . . . . . . . . . . . . . . . 22
Turning the TV On and Off. . . . . . . . . . . . . . . . . . . . . . . . . . . . . . . . . 22
Plug & Play Feature
. . . . . . . . . . . . . . . . . . . . . . . . . . . . . . . . . . . . . . 22
Viewing the Menus and On-Screen Displays . . . . . . . . . . . . . . . . . . . . 24
Viewing the Menus . . . . . . . . . . . . . . . . . . . . . . . . . . . . . . . . 24
Viewing the Display
. . . . . . . . . . . . . . . . . . . . . . . . . . . . . . . 24
Selecting a Menu Language . . . . . . . . . . . . . . . . . . . . . . . . . . . . . . . . . 25
Memorizing the Channels . . . . . . . . . . . . . . . . . . . . . . . . . . . . . . . . . . 26
Selecting the Video Signal-source . . . . . . . . . . . . . . . . . . . . . 26
Storing Channels in Memory (Automatic Method) . . . . . . . . 27
Adding and Erasing Channels (Manual Method). . . . . . . . . . 28
Changing Channels. . . . . . . . . . . . . . . . . . . . . . . . . . . . . . . . . . . . . . . 29
Using the Channel Buttons . . . . . . . . . . . . . . . . . . . . . . . . . . 29
Using the Number Buttons . . . . . . . . . . . . . . . . . . . . . . . . . . 29
Using the PRE-CH Button to Select the Previous Channel. . . 29
Labeling the Channels. . . . . . . . . . . . . . . . . . . . . . . . . . . . . . . . . . . . . 30
Setting the Clock. . . . . . . . . . . . . . . . . . . . . . . . . . . . . . . . . . . . . . . . . 31
Option 1: Setting the Clock Manually . . . . . . . . . . . . . . . . . . 31
Option 2: Setting the Clock Automatically
. . . . . . . . . . . . . . 32