Samsung WF45R6300AC/US User Manual - Page 28
Step 6, Step 7
 |
View all Samsung WF45R6300AC/US manuals
Add to My Manuals
Save this manual to your list of manuals |
Page 28 highlights
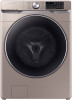
Installation * A (*): Min. 6 in. (152 mm), Max. 8 in. (203 mm) A 3. Route the drain hose to the drain system. CAUTION • If using a standpipe, make sure the standpipe and drain hose connection is not airtight. • If using a standpipe, make sure the drain hose is inserted at least 6 in. (152 mm) but no more than 8 in. (203 mm) into the standpipe. 4. Secure the drain hose with cable ties. Over the edge of a wash basin The drain hose must be placed no lower than 24 in. (60 cm) and no higher than 35 in. (90 cm) from the floor. To keep the spout of the drain hose bent, use the supplied plastic hose guide (A). Secure the guide to the wall using a hook to ensure stable drainage. STEP 6 Remove the film inside the door Remove the small circle of film (B) above the door latch before use. Installation B STEP 7 Power on Plug the power cord into an AC 120 V / 60 Hz / 15 AMP approved electrical outlet protected by a fuse or circuit breaker. Then, press Power to turn on the washer. 28 English
-
 1
1 -
2
-
3
-
4
-
5
-
6
-
7
-
8
-
9
-
10
-
11
-
12
-
13
-
14
-
15
-
16
-
17
-
18
-
19
-
20
-
21
-
22
-
 23
23 -
 24
24 -
 25
25 -
 26
26 -
 27
27 -
 28
28 -
 29
29 -
 30
30 -
 31
31 -
 32
32 -
 33
33 -
34
-
35
-
36
-
37
-
38
-
39
-
40
-
41
-
42
-
43
-
44
-
45
-
46
-
47
-
48
-
49
-
50
-
51
-
52
-
53
-
54
-
55
-
56
-
57
-
58
-
59
-
60
-
61
-
62
-
63
-
64
-
65
-
66
-
67
-
68
-
69
-
70
-
71
-
72
-
73
-
74
-
75
-
76
-
77
-
78
-
79
-
80
-
81
-
82
-
83
-
84
-
85
-
86
-
87
-
88
-
89
-
90
-
91
-
92
-
93
-
94
-
95
-
96
-
97
-
98
-
99
-
100
-
101
-
102
-
103
-
104
-
105
-
106
-
107
-
108
-
109
-
110
-
111
-
112
-
113
-
114
-
115
-
116
-
117
-
118
-
119
-
120
-
121
-
122
-
123
-
124
-
125
-
126
-
127
-
128
-
129
-
130
-
131
-
132
 |
 |
