Sanyo DP50710 Quik'N Easy Guide - Page 2

Hdtv Initial Setup, Administrating Your Channels, Protecting Your Hdtv's Screen

Page 2 highlights

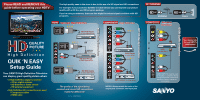
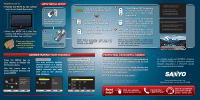
PPlleeaassee bbee ssuurree ttoo:: Handle the HDTV by the cabinet only, do not touch the screen. HDTV INITIAL SETUP 1 Place the HDTV on a flat firm surface and allow adequate space on both sides, top, and back. Please save the carton and all packaging material in case return or repair is needed. Plug in the HDTV and any other AV equipment hooked up to your HDTV. 2 Place fresh batteries in the remote control. NOTE: To ensure safe operation please follow the Battery Installation precautions in your owner's manual. 3 TTuurrnn oonn yyoouurr HHDDTTVV aanndd aallll ooff tthhee AAVV eeqquuiippmmeenntt tthhaatt iiss hhooookkeedd uupp ttoo iitt.. 4 PPrreessss CCHH▼▼ iiff yyoouu''rree sseettttiinngg uupp yyoouurr TTVV ffoorr hhoommee uussee.. OORR PPrreessss CCHH▲▲,, iiff tthhee TTVV sseett wwiillll bbee ppuutt oonn ddiissppllaayy.. NOTE: Before proceeding, make sure your antenna and equipment are hooked up correctly to the HDTV. 5 PPrreessss CCHH▲▲ oorr CCHH▼▼ ttoo ppeerrffoorrmm aa cchhaannnneell sseeaarrcchh ffrroomm aann AAnntteennnnaa oorr aa ddiirreecctt CCaabbllee ccoonnnneeccttiioonn YYoouu mmaayy aacccceessss aann OOnn SSccrreeeenn HHeellpp mmeennuu wwiitthh ccoommmmoonn pprroobblleemmss aanndd ssoolluuttiioonnss bbyy pprreessssiinngg tthhee VVOOLL kkeeyy.. 6 AAfftteerr tthhee CChhaannnneell//SSiiggnnaall sseeaarrcchh pprroocceessss iiss ccoommpplleetteedd,, ttuunnee ttoo tthhee ddeessiirreedd iinnppuutt bbyy pprreessssiinngg tthhee IINNPPUUTT kkeeyy oonn yyoouurr rreemmoottee.. NOTE: If you receive Satellite or Cable service through a set top box, tune to the correct input on your HDTV and use the receiver and its remote for channel viewing. Please select the proper location for your TV, the display will be adjusted for best results Press CHannel UP for Store Mode. Press CHannel DOWN for Home Mode. Store mode is for the retail display setup. Home mode qualifies for ENERGY STAR Please connect all antennas* and signals to the jacks and terminals. Make sure all of your equipment is switched on. Press CHannel UP or DOWN for Channel/Signal search. Press VOLume DOWN for On Screen Help. * To avoid signal interference when searching for channels using an Indoor Antenna, place the antenna at least 3 feet away from TV. High quality picture is available with proper HD signal and connection. Please wait while your TV searches for channels and Signals. Digital 000 Analog 000 ADMINISTRATING YOUR CHANNELS PPrreessss tthhee MMEENNUU kkeeyy oonn yyoouurr rreemmoottee ttoo ddiissppllaayy tthhee OOnn SSccrreeeenn mmeennuu.. UUssee tthhee ccuurrssoorr kkeeyyss ttoo sseelleecctt CChhaannnneell SSeettttiinngg aanndd pprreessss EENNTTEERR.. Channel Search You may perform another channel search or a Digital Add-On which searches for digital channels and adds new ones to the channel map database. Channel Scan Memory VViieeww aa lliisstt ooff aallll AAnnaalloogg aanndd DDiiggiittaall cchhaannnneellss ffoouunndd.. YYoouu mmaayy aadddd ((eennaabbllee)) oorr rreemmoovvee ((ddiissaabbllee)) cchhaannnneellss ttoo mmeeeett yyoouurr pprreeffeerreenncceess.. Analog Digital Digital Analog Analog Analog Digital 03 03-1 03-2 04 05 06 06-1 WCVB WFXT NICK VBCT PROTECTING YOUR HDTV's SCREEN TThhee ssccrreeeenn ccaann bbee ddaammaaggeedd iiff iitt''ss nnoott mmaaiinnttaaiinneedd pprrooppeerrllyy.. DDoo nnoott uussee hhaarrdd oobbjjeeccttss ssuucchh aass hhaarrdd ccllootthh oorr ppaappeerr.. DDoo nnoott uussee eexxcceessssiivvee pprreessssuurree wwhheenn cclleeaanniinngg tthhee ssccrreeeenn;; eexxcceessssiivvee pprreessssuurree ccaann ccaauussee ppeerrmmaanneenntt ddiissccoolloorraattiioonn oorr ddaarrkk ssppoottss.. NNEEVVEERR sspprraayy lliiqquuiiddss oonn tthhee ssccrreeeenn!! HDMI, the HDMI Logo and High-Definition Multimedia Interface are trademarks or registered trademarks of HDMI Licensing LLC. Si necesita ayuda en ESPAÑOL, marque al 1-800-877-5032 y nuestros asesores estarán dispuestos a ofrecerle ayuda con cualquiera de sus dudas. Sanyo Manufacturing Corp. 3333 Sanyo Road, Forrest City, AR 72335 Need help? Visit our website www.sanyoctv.com Call toll free 1.800.877.5032 One of our Service associates will be glad to assist you!

  • 1
  • 2

Place fresh
batteries in
the remote
control.
Plug in the HDTV and
any other AV equipment
hooked up to your HDTV.
Place fresh
batteries in
the remote
control.
NOTE: To ensure safe operation
please follow the Battery Installation
precautions in your owner’s manual.
NOTE: If you receive Satellite or Cable service
through a set top box, tune to the correct input
on your HDTV and use the receiver and its
remote for channel viewing.
NOTE: Before proceeding, make sure your
antenna
and
equipment
are
hooked
up
correctly to the HDTV.
Plug in the HDTV and
any other AV equipment
hooked up to your HDTV.
Handle the HDTV by the cabinet
only, do not touch the screen
Place the HDTV on a flat firm
surface and allow adequate space
on both sides, top, and back.
You may access an On Screen
Help menu with common
problems and solutions by
pressing the VOL
key.
You may access an On Screen
Help menu with common
problems and solutions by
pressing the VOL
key.
Turn on your HDTV and all
of the AV equipment that is
hooked up to it.
Press CH
or CH
to perform
a channel search from an
Antenna or a direct Cable
connection
Press CH
if you’re setting
up your TV for home use.
OR
Press CH
, if the TV set will
be put on display.
Press the MENU key on
your remote to display the
On Screen menu.
Use the cursor keys to
select Channel Setting and
press ENTER.
View a list of all Analog and
Digital channels found. You
may add (enable) or remove
(disable) channels to meet
your preferences.
The screen can be damaged if it’s not maintained
properly. Do not use hard objects such as hard
cloth or paper.
Do not use excessive pressure when cleaning the
screen; excessive pressure can cause permanent
discoloration or dark spots.
NEVER spray liquids on the screen!
Handle the HDTV by the cabinet
only, do not touch the screen.
Please be sure to:
Please be sure to:
Place the HDTV on a flat firm
surface and allow adequate space
on both sides, top, and back.
Channel Search
Please save the carton
and all packaging
material in case return
or repair is needed.
HDTV INITIAL SETUP
Analog
Digital
Digital
Analog
Analog
Analog
Digital
03
03-1
03-2
04
05
06
06-1
WCVB
WFXT
NICK
VBCT
ADMINISTRATING YOUR CHANNELS
PROTECTING YOUR HDTV’s SCREEN
Channel Scan Memory
Need
help?
Visit our website
www.sanyoctv.com
Call toll free
1.800.877.5032
One of our Service
associates will be
glad to assist you!
HDMI, the HDMI Logo and High-Definition Multimedia Interface
are trademarks or registered trademarks of HDMI Licensing LLC.
Sanyo Manufacturing Corp.
3333 Sanyo Road, Forrest City, AR 72335
Si necesita ayuda en ESPAÑOL, marque
al 1-800-877-5032 y nuestros asesores
estarán dispuestos a ofrecerle ayuda
con cualquiera de sus dudas.
High quality picture is available with proper HD signal and connection.
Please wait while your TV searches for channels and Signals.
Digital 000
Analog 000
Please select the proper location for your TV,
the display will be adjusted for best results
Store mode is for the retail display setup.
Home mode qualifies for ENERGY STAR
Press CHannel UP for Store Mode.
Press CHannel DOWN for Home Mode.
Please connect all antennas* and signals to the jacks and terminals.
Make sure all of your equipment is switched on.
*
To avoid signal interference when searching for channels using
an Indoor Antenna, place the antenna at least 3 feet away from TV.
Press CHannel UP or DOWN for Channel/Signal search.
Press VOLume DOWN for On Screen Help.
1
2
3
5
6
4
Turn on your HDTV and all
of the AV equipment that is
hooked up to it.
Press CH
or CH
to perform
a channel search from an
Antenna or a direct Cable
connection
Press CH
if you’re setting
up your TV for home use.
OR
Press CH
, if the TV set will
be put on display.
After
the
Channel/Signal
search
process is completed, tune to the
desired input by pressing the INPUT
key on your remote.
After
the
Channel/Signal
search
process is completed, tune to the
desired input by pressing the INPUT
key on your remote.
Press the MENU key on
your remote to display the
On Screen menu.
Use the cursor keys to
select Channel Setting and
press ENTER.
You may perform another
channel search or a Digital
Add-On which searches for
digital channels and adds
new ones to the channel
map database.
View a list of all Analog and
Digital channels found. You
may add (enable) or remove
(disable) channels to meet
your preferences.
The screen can be damaged if it’s not maintained
properly. Do not use hard objects such as hard
cloth or paper.
Do not use excessive pressure when cleaning the
screen; excessive pressure can cause permanent
discoloration or dark spots.
NEVER spray liquids on the screen!