Sanyo DP52848 User Manual - Page 5
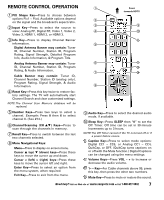
Installation, Getting Started - remote
 |
View all Sanyo DP52848 manuals
Add to My Manuals
Save this manual to your list of manuals |
Page 5 highlights
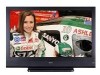
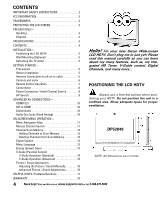
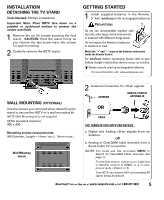
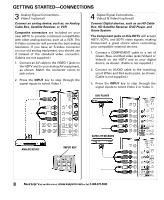
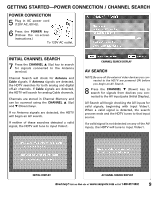
INSTALLATION DETACHING THE TV STAND Tools Needed: Phillips screwdriver Important Note: Place HDTV face down on a padded or cushioned surface to protect the screen and finish. 1 Remove the six (6) screws securing the foot stand. CAUTION: Hold the stand firmly as you remove the last screw (save the screws for wall mounting). 2 Carefully remove the HDTV stand. GETTING STARTED 1 Install supplied batteries in the Remote. (2 "AAA" eneloop Ni-MH rechargeable batteries) PRECAUTIONS Do not use rechargeables together with dry cells, other types, mixed new and old, or batteries with different charge levels. Do not expose the Remote or batteries to moisture or heat. Match the "+" and "-" signs on the batteries with marks inside the Remote Control. For eneloop battery recharging, please refer to your battery charger's instructions (battery charger not included). Please recycle used up rechargeable batteries. For more information visit : www.eneloopusa.com WALL MOUNTING (OPTIONAL) Use the screws you removed when dettaching the stand to secure the HDTV to a wall mounting kit. NOTE:Wall Mounting kit is not supplied. VESA standard interface: 400 x 400 Mounting screws measurements: M6 Diameter, Length-14mm (min.); 16mm (max.) Wall Mounting Inserts 2 Antenna Connection for off-air signals. ANTENNA ANALOG / DIGITAL ANTENNA IN OR CABLE THE TUNER IN THIS HDTV CAN RECEIVE : a. Digital and Analog off-air signals from an antenna. OR b. Analog or ClearQAM cable channels from a direct Cable TV connection. NOTES: You must use the on-screen MENU to Search for ClearQAM Cable channels. See page 11. For the best picture, connect your Cable box or Satellite receiver to HDMI1, 2, 3, or component jacks (Video2 or 3). This HDTV can receive ANY unscrambled RF signal being broadcast. Need help? Visit our Web site at www.sanyoctv.com or Call 1-800-877-5032 5
-
 1
1 -
 2
2 -
 3
3 -
 4
4 -
 5
5 -
 6
6 -
 7
7 -
 8
8 -
 9
9 -
 10
10 -
 11
11 -
12
-
13
-
14
-
15
-
16
-
17
-
18
-
19
-
20
-
21
-
22
-
23
-
24
-
25
-
26
-
27
-
28
-
29
-
30
-
31
-
32
-
33
-
34
-
35
-
36
-
37
-
38
-
39
-
40
-
41
-
42
-
43
-
44
-
45
-
46
-
47
-
48
-
49
-
50
-
51
-
52
 |
 |
