Sanyo HD150 Owners Manual - Page 9
Preparation, Positioning Projector, Lens Installation, Lens Shift Adjustment
 |
View all Sanyo HD150 manuals
Add to My Manuals
Save this manual to your list of manuals |
Page 9 highlights
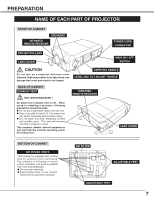
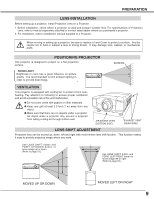
PREPARATION LENS INSTALLATION Before setting up a projector, install Projection Lens on a Projector. 1. Before installation, check where a projector is used and prepare suitable lens. For specifications of Projection Lens, refer to manual separately attached or contact sales dealer where you purchased a projector. 2. For installation, refer to installation manual supplied to a Projector. When moving or setting up a projector, be sure to replace a Lens Cover to protect a surface. And be careful not to hold or subject a lens to strong forces. It may damage lens, cabinet, or mechanical parts. POSITIONING PROJECTOR This projector is designed to project on a flat projection surface. ROOM LIGHT Brightness in room has a great influence on picture quality. It is recommended to limit ambient lighting in order to provide best image. SCREEN VENTILATION This projector is equipped with cooling fan to protect it from overheating. Pay attention to following to ensure proper ventilation and avoid a possible risk of fire and malfunction. G Do not cover vents with papers or other materials. G Keep rear grill at least 3.3 feet (1 m) away from any object. G Make sure that there are no objects under a projector. An object under a projector may prevent a projector from taking cooling air through bottom vent. AIR INTAKE VENT (BOTTOM SIDE) EXHAUST VENT (REAR SIDE) LENS SHIFT ADJUSTMENT Projection lens can be moved up, down, left and right with motor-driven lens shift function. This function makes it easy to provide projected image where you want. Use LENS SHIFT button and POINT UP/DOWN button to move image up or down. (Refer to page 23.) Use LENS SHIFT button and POINT LEFT/RIGHT button to move image left or right. (Refer to page 23.) MOVED UP OR DOWN MOVED LEFT OR RIGHT 9
-
 1
1 -
2
-
3
-
 4
4 -
 5
5 -
 6
6 -
 7
7 -
 8
8 -
 9
9 -
 10
10 -
 11
11 -
 12
12 -
 13
13 -
 14
14 -
15
-
16
-
17
-
18
-
19
-
20
-
21
-
22
-
23
-
24
-
25
-
26
-
27
-
28
-
29
-
30
-
31
-
32
-
33
-
34
-
35
-
36
-
37
-
38
-
39
-
40
-
41
-
42
-
43
-
44
-
45
-
46
-
47
-
48
-
49
-
50
-
51
-
52
-
53
-
54
 |
 |
