Sanyo PLC-HF10000L Owner's Manual - Page 49
Auto picture control, Advanced color, Sharpness, Gamma, Offset Red/Green/Blue, SECAM, PAL-M
 |
View all Sanyo PLC-HF10000L manuals
Add to My Manuals
Save this manual to your list of manuals |
Page 49 highlights
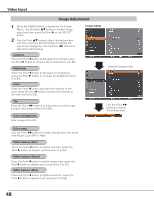
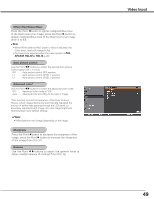
Offset (Red/Green/Blue) Press the Point 7 button to lighten red/green/blue tone of the black level of an image; press the Point 8 button to deepen red/green/blue tone of the black level of an image (from 0 to 63). ✔Note • When White balance Red, Green or Blue is adjusted, the Color temp. level will change to Adj.. • Tint cannot be selected when the video system is PAL, SECAM, PAL-M or PAL-N (p.46). Auto picture control Use the Point 7 8 buttons to select the desired Auto picture control option (Off, L1 or L2). Off . . . . . Auto picture control OFF position. L1 . . . . . Auto picture control LEVEL 1 position. L2 . . . . . Auto picture control LEVEL 2 position. Advanced color* Use the Point 7 8 buttons to select the advanced color mode. Off . . . . . Advanced color mode is "Off". Auto . . . . Advanced color according to the type of image. *This function controls the operation of the Color Control Device, which independently and automatically regulates the amount of yellow light passing through the LCD panel, to accurately reproduce both image color and image brightness. Normally leave Auto (default setting). ✔Note: • White balance may change depending on the image. Sharpness Press the Point 7 button to decrease the sharpness of the image; press the Point 8 button to increase the sharpness of the image (from 0 to 31). Gamma Use the Point 7 8 buttons to adjust the gamma value to obtain a better balance of contrast (from 0 to 15). Video Input 49
-
 1
1 -
2
-
3
-
4
-
5
-
6
-
7
-
8
-
9
-
10
-
11
-
12
-
13
-
14
-
15
-
16
-
17
-
18
-
19
-
20
-
21
-
22
-
23
-
24
-
25
-
26
-
27
-
28
-
29
-
30
-
31
-
32
-
33
-
34
-
35
-
36
-
37
-
38
-
39
-
40
-
41
-
42
-
43
-
 44
44 -
 45
45 -
 46
46 -
 47
47 -
 48
48 -
 49
49 -
 50
50 -
 51
51 -
 52
52 -
 53
53 -
 54
54 -
55
-
56
-
57
-
58
-
59
-
60
-
61
-
62
-
63
-
64
-
65
-
66
-
67
-
68
-
69
-
70
-
71
-
72
-
73
-
74
-
75
-
76
-
77
-
78
-
79
-
80
-
81
-
82
-
83
-
84
-
85
-
86
-
87
-
88
-
89
-
90
-
91
-
92
-
93
-
94
-
95
-
96
-
97
-
98
-
99
 |
 |
