Sanyo PLC-XP200L Instruction Manual, PLC-XP200L - Page 13
Side Control and Indicators, Side Control, Indicators on the top panel - replacement filter
 |
UPC - 086483072208
View all Sanyo PLC-XP200L manuals
Add to My Manuals
Save this manual to your list of manuals |
Page 13 highlights
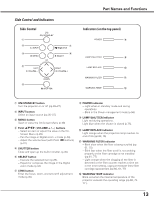
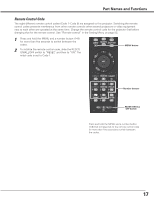
Side Control and Indicators Side Control q w e r t Part Names and Functions Indicators (on the top panel) i u y o !0 !1 !2 q ON/STAND-BY button Turn the projector on or off (pp.26-27). w INPUT button Select an input source (pp.35-37). e MENU button Open or close the On-Screen Menu (p.28). r Point ed7 8 ( VOLUME + / - ) buttons - Select an item or adjust the value in the OnScreen Menu (p.28). - Pan the image in Digital zoom + mode (p.44). - Adjust the volume level (with Point 7 8 buttons) (p.31). t SHUTTER button Close and open up the built-in shutter. (p.30) y SELECT button - Execute the selected item (p.28). - Expand or compress the image in the Digital zoom mode (p.44). u LENS button Enter the focus, zoom, and lens shift adjustment mode (p.30). i POWER indicator - Light when in stand-by mode and during operations. - Blink in the Power management mode (p.56). o LAMP/SHUTTER indicator Light red during operations. Light blue when the shutter is closed (p.75). !0 LAMP REPLACE indicator Light orange when the projection lamp reaches its end of life (pp.64, 76). !1 WARNING FILTER indicator - Blink slow when the filter is being scrolled (pp. 61, 75). - Blink fast when the filter scroll is not working properly or the filter cartridge is not installed (pp.61, 77). - Light orange when the clogging of the filter is detected or the filter counter reaches a time set in the timer setting, urging immediate filter/ filter cartridge replacement (pp.60, 61, 77). !2 WARNING TEMP. indicator Blink red when the internal temperature of the projector exceeds the operating range (pp.68, 7577 ). 13
-
 1
1 -
2
-
3
-
4
-
5
-
6
-
7
-
 8
8 -
 9
9 -
 10
10 -
 11
11 -
 12
12 -
 13
13 -
 14
14 -
 15
15 -
 16
16 -
 17
17 -
 18
18 -
19
-
20
-
21
-
22
-
23
-
24
-
25
-
26
-
27
-
28
-
29
-
30
-
31
-
32
-
33
-
34
-
35
-
36
-
37
-
38
-
39
-
40
-
41
-
42
-
43
-
44
-
45
-
46
-
47
-
48
-
49
-
50
-
51
-
52
-
53
-
54
-
55
-
56
-
57
-
58
-
59
-
60
-
61
-
62
-
63
-
64
-
65
-
66
-
67
-
68
-
69
-
70
-
71
-
72
-
73
-
74
-
75
-
76
-
77
-
78
-
79
-
80
-
81
-
82
-
83
-
84
-
85
-
86
-
87
-
88
 |
 |
