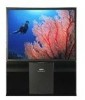
Sanyo PLC-XR70N Installation
Sanyo PLC-XR70N - 70" Rear Projection TV Manual
 |
View all Sanyo PLC-XR70N manuals
Add to My Manuals
Save this manual to your list of manuals |
Sanyo PLC-XR70N manual content summary:
- Sanyo PLC-XR70N | Installation - Page 1
NEVER TOUCH THE SURFACE OF THE PROJECTION SCREEN AND THE PROJECTION MIRROR DIRECTLY. THEY MAY EFFECT THE PROJECTION IMAGE QUALITY. BE CAREFUL NOT TO DROP ANY PART OR TOOL LIKE SCREW INTO THE SYSTEM. IF IT SHOULD, CONTACT A SERVICE. EXCEPT WHEN ADJUSTING THE PROJECTION MIRROR, NEVER TURN THE SYSTEM - Sanyo PLC-XR70N | Installation - Page 2
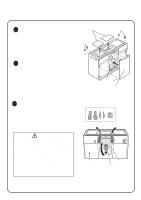
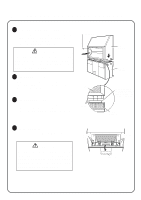
Cabinet : Refer to the steps 2, 6 and 7 for installation. Qty. Installation Parts Glass Doors 2 Compartment Shelves 4 Shelves' Pins 16 Package 3 Installation Part Accessories Qty. Center Panel 1 Owner's Manual 1 Installation Manual (this brochure AC Power Cord Wireless Remote Control Unit - Sanyo PLC-XR70N | Installation - Page 3
Leg Center Panel Meet the Center Panel and the Bottom Cabinet at the upper part first and push in the Panel securely. 3 Remove Protection Pads There are 4 Pads supporting at the upper side of the Bottom Cabinet first. And then, remove the pad(A) supporting at the lower side of the projector. When - Sanyo PLC-XR70N | Installation - Page 4
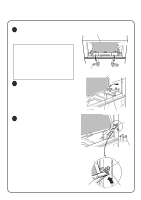
the frame of the Top Cabinet completely. CAUTION THE TOP CABINET OF THIS PROJECTOR HAS ITS GRAVITY AT THE SCREEN SIDE. WHEN LIFTING THE TOP CABINET, installations are finished, all those parts should be replaced. 3 Remove Cover Plate Remove the Cover Plate on the lower part of the Top Cabinet. Keep - Sanyo PLC-XR70N | Installation - Page 5
MIRROR HANDLE. BE SURE TO REMOVE ALL THE PROTECTION PADS FROM THE CABINET. 2 Set Mirror Arms Remove the 8 Screws(A) of the Mirror Arms. Lift the Projection Mirror and raise the Mirror Arms backward. Loosen the Screws(B) on the end of the Mirror Arms. Put the Mirror Holder between the Adjusting Nut - Sanyo PLC-XR70N | Installation - Page 6
to the AC outlet, and turn the projector on. Connect the video output equipment to the projector. Project the image of cross-hatch or circles to check whether the picutre is displayed fully on the Projection Screen and is not distorted. (Refer to the Owner's Manual for operation.) If the figure is - Sanyo PLC-XR70N | Installation - Page 7
6 ASSEMBLE STORAGE SPACES 1 Replace Back Cover Replace the Back Cover to the Top Cabinet. Turn the Back Cover over, and fix the cover in the reverse to the initial position. Screws (14 pcs) Back Cover 2 Install Glass Doors 1. Remove the Hinge Covers by removing the 2 screws of each Hinge. 2. - Sanyo PLC-XR70N | Installation - Page 8
7 LOCK CABINET 1 Lock the Cabinet Turn Lock Bolts to the direction indicated on the figure to lock the cabinet on the floor. Make sure that all the Casters are slightly raised from the floor. The tilt of Cabinet can be also adjusted with these Lock Bolts. CAUTION BE SURE TO LOCK THE CABINET WITH
-
 1
1 -
 2
2 -
 3
3 -
 4
4 -
 5
5 -
 6
6 -
 7
7 -
8
 |
 |

Please read all instructions below and install this system properly.
Please read "SAFETY PRECAUTIONS" and "IMPORTANT SAFETY INSTRUCTIONS" on
OWNER'S MANUAL to install and place this system.
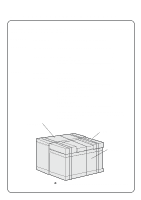
This system is supplied in 3 packages and they need to be installed.
Please make sure all the
parts are included.
If any part is missing, or if you have questions, contact a sales dealer.
CAUTION
WHEN INSTALLING THIS SYSTEM, BE CAREFUL NOT TO DAMAGE THE PROJECTION
SCREEN.
AND NEVER TOUCH THE SURFACE OF THE PROJECTION SCREEN AND
THE PROJECTION MIRROR DIRECTLY.
THEY MAY EFFECT THE PROJECTION IMAGE
QUALITY.
BE CAREFUL NOT TO DROP ANY PART OR TOOL LIKE SCREW INTO THE SYSTEM.
IF
IT SHOULD, CONTACT A SERVICE.
EXCEPT WHEN ADJUSTING THE PROJECTION MIRROR, NEVER TURN THE SYSTEM
ON UNTIL THE INSTALLATION IS FINISHED.
IT MAY CAUSE ELECTRICAL SHOCK OR
FIRE HAZARD.
REQUEST A SALES DEALER FOR INSTALLATION
Rear Projection Display
Installation Manual
Install the system following steps.
1AA6P1P1756--
(M8EA)
1.
CHECK CONTENTS IN PACKAGES
2.
ASSEMBLE BOTTOM CABINET
3.
JOINT TOP AND BOTTOM CABINETS
4.
SETUP PROJECTION MIRROR
5.
ADJUST PROJECTION MIRROR
THIS SYSTEM MUST BE INSTALLED BY 2 OR MORE PEOPLE
6.
ASSEMBLE STORAGE SPACES
7.
LOCK CABINET
710-00792-1