Sanyo PLC XU115 Instruction Manual, PLC-XU115 Network Set Up - Page 34
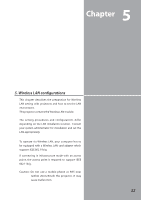
Setting the network environment, Setting procedures, Wireless LAN configurations
 |
UPC - 086483071393
View all Sanyo PLC XU115 manuals
Add to My Manuals
Save this manual to your list of manuals |
Page 34 highlights
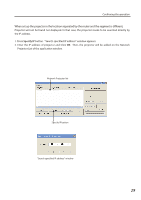
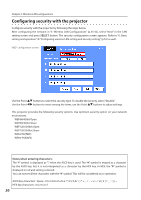
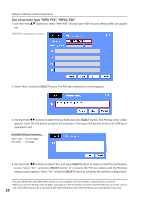
Chapter 5 Wireless LAN configurations Setting the network environment The projector contains the Wireless LAN adapter. Set the Wireless LAN network through the projector menu. Detailed network settings will be made with browser. Refer to "6. Basic setting and operation". ➔"Network configuration" (p.51). Complete the settings described in this chapter before performing the steps in "6. Basic setting and operation." Setting procedures With Easy wireless setting function, you can make Wireless LAN settings easily without any complicating settings (p.39). 1. Turn on the projector and select "Wireless" from the input menu of the projector. The "Please wait..." message will be displayed on the screen. After short time, the network connection standby display screen will appear. Refer to "3. Names and Functions of the Operation Screen" (p.21). 2. Select "Wireless Setting" from the projector menu and press SELECT button. Select similar environment between LAN 4 and LAN 5 with the Point 7 8 buttons. (LAN 4, LAN 5, and SIMPLE* are factory default settings. Select similar environment to the installation location. For each settings, refer to "Wireless LAN factory default settings" on page 42.) ✳ "SIMPLE" mode is used for simple setting without complicated LAN setting procedures to connect to the Wireless LAN. See "Easy wireless setting" (p.39) for details. 3. Press the Point button then the "Please wait..." message will appear and switching operation will start. Switching will take a while and after completing the operation the message will disappear. During the switching period, the projector cannot be operated. Wireless setting Network PIN code Network Information Wireless factory default 34
-
 1
1 -
2
-
3
-
4
-
5
-
6
-
7
-
8
-
9
-
10
-
11
-
12
-
13
-
14
-
15
-
16
-
17
-
18
-
19
-
20
-
21
-
22
-
23
-
24
-
25
-
26
-
27
-
28
-
 29
29 -
 30
30 -
 31
31 -
 32
32 -
 33
33 -
 34
34 -
 35
35 -
 36
36 -
 37
37 -
 38
38 -
 39
39 -
40
-
41
-
42
-
43
-
44
-
45
-
46
-
47
-
48
-
49
-
50
-
51
-
52
-
53
-
54
-
55
-
56
-
57
-
58
-
59
-
60
-
61
-
62
-
63
-
64
-
65
-
66
-
67
-
68
-
69
-
70
-
71
-
72
-
73
-
74
-
75
-
76
-
77
-
78
-
79
-
80
-
81
-
82
-
83
-
84
-
85
-
86
-
87
-
88
-
89
-
90
-
91
-
92
-
93
-
94
-
95
-
96
-
97
-
98
-
99
-
100
-
101
-
102
-
103
-
104
-
105
-
106
-
107
-
108
-
109
-
110
-
111
-
112
-
113
-
114
-
115
-
116
-
117
-
118
-
119
-
120
-
121
-
122
-
123
-
124
-
125
-
126
-
127
-
128
-
129
-
130
-
131
-
132
-
133
-
134
-
135
-
136
-
137
-
138
-
139
-
140
-
141
-
142
-
143
-
144
 |
 |