Sanyo VPC S6 Instruction Manual, VPC-S600
Sanyo VPC S6 - Xacti Digital Camera Manual
 |
UPC - 086483059193
View all Sanyo VPC S6 manuals
Add to My Manuals
Save this manual to your list of manuals |
Sanyo VPC S6 manual content summary:
- Sanyo VPC S6 | Instruction Manual, VPC-S600 - Page 1
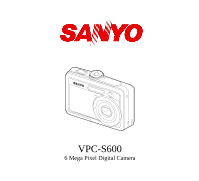
VPC-S600 6 Mega Pixel Digital Camera - Sanyo VPC S6 | Instruction Manual, VPC-S600 - Page 2
the limits for Class B digital devices, pursuant to Part 15 in accordance with the instructions, may cause harmful experienced radio/TV technician for help. Use of shielded cable is required to comply with Class B limits in Subpart specified in the manual. If such changes or modifications should be made, - Sanyo VPC S6 | Instruction Manual, VPC-S600 - Page 3
subject to change without notice. This includes primary product specifications, software, software drivers, and user's manual. This User Manual is a general reference guide for the product. „ The product and accessories that come with your digital camera may be different from those described in this - Sanyo VPC S6 | Instruction Manual, VPC-S600 - Page 4
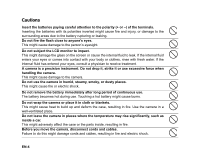
INSTRUCTIONS Read and understand all Warnings and Cautions before using this product. Warnings If foreign objects or water have entered the camera, or repair the camera. This might cause fire or electric shock. For repair or internal inspection, ask the store of purchase. Do not use the camera in - Sanyo VPC S6 | Instruction Manual, VPC-S600 - Page 5
a well-ventilated place. Do not leave the camera in places where the temperature may rise significantly, such as inside a car. This might adversely affect the case or the parts inside, resulting in fire. Before you move the camera, disconnect cords and cables. Failure to do this might damage cords - Sanyo VPC S6 | Instruction Manual, VPC-S600 - Page 6
has been tested and found to comply with the limits for a Class B digital device, pursuant to Part 15 of the FCC Rules. These limits are designated frequency energy and, if not installed and used in accordance with instructions, may cause harmful interference to radio communications. However, there - Sanyo VPC S6 | Instruction Manual, VPC-S600 - Page 7
products. Please help up to conserve the environment we live in! Symbols used in this manual Points giving some extended instructions or special points to pay attention to. You many find the answers to questions or problems concerning camera operation in the section "TROUBLESHOOTING GUIDE". EN-6 - Sanyo VPC S6 | Instruction Manual, VPC-S600 - Page 8
FOR HOME OR OFFICE USE Declaration of Conformity Model number: VPC-S600 Trade Name: SANYO Responsible party: SANYO FISHER COMPANY Address: 21605 Plummer Street, Chatsworth, California 91311 operation. Canadian ICES-003 information This class B digital apparatus complies with Canadian ICES-003. EN-7 - Sanyo VPC S6 | Instruction Manual, VPC-S600 - Page 9
battery, carefully read and strictly observe the Safety Instructions and the notes described below: „ Different battery not be using the batteries for an extended period of time, remove them from the camera to prevent leakage or corrosion. „ Never use batteries of different types (together) or - Sanyo VPC S6 | Instruction Manual, VPC-S600 - Page 10
13 Front View ...13 Rear View ...14 LCD Monitor Information ...15 PREPARING THE CAMERA ...18 Installing the Batteries ...18 Inserting and Removing an SD/SDHC Memory Card (Optional Accessory 19 Attaching the Camera Strap ...20 LED Indicators and Self-timer Indicators ...20 GETTING STARTED ...21 - Sanyo VPC S6 | Instruction Manual, VPC-S600 - Page 11
movie clips ...51 EDITING SOFTWARE INSTALLATION 52 Installing Photo Explorer ...52 Installing Photo Express ...53 Installing Cool 360 ...54 MENU OPTIONS ...55 Camera Menu ...55 Movie Menu ...59 Playback Menu ...60 Setup Menu ...62 SPECIFICATIONS ...65 TROUBLESHOOTING GUIDE ...67 POSSIBLE NUMBER OF - Sanyo VPC S6 | Instruction Manual, VPC-S600 - Page 12
purchasing the new digital still camera! Equipped with a 6.0 Megapixels CCD sensor, your camera delivers high quality, 2816 x 2112 resolution images. Other features provided by the camera include the following: „ 6.0 Megapixels A high-resolution CCD sensor provides 6.0 megapixels for high quality - Sanyo VPC S6 | Instruction Manual, VPC-S600 - Page 13
missing or if you find any mismatch or damage, promptly contact your dealer. Common Product Components: „ Digital Camera „ User's Manual „ User's Quick Guide „ Software CD-ROM „ Camera Strap „ Camera Pouch „ USB Cable „ Video Cable „ Batteries • Accessories and components may vary by retailer. EN-12 - Sanyo VPC S6 | Instruction Manual, VPC-S600 - Page 14
GETTING TO KNOW YOUR CAMERA Front View 1 2 3 4 5 1. Shutter release button 2. Mode dial 3. Power switch 4. Flash 6 8 7 5. Self-timer LED 6. PC / Video terminal 7. Lens 8. Microphone EN-13 - Sanyo VPC S6 | Instruction Manual, VPC-S600 - Page 15
Rear View 1 2 14 13 1. LED indicator 2. / Zoom in (telephoto) button / Zoom out (wide-angle) button 3. Playback button 4. Strap holder 5. Arrow button (Up) Self-timer button 6. Arrow button (Right) Focus 3 4 5 6 7 8 9 10 11 12 7. button 8. Arrow button (Down) Exposure - Sanyo VPC S6 | Instruction Manual, VPC-S600 - Page 16
LCD Monitor Information „ Camera Mode 1. Mode indication [ ] Program Mode [ ] Portrait Mode [ ] Panorama Mode [ ] Sport Mode ] Macro [ ] Infinity 5. Possible number of shots 6. Memory status : Built-in memory (without card) : SD/SDHC memory card 7. Battery [ ] Full battery power [ ] Medium - Sanyo VPC S6 | Instruction Manual, VPC-S600 - Page 17
status 5. Battery power indicator 6. Focus area 7. Zoom bar „ Image Playback 1. Playback mode 2. Number of image 3. Memory status 4. Battery power indicator 5. Index number of total number 6. DPOF indicator 7. Protect indicator 8. Date 9. Time 10. Aperture 11. Shutter speed 12. EV compensation - Sanyo VPC S6 | Instruction Manual, VPC-S600 - Page 18
„ Movie Playback 1. Playback mode 2. Movie mode 3. Number of movie 4. Memory status 5. Battery power indicator 6. Index number of total number 7. Elapsed time 8. Date 9. Time 10. Play/Pause indicator 12 10 3 4 100-0001 00:00:05 5 1/7 6 7 01/01/2006 8 12:01 9 EN-17 - Sanyo VPC S6 | Instruction Manual, VPC-S600 - Page 19
You can use 2 AA size batteries (Ni-MH rechargeable or alkaline) to power the camera. Make sure that the power of the digital camera is off before inserting or removing the batteries. 1. Make sure the camera is turned off. 2. Open the battery cover. 3. Insert the batteries in the correct orientation - Sanyo VPC S6 | Instruction Manual, VPC-S600 - Page 20
card and it will eject. • Be sure to format an SD/SDHC memory card with this digital camera before using it. Refer to section in the manual titled "Formatting an SD/SDHC Memory Card or Internal Memory" for further details. • To prevent valuable data from being accidentally erased from an SD/SDHC - Sanyo VPC S6 | Instruction Manual, VPC-S600 - Page 21
LED indicator LED indicator LED indicator Self-timer indicator State Solid green Blinking red and green Blinking red and green Blinking blue Description/Activity The digital camera is on. USB transfer in progress Charging the flash. The self-timer function is activated. EN-20 - Sanyo VPC S6 | Instruction Manual, VPC-S600 - Page 22
the Power On/Off „ Press the power switch until the digital camera turns on. „ To turn the power off, press the below to choose the desired language. 1. Rotate the mode dial to power switch. and turn your camera on by pressing the 2. [Set-up1] is displayed. 3. Use the four-way controller (T) to - Sanyo VPC S6 | Instruction Manual, VPC-S600 - Page 23
Date and Time Follow the steps below to set the date display style, current date and time. 1. Rotate the mode dial to and turn your camera on by pressing the power switch. 2. [Set-up1] is displayed. 3. Use the four-way controller (T) to select [Date & Time], then press the button. Set-up1 - Sanyo VPC S6 | Instruction Manual, VPC-S600 - Page 24
data on the SD/SDHC memory card will be erased. Protected images are also erased. • To format the internal memory, do not insert an SD/SDHC memory card into the camera. Otherwise, you will format the SD/SDHC memory card. • An SD/SDHC memory card having any problem cannot be properly formatted. EN - Sanyo VPC S6 | Instruction Manual, VPC-S600 - Page 25
Using the LCD Monitor Your camera is equipped with a 2.4" full color TFT LCD monitor to help you compose images, This is especially important when you are shooting under low lighting conditions, since your camera may decelerate the shutter speed to ensure your images are properly exposed. EN-24 - Sanyo VPC S6 | Instruction Manual, VPC-S600 - Page 26
frame. 3. Press the shutter release button down halfway to focus the image. „ When you press the shutter release button down halfway, the camera's Auto Focus feature automatically focuses the image. The focus frame turns green if the subject is in focus. Proper exposure is determined and locked at - Sanyo VPC S6 | Instruction Manual, VPC-S600 - Page 27
the ISO, EV, and White Balance to be set manually. 2. Portrait Select this mode to make people stand out series of shots then stitch them together with software to make a single photo. 4. Sports Select 6. Setup Select this mode to adjust the camera settings. 7. Video Select this mode to - Sanyo VPC S6 | Instruction Manual, VPC-S600 - Page 28
it easier to take a series of shots then stitch them together with software to make a single photo. You can capture a photographic subject that won „ The next image appears beside the previous image. 3. Orient the camera so that the second frame overlaps a small portion of the photographic subject - Sanyo VPC S6 | Instruction Manual, VPC-S600 - Page 29
you get to know the digital camera, you can set the image resolution (number of vertical and horizontal pixels) and image quality (compression ratio) based on the types of images you want to shoot.These settings affect the number of images that can be stored in the internal memory, or on an SD - Sanyo VPC S6 | Instruction Manual, VPC-S600 - Page 30
the Zoom Function This camera is equipped with 3x optical zoom. The lens moves during the optical camera reaches its maximum optical zoom factor (3x) and the zoom bar is within the digital zoom area. You can enlarge the subject to a maximum magnification equivalent to 12 times. A useful feature - Sanyo VPC S6 | Instruction Manual, VPC-S600 - Page 31
four-way controller (ST). 4. Press the button to confirm the setting. 5. Compose your scene and press the shutter release button. Flash Mode Auto OK : The camera has four flash modes: Auto, Auto + Red-eye, Flash on and Flash off. The table below will help you to choose the appropriate flash mode - Sanyo VPC S6 | Instruction Manual, VPC-S600 - Page 32
setting. 5. Compose your scene and press the shutter release button. The camera has three focus modes: Standard, Macro and Infinity. The table below will -up images. When the lens is zoomed to its widest position you may focus objects as close as 6 cm (2.4"). When the lens is zoomed to its telephoto - Sanyo VPC S6 | Instruction Manual, VPC-S600 - Page 33
CAPTURE MODE Burst This mode is used for continuous shooting. 3 pictures are taken continuously once the shutter release button is pressed. Secure the camera to a tripod or place it on a stable surface. 1. Rotate the mode dial to , , , , , or . 2. Press the power switch to turn on the power. 3. - Sanyo VPC S6 | Instruction Manual, VPC-S600 - Page 34
Auto Bracket In this mode, the camera automatically changes the exposure within a set range to take three shots after you press the shutter release button once. Auto Bracket settings can be combined - Sanyo VPC S6 | Instruction Manual, VPC-S600 - Page 35
Self-timer 10+2 sec. Self-timer Description The image is captured about 2 seconds after the shutter is pressed. This mode is useful for preventing camera shake. The image is captured about 10 seconds after the shutter is pressed. This mode is suitable for the shots in which the photographer has - Sanyo VPC S6 | Instruction Manual, VPC-S600 - Page 36
Adjusting the Exposure (EV Compensation) You can manually adjust the exposure determined by the digital camera. Use this mode when the proper exposure cannot be obtained, for example, when the contrast (difference between bright and dark areas) between the subject and - Sanyo VPC S6 | Instruction Manual, VPC-S600 - Page 37
Setting White Balance This feature lets you make adjustments to compensate for different lighting types according to your shooting conditions. 1. Rotate the mode dial to , , , , or . 2. Press the power switch - Sanyo VPC S6 | Instruction Manual, VPC-S600 - Page 38
one. 1. Rotate the mode dial to , , , , , or and turn your camera on by pressing the power switch. 2. Press the button. „ The last recorded image in this manual titled "Setting the DPOF" for further details.) • If there is no image stored in the internal memory or on the SD/SDHC memory card, [No - Sanyo VPC S6 | Instruction Manual, VPC-S600 - Page 39
Magnifying Images While reviewing your images, you may enlarge a selected portion of an image. This magnification allows you to view fine details. The zoom factor displayed on the screen - Sanyo VPC S6 | Instruction Manual, VPC-S600 - Page 40
movie clips, the movie mode icon will be displayed. „ For protected images/movie clips, mark will be displayed. (Refer to the section in this manual titled "Protecting Images/Movie Clips" for further details.) 3. Use the four-way controller (STWX) to move the cursor to select the image to be - Sanyo VPC S6 | Instruction Manual, VPC-S600 - Page 41
Display The slideshow function enables you to play your images back automatically in sequential order. This is very useful and entertaining feature for reviewing recorded images and for presentations. 1. Press the button. „ The last recorded image appears on the LCD monitor screen. 2. Press the - Sanyo VPC S6 | Instruction Manual, VPC-S600 - Page 42
Resizing an Image You can change the image size of a captured image to one of the following sizes: 2304 x 1728 pixel, 1600 x 1200 pixel and 640 x 480 pixel. 1. Press the button. „ The last recorded image appears on the LCD monitor screen. 2. In the mode, use the four-way controller (WX) to select - Sanyo VPC S6 | Instruction Manual, VPC-S600 - Page 43
via built-in microphone. 1. Rotate the mode dial to and turn your camera on by pressing the power switch. 2. Press the shutter release button to ) can be activated before you start recording the movie clips • The digital zoom function can be activated before and during the recording. • Pressing the - Sanyo VPC S6 | Instruction Manual, VPC-S600 - Page 44
Playing Back Movie Clips You can play back the recorded movie clips on the LCD monitor screen. However, the sound recorded with movie clips can only be played back on a computer. 1. Press the button. 2. Use the four-way controller (WX) to go through the images until the movie clip you want to play - Sanyo VPC S6 | Instruction Manual, VPC-S600 - Page 45
the video output system of the video equipment you are going to connect to the digital camera, then turn off all devices to be connected. 1. Connect one end of the Video cable to the Video terminal of the digital camera. 2. Connect the other end to the Video input socket of the TV set. 3. Turn the - Sanyo VPC S6 | Instruction Manual, VPC-S600 - Page 46
card or the internal memory. Please note that the deleted images or movie clips cannot be recovered. Exercise caution before deleting a file. 1. Rotate the mode dial to , , , , , or and turn your camera on by pressing the power switch. 2. Press the button. „ The last recorded image/movie clip - Sanyo VPC S6 | Instruction Manual, VPC-S600 - Page 47
Protecting Images/Movie Clips Set the data to read-only to prevent images from being erased by mistake. 1. Press the button. „ The last recorded image appears on the LCD monitor screen. 2. In the mode, use the four-way controller (WX) to select the desired images. „ To view the previous image, - Sanyo VPC S6 | Instruction Manual, VPC-S600 - Page 48
Setting the DPOF DPOF (Digital Print Order Format) allows you to embed printing information on your SD/SDHC memory card. By using DPOF, you can select an image to be printed and then specify how many prints or which image you would like. Take your SD/SDHC memory card to a DPOF enabled printer that - Sanyo VPC S6 | Instruction Manual, VPC-S600 - Page 49
DPOF One Image All Images Reset All Cancel : Select : • Before you perform the DPOF settings on your camera, always remember to copy your images from the internal memory to an SD/SDHC memory card first. • The print icon will appear on the LCD monitor screen indicating images selected for printing - Sanyo VPC S6 | Instruction Manual, VPC-S600 - Page 50
TRANSFERRING RECORDED IMAGES AND VIDEOS TO YOUR COMPUTER System Requirements (Windows) „ Pentium III 600 MHz or higher „ Windows 2000/XP/Vista „ 64MB RAM „ 128MB hard disk space „ CD-ROM drive „ Available USB port System Requirements (Macintosh) „ PowerPC G3/G4 „ OS 9.0 or later „ 64MB RAM „ 128MB - Sanyo VPC S6 | Instruction Manual, VPC-S600 - Page 51
Connect the digital camera to your computer 1. Rotate the mode dial to and turn your camera on by pressing the power then press the button. 5. Turn off your camera. 6. Connect your camera and the computer via the supplied USB cable. 7. Turn your camera on by pressing the power switch. 8. There - Sanyo VPC S6 | Instruction Manual, VPC-S600 - Page 52
the "untitled" disk icon, and the destination location on your hard disk. Drag and drop from the digital camera to the desired destination. • Memory card users may prefer to use a memory card reader (highly recommended). • Video playback application is not included with the package. Make sure that - Sanyo VPC S6 | Instruction Manual, VPC-S600 - Page 53
owners of digital cameras, WebCams, DV camcorders, scanners, or anyone who strives to effectively organize a large collection of digital media. 1. Insert the enclosed CD-ROM into your CD-ROM drive. 2. When the welcome screen appears, click "Photo Explorer 8.0". Follow the on-screen instructions to - Sanyo VPC S6 | Instruction Manual, VPC-S600 - Page 54
software for digital images. The step-by-step workflow, visual program interface, and in-program help assist users in creating exciting photo projects. Acquire digital photos effortlessly from digital cameras instructions to supported on Mac. • Photo Express is not supported on Windows Vista. EN-53 - Sanyo VPC S6 | Instruction Manual, VPC-S600 - Page 55
-ROM drive. 2. When the welcome screen appears, click "Cool 360". Follow the on-screen instructions to complete the installation. • For more information about the operation of Cool 360 application software, refer to its respective help documentation. • For Windows 2000/XP users, please make sure to - Sanyo VPC S6 | Instruction Manual, VPC-S600 - Page 56
Digital Zoom Quick View Mode3 On Off Return : Mode1 Mode2 Color Sharpness Saturation Date Imprint Return : Mode3 Medium Medium Off 1. Rotate the mode dial to , , , , , or and turn your camera the section in this manual titled "Setting Image Resolution and Quality" for further details. - Sanyo VPC S6 | Instruction Manual, VPC-S600 - Page 57
rate) at which the image is captured. Refer to the section in this manual titled "Setting Image Resolution and Quality" for further details. Fine Normal Economy „ for further details. Quality Refer to the section in this manual titled "Setting Image Resolution and Quality" for further details. - Sanyo VPC S6 | Instruction Manual, VPC-S600 - Page 58
/ 64 / 100 / 200 / 400 „ Mode2 settings Item Metering Digital Zoom Functional Description You can select the metering mode that sets which part . This sets whether or not to use digital zoom at the time of shooting. Refer to the section in this manual titled "Using the Zoom Function" for further - Sanyo VPC S6 | Instruction Manual, VPC-S600 - Page 59
Sets the level of image sharpness. High Medium Low Saturation To capture an image, your camera offers you three different degrees of color to match with your preference. Your images will the captured picture. When images are shot with date imprint feature, the date cannot be removed later. EN-58 - Sanyo VPC S6 | Instruction Manual, VPC-S600 - Page 60
Movie Menu This menu is for the basic settings to be used when recording movie clips. Video Color Digital Zoom On Return : Select : 1. Rotate the mode dial to and turn your camera on. 2. Press the MENU button. 3. Press the four-way controller (ST) to select the option item. Then press the - Sanyo VPC S6 | Instruction Manual, VPC-S600 - Page 61
images in order with a selected interval time. This function is useful for checking your images or for presentations, etc. Refer to the section in this manual titled "Slideshow Display" for further details. 3 Sec. / 5 Sec. / 10 Sec. EN-60 - Sanyo VPC S6 | Instruction Manual, VPC-S600 - Page 62
to prevent images from being erased by mistake. Refer to the section in this manual titled "Protecting Images/Movie Clips" for further details. DPOF Allows you to you to copy your files from the digital camera's internal memory to an SD/SDHC memory card. You can only do this if you have an SD - Sanyo VPC S6 | Instruction Manual, VPC-S600 - Page 63
all images and reformats the SD/SDHC memory card loaded in your camera. Protected images are also erased. SD/SDHC memory card cannot be formatted if it is write-protected. Refer to the section in this manual titled "Formatting an SD/SDHC Memory Card or Internal Memory" for further details. This sets - Sanyo VPC S6 | Instruction Manual, VPC-S600 - Page 64
displayed on the LCD monitor screen. Refer to the section in this manual titled "Choosing the Screen Language" for further details. „ Set-up2 a specific period of time, the power to the camera is Down automatically turned off. This feature is useful to reduce battery wear. 2 Min. / 3 Min. - Sanyo VPC S6 | Instruction Manual, VPC-S600 - Page 65
0001. If you want to reset the file number, be sure that no images are recorded in the internal memory or the SD/SDHC memory card. Returns all basic settings to the digital camera's default settings. The time setting will not be reset. Version This displays the current firmware version of the - Sanyo VPC S6 | Instruction Manual, VPC-S600 - Page 66
Still image: Fine / Normal / Economy Movie image: QVGA Recording media Approx. 16MB internal memory SD/SDHC memory card (Optional, up to 4 GB) File format JPEG (Exif 2.2), DCF, Motion JPEG (AVI) Lens F-no.: Wide: 2.8 / Tele: 4.8 Focal length: 5.5mm~16.5mm (equivalent to 34~102mm) Focus - Sanyo VPC S6 | Instruction Manual, VPC-S600 - Page 67
Item White balance ISO Interface Power Dimension Weight Description Auto, Daylight, Cloudy, Tungsten, Fluorescent Auto, 64, 100, 200, 400 PC/Video terminal 2 x AA (Ni-MH rechargeable or alkaline) batteries Approx. 87 x 60 x - Sanyo VPC S6 | Instruction Manual, VPC-S600 - Page 68
TROUBLESHOOTING GUIDE Symptom Possible causes Solutions / Corrective memory card with available space or memory or SD/SDHC memory delete unwanted images. card is full. Cannot transfer files over a USB connection. * USB cable is not connected securely. * USB driver is not installed. * Camera - Sanyo VPC S6 | Instruction Manual, VPC-S600 - Page 69
Recording Time The table below indicates the approximate duration of recording time depending on the capacity of the internal memory and the SD/SDHC memory card. Image size Internal Memory 64MB SD/SDHC Memory Card 128MB 256MB 512MB 1GB 2GB 4GB (SDHC) 320 x 240 00:00:18 00:01:23 00:02:49 - Sanyo VPC S6 | Instruction Manual, VPC-S600 - Page 70
camera directly to a printer that supports PictBridge to perform image selection and printing using the camera screen and controls. DPOF support select [PictBridge], then press the button. 4. Connect your camera and the printer via a supplied USB cable. „ The message "One moment" will appear on - Sanyo VPC S6 | Instruction Manual, VPC-S600 - Page 71
Step 2 3 4 5 Figure 100-0008 Select : Cancel : Print : Set : Print Info Quantity Date File Name 10 With With Cancel : Select : 100-0008 Select : Cancel : Print : Set : Print Paper Size Standard Borderless Standard Cancel : Total 3 OK : Procedure Use the four-way controller (WX) to - Sanyo VPC S6 | Instruction Manual, VPC-S600 - Page 72
with PictBridge. Step 1 Figure Printing Mode Select Print Print All Print With DPOF Procedure If you wish to print all the images stored in the camera, you may choose [Print All] in [Printing Mode Select]. OK : 2 To set Print Settings, follow steps 2 to 6 in [Print] Mode. EN-71 - Sanyo VPC S6 | Instruction Manual, VPC-S600 - Page 73
„ In [Print With DPOF] Mode: This function only lets you print the specified image based on the previous DPOF settings. Step 1 Figure Printing Mode Select Print Print All Print With DPOF Procedure If you wish to print images with DPOF setting, you may choose [Print With DPOF] in [Printing Mode
-
 1
1 -
 2
2 -
 3
3 -
 4
4 -
 5
5 -
 6
6 -
 7
7 -
8
-
9
-
10
-
11
-
12
-
13
-
14
-
15
-
16
-
17
-
18
-
19
-
20
-
21
-
22
-
23
-
24
-
25
-
26
-
27
-
28
-
29
-
30
-
31
-
32
-
33
-
34
-
35
-
36
-
37
-
38
-
39
-
40
-
41
-
42
-
43
-
44
-
45
-
46
-
47
-
48
-
49
-
50
-
51
-
52
-
53
-
54
-
55
-
56
-
57
-
58
-
59
-
60
-
61
-
62
-
63
-
64
-
65
-
66
-
67
-
68
-
69
-
70
-
71
-
72
-
73
 |
 |
VPC-S600
6 Mega Pixel Digital Camera