Schwinn Airdyne Windjammer Owner's Manual - Page 3
Operation - upper body exerciser
 |
View all Schwinn Airdyne Windjammer manuals
Add to My Manuals
Save this manual to your list of manuals |
Page 3 highlights
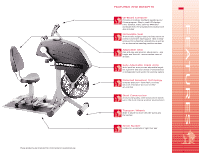
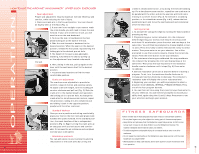
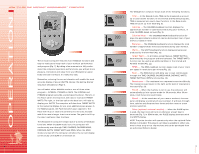
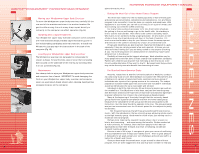
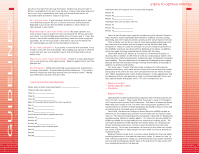
HOW TO USE THE AIRDYNE® WINDJAMMER™ UPPER BODY EXERCISER OPERATION s Seat adjustment Proper seat adjustment ensures maximum exercise efficiency and comfort, while reducing the risk of injury. 1. Place one crank arm in the forward position. Your arm should be slightly bent at the elbow (Fig. 1). 2. If your arm is too straight or you cannot reach FIG.1 the crank handle, you will need to move the seat forward. If your arm is bent too much, you will need to move the seat backward. 3. To move the seat, sit and depress the foot pedal locking pin at the base of the seat. 4. Slide the seat forward or backward to the desired position. When the seat is in the desired position, release the foot pedal, repositioning the locking pin in the desired, pre-set hole. 5. The height of the seat is also adjustable. Standing, fully elevate the seat by pulling up on the adjustment lever located underneath the seat. 6. Then, sitting in the seat, pull up again on the FIG.2 lever until the seat lowers itself to the desired position. 7. Try several seat locations to find the most comfortable position. FIG.3 s Crank arm adjustment The crank arms are adjustable to provide for comfort, range of motion and exercise variety. To adjust crank arm length, turn the locking pin counter-clockwise and pull out (Fig. 2). Slide the crank arm to the desired length and reposition the locking pin in a pre-set hole. To change the crank arms for simultaneous arm motion, repeat this procedure, sliding the arm completely out and sliding it back in the opposite position, parallel with the other crank arm. s Standard Workout Once you are in position and sitting comfortably, place your feet on the foot rests and grasp crank handles with palms forward. In the standard position, the crank handles will be in independent positions (Fig. 1). Begin turning the crank arms at an easy pace until you feel secure and comfortable. To increase the air resistance and workload, increase your crank speed. s Alternative workouts You can add variety to your workout by altering the position of the crank arms by turning the 4 FIG.4 cranks in a backwards motion, or by doing the exercise standing up. For a simultaneous arm motion, reposition one crank arm to be parallel with the other and do the exercise with both arms moving in a uniform motion (Fig. 3). To exercise in a standing position, or for wheelchair access (Fig. 4 & 5), release the foot pedal locking pin and move the seat backward and completely off of the seat track. FIG.5 FIG.6 s Getting started 1. To activate the computer, begin by turning the hand cranks or pressing any key. 2. Programming your current elevation into the computer before beginning your workout will ensure a more accurate work level. To set elevation, press the enter and race keys at the same time. You will then be prompted to choose English or metric units. Press the (+) key to select feet and the (-) key to select meters. Then press enter to set your selection. You will be prompted to use the (+) and (-) keys to choose the correct elevation. Press the enter button to set your selection. 3. The resistance is factory pre-calibrated. You may recalibrate the computer by pressing the enter and manual keys at the same time. Then press the race key and turn the resistance handle counter-clockwise until it stops (Fig. 6). Press enter to calibrate. 4. Exercise resistance can be set at any time before or during a program. To set, turn the resistance handle clockwise to increase and counter-clockwise to decrease. The computer's resistance scale will display the current resistance level. 5. Beginning your workout, you will be prompted to select a program mode (MANUAL, INTERVAL, PYRAMID OR RACE). Press one of the four program buttons. 6. You can then set time using the (+) and (-) keys. Press enter to set your selection. You will then be prompted to choose your ability level, again using the (+) and (-) keys. Press enter to set your selection and begin your workout. FITNESS SAFEGUARDS Failure to follow any of these safeguards may result in injury or serious health problems. • Do not place fingers or any other objects into moving parts of the exercise equipment • Keep children and pets away from the Windjammer upper body exerciser. A child's curiosi- ty may result in injury. Do not allow children to use the Windjammer Exerciser. The machine is designed and intended for adults, not children. • To avoid entanglement and possible injury, do not expose hands or arms to the drive mechanism. • Do not release the crank handles on the Windjammer upper body exerciser until the crank handles are at a complete STOP. • Warn bystanders to keep a safe distance. Do not allow anyone to touch the exerciser while it is in operation. 5
-
 1
1 -
 2
2 -
 3
3 -
 4
4 -
 5
5 -
 6
6 -
 7
7 -
 8
8 -
 9
9 -
10
 |
 |
