Schwinn IC Pro Indoor Cycling Bike Owner's Manual - Page 9
Handlebar adjustment, Foot positioning/pedal strap adjustment, Lower body workout, Upper body - fit
 |
View all Schwinn IC Pro Indoor Cycling Bike manuals
Add to My Manuals
Save this manual to your list of manuals |
Page 9 highlights
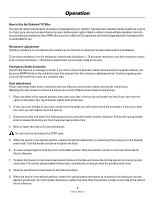
Operation Handlebar adjustment The handlebars may be adjusted to more accurately simulate the upper body position of road cycling. Raise or lower the handlebars for a more efficient, comfortable ride. 1. To raise or lower the handlebars, loosen the locking pop pin. Pull out the spring-loaded release knob. This releases the locking pin from the preset handlebar position hole. 2. Raise or lower the handlebars to the desired position. Do not raise the handlebar above the STOP mark. 3. When the handlebars are in the desired position, release the spring-loaded knob re-positioning the locking pin in the desired, preset hole. Turn the handle clockwise to tighten the knob. 4. Try several handlebar settings to find the most comfortable position. Note the position number on the side of the tube for future reference. Foot positioning/pedal strap adjustment Place the ball of each foot in the toe clip until the front of the shoe fits snugly in the toe clip cage. Rotate one foot to within arm's reach, then tighten the webbed cloth strap of the toe clip around your shoe by pulling up on the strap. Pull up on the strap until the cage of the toe clip fits snugly around the shoe. Repeat for the other foot. Point your toes and knees directly forward to ensure maximum pedal efficiency. Lower body workout Once you are in position and sitting comfortably, slowly begin pedaling, with your hands resting comfortably on the handlebars. Pedal casually and rhythmically at a low resistance level until you feel secure and comfortable. As you feel more and more comfortable, experiment with seat positions and resistance levels. Upper body positioning For added enjoyment, comfort and variety during your workout, experiment with moving your hands to various positions on the handlebars. • Do not attempt to ride this bike at high RPMs or in a standing position until you have practiced and are comfortable riding at slower RPMs. • After exercising, turn the adjustment control knob clockwise (+) to increase tension so the pedals will not rotate freely and possibly hurt someone. 9 Owner's Manual
-
 1
1 -
2
-
3
-
 4
4 -
 5
5 -
 6
6 -
 7
7 -
 8
8 -
 9
9 -
 10
10 -
 11
11 -
 12
12 -
 13
13 -
 14
14 -
15
-
16
 |
 |