Schwinn Journey 8.0 Treadmill Assembly and Owner's Manual - Page 10
Tools, Before Assembly
 |
View all Schwinn Journey 8.0 Treadmill manuals
Add to My Manuals
Save this manual to your list of manuals |
Page 10 highlights
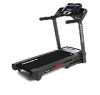
HARDWARE / TOOLs / BEFORE ASSEMBLY A B C D E F Item Qty Description A 4 Socket Head Hex Screw, M8x50 B 8 Socket Head Hex Screw, M8x16 C 2 Phillips Head Screw, M5x14 Item Qty Description D 10 Self Tapping Screw, M4.2x16 E 12 Lock Washer, M8 F 12 Flat Washer, M8 Tools Included Not Included #2 6 mm (recommended) 6 mm Before Assembly Select the area where you are going to set up and operate your machine. For safe operation, the location must be on a hard, level surface. Allow a workout area of a minimum 83.2" x 151.2" (211.3 cm x 384 cm). Be sure that the workout space you are utilizing has adequate height clearance, taking into consideration the height of the user and the maximum incline of the machine. Basic Assembly Tips Follow these basic points when you assemble your machine: • Read and understand the "Important Safety Instructions" before assembly. • Collect all the pieces necessary for each assembly step. • Using the recommended wrenches, turn the bolts and nuts to the right (clockwise) to tighten, and the left (counterclock- wise) to loosen, unless instructed otherwise. • When attaching 2 pieces, lightly lift and look through the bolt holes to help insert the bolt through the holes. • The assembly can require 2 people. 10
-
 1
1 -
2
-
3
-
4
-
 5
5 -
 6
6 -
 7
7 -
 8
8 -
 9
9 -
 10
10 -
 11
11 -
 12
12 -
 13
13 -
 14
14 -
 15
15 -
16
-
17
-
18
-
19
-
20
-
21
-
22
-
23
-
24
-
25
-
26
-
27
-
28
-
29
-
30
-
31
-
32
-
33
-
34
-
35
-
36
-
37
-
38
-
39
-
40
-
41
-
42
-
43
-
44
-
45
-
46
-
47
-
48
-
49
-
50
 |
 |
