Seagate Business Storage 4-Bay NAS Business Storage 4 Bay NAS Quick Start Guid
Seagate Business Storage 4-Bay NAS Manual
 |
View all Seagate Business Storage 4-Bay NAS manuals
Add to My Manuals
Save this manual to your list of manuals |
Seagate Business Storage 4-Bay NAS manual content summary:
- Seagate Business Storage 4-Bay NAS | Business Storage 4 Bay NAS Quick Start Guid - Page 1
START GUIDE 3 manually by clicking Start and then Run (Windows). Type d:\setup.exe when the Run dialog box displays (where "d" is the drive letter of your computer's CD drive). For Windows 7, click Start > Computer > Devices with Removable Storage > BlackArmor. b. Follow the on-screen instructions - Seagate Business Storage 4-Bay NAS | Business Storage 4 Bay NAS Quick Start Guid - Page 2
event messages that appear when a problem occurs. Use the buttons on the . If you have more questions, review the Help and documentation provided with Support pages for assistance with: • Installation: Additional instructions and troubleshooting assistance • Warranty Information To contact support
-
 1
1 -
 2
2
 |
 |
3
1
2
4
4 Bay PANAM
NAS 4 Bay PANAM
Part Number: 100710043
Folded Size: 120mm W x 150mm H
Trim Size: mm 240W X 450mm H
Colors: 2C/2C
NAS Blue
K
Business
Storage
COVER
Business
Storage
COVER
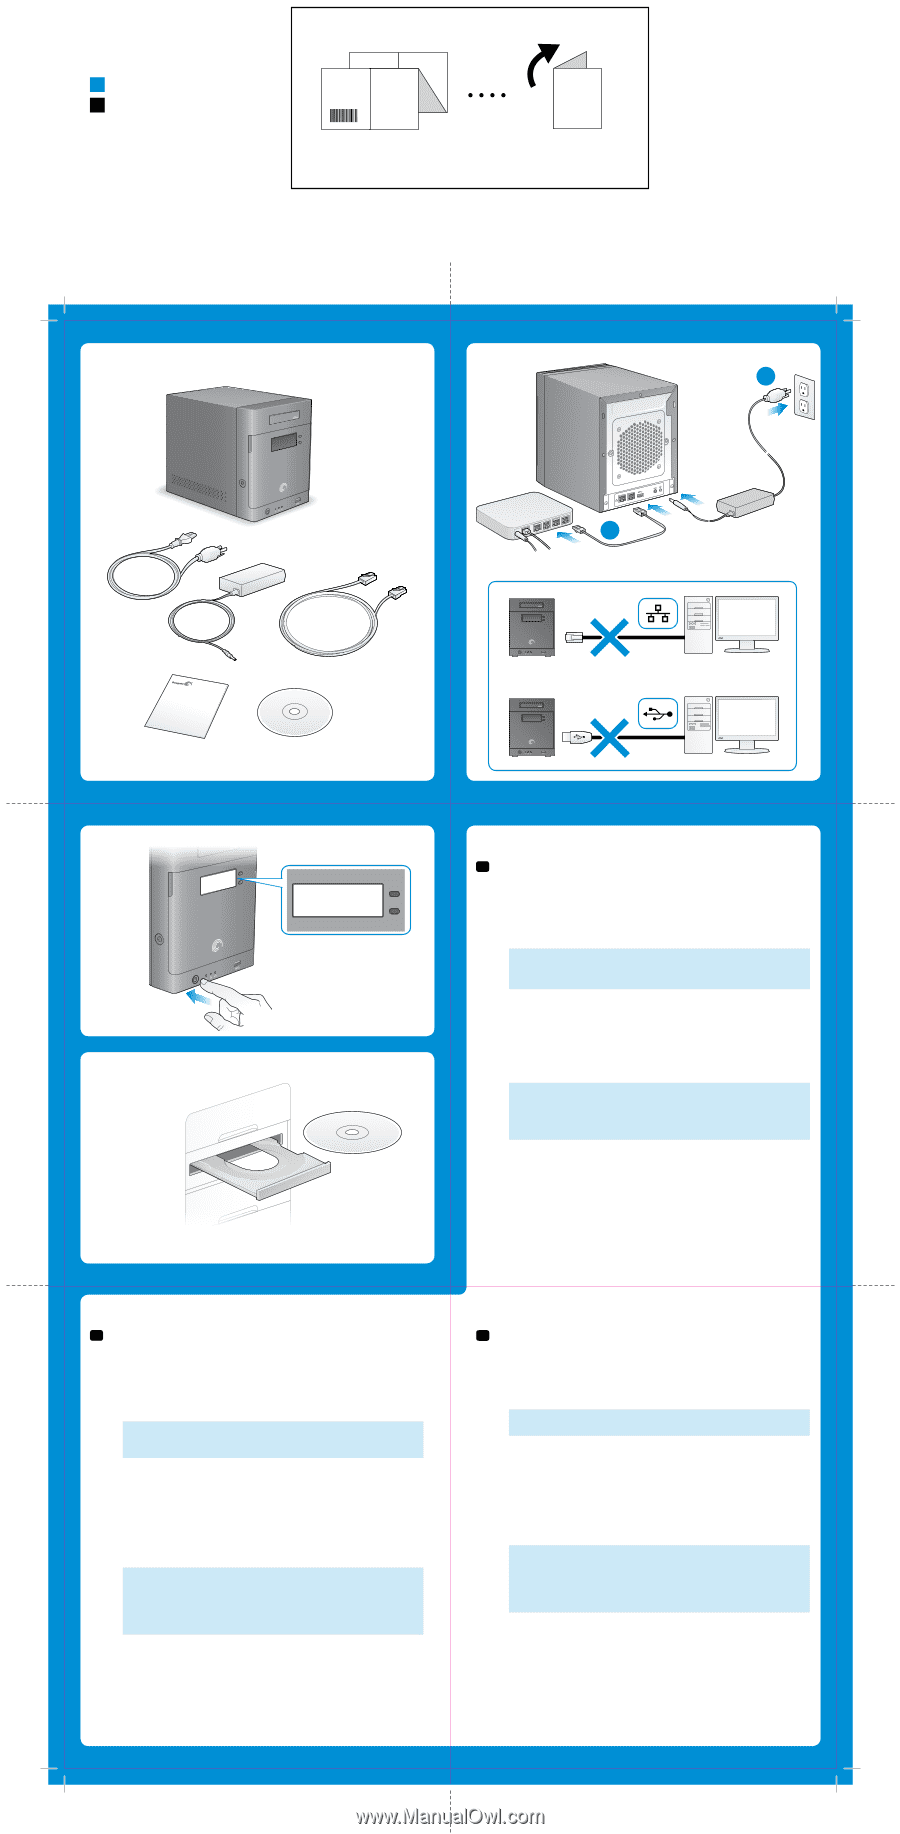
1. Unpack the box.
2. Connect the Seagate NAS.
a. Connect the Ethernet cable from the Seagate NAS to
your router.
b. Connect the power adapter from the Seagate NAS to a
power outlet.
NOTE:
Do not connect the Seagate NAS directly to your
computer; connect the computer through a router to the
Seagate NAS.
3. Press the power button on the NAS. Wait for the LCD screen on
the front panel to display the message “Seagate BlackArmor”. This
may take a couple of minutes.
4 Insert the DVD.
a.
Windows:
The installation wizard opens automatically.
Windows 7: Click
Run Setup.exe
in the AutoPlay window.
NOTE:
If the installation does not begin automatically, launch it manually
by clicking
Start
and then
Run
(Windows). Type
d:\setup.exe
when the
Run dialog box displays (where “d” is the drive letter of your computer’s
CD drive). For Windows 7, click
Start > Computer > Devices with
Removable Storage > BlackArmor
.
b. Follow the on-screen instructions to complete the installation.
Install both Discovery and Backup software unless you are
already using another backup software program.
c. Open Discovery by double-clicking the icon on your desktop
(Windows) or in your Applications folder (Mac).
EN
4-BAY NAS
Business
Storage
QUICK START GUIDE
a
b
Seagate BlackArmor
FR
1. Desembale la caja.
2. Conecte Seagate NAS.
a. Conecte el cable Ethernet desde Seagate NAS al enrutador.
b. Conecte el adaptador de corriente desde Seagate NAS a un
tomacorriente.
NOTA:
No conecte Seagate NAS directamente a la computadora;
conecte la computadora a Seagate NAS mediante un enrutador.
3. Presione el botón de encendido de NAS. Espere que la pantalla
LCD en el panel frontal muestre el mensaje “Seagate BlackArmor”.
Esto puede demorar algunos minutos.
4. Inserte el DVD.
a.
Windows:
El asistente de instalación se inicia
automáticamente. Windows 7: Haga clic en
Ejecutar Setup.
exe
en la ventana de Reproducción automática.
NOTA:
Si la instalación no comienza automáticamente, iníciela de forma
manual haciendo clic en
Inicio
y luego en
Ejecutar
(Windows). Cuando
aparezca el cuadro de diálogo de Ejecutar, escriba
d:\setup.exe
(la letra
de unidad “d” hace referencia a la unidad
de CD de la computadora).
Para Windows 7, haga clic en
Inicio > Equipo > Dispositivos con
almacenamiento extraíble > BlackArmor
.
b. Siga las instrucciones en pantalla para completar la instalación.
Instale los software Backup y Discovery a menos que esté
utilizando otro programa de software de copia de resguardo.
c. Para abrir el software Discovery, haga doble clic en el ícono de
su escritorio (Windows) o en la carpeta de Aplicaciones (Mac).
1. Déballez le produit.
2. Connectez le serveur NAS Seagate.
a. Connectez le câble Ethernet du serveur NAS Seagate à votre
routeur.
b. Branchez le cordon d’alimentation du serveur NAS Seagate sur
une prise de courant.
REMARQUE :
Ne connectez pas le serveur NAS Seagate directement à
votre ordinateur. Utilisez votre routeur comme intermédiaire entre votre
ordinateur et le serveur NAS.
3. Appuyez sur le bouton de marche/arrêt du serveur NAS. Attendez
que l’écran LCD du panneau avant affiche le message « Seagate
BlackArmor ». Cet affichage peut demander quelques minutes.
4. Insérez le DVD.
a.
Windows :
L’assistant d’installation s’ouvre automatiquement.
Sous Windows 7 : Sélectionnez
Exécuter Setup.exe
dans la
fenêtre Exécution automatique.
REMARQUE :
Si l’installation ne démarre pas automatiquement, lancez-
la manuellement en cliquant sur
Démarrer
, puis sur
Exécuter
(Windows).
Saisissez
d:\setup.exe
dans la boîte de dialogue Exécuter qui s’affiche
(« d » étant la lettre associée au lecteur de CD de votre ordinateur). Pour
Windows 7, cliquez sur
Démarrer > Ordinateur > Périphérique de
stockage amovible > BlackArmor
.
b. Suivez les instructions à l’écran pour réaliser l’installation.
Installez à la fois le logiciel Discovery et le logiciel Backup à moins
que vous n’utilisiez déjà un autre programme de sauvegarde.
c. Ouvrez Discovery en double-cliquant sur son icône sur le bureau
(Windows) ou dans le dossier Applications (Mac).
ES