Sennheiser ew 300 Instructions for Use - Page 51
Inserting and changing the battery, Switching the transmitter on/off, ON/OFF, Muting the transmitter
 |
View all Sennheiser ew 300 manuals
Add to My Manuals
Save this manual to your list of manuals |
Page 51 highlights
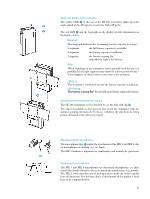
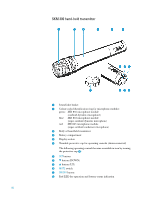
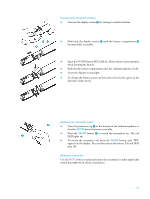
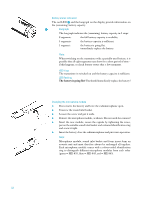
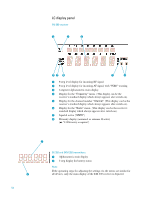
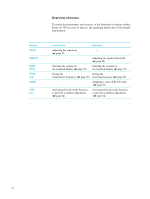
Inserting and changing the battery Ǡ Unscrew the display section ´ by turning it counter-clockwise. Ǡ Slide back the display section ´ until the battery compartment ¿ becomes fully accessible. Ǡ Insert the 9 V PP3 battery (IEC 6 LR 61). Please observe correct polarity when inserting the battery. Ǡ Push the the battery compartment into the radiomicrophone's body. Ǡ Screw the display section tight. Ǡ To change the battery, press out the battery from below (press in the direction of the arrow). Switching the transmitter on/off Ǡ Turn the protective cap ² at the bottom of the radiomicrophone so that the ON/OFF button becomes accessible. Ǡ Press the ON/OFF button ¸ to switch the transmitter on. The red LED lights up. Ǡ To switch the transmitter off, press the ON/OFF button until "OFF" appears on the display. You can then release the button. The red LED goes off. Muting the transmitter Use the MUTE switch to noiselessly mute the transmitter's audio signal (this switch does not switch off the transmitter). 51
-
 1
1 -
2
-
3
-
4
-
5
-
6
-
7
-
8
-
9
-
10
-
11
-
12
-
13
-
14
-
15
-
16
-
17
-
18
-
19
-
20
-
21
-
22
-
23
-
24
-
25
-
26
-
27
-
28
-
29
-
30
-
31
-
32
-
33
-
34
-
35
-
36
-
37
-
38
-
39
-
40
-
41
-
42
-
43
-
44
-
45
-
 46
46 -
 47
47 -
 48
48 -
 49
49 -
 50
50 -
 51
51 -
 52
52 -
 53
53 -
 54
54 -
 55
55 -
 56
56 -
57
-
58
-
59
-
60
-
61
-
62
-
63
-
64
-
65
-
66
-
67
-
68
-
69
-
70
-
71
-
72
-
73
-
74
-
75
-
76
-
77
-
78
-
79
-
80
-
81
-
82
-
83
-
84
-
85
-
86
-
87
-
88
-
89
-
90
-
91
-
92
-
93
-
94
-
95
-
96
-
97
-
98
-
99
-
100
-
101
-
102
-
103
-
104
-
105
-
106
-
107
-
108
-
109
-
110
-
111
-
112
-
113
-
114
-
115
-
116
-
117
-
118
-
119
-
120
-
121
-
122
-
123
-
124
-
125
-
126
-
127
-
128
-
129
-
130
-
131
-
132
-
133
-
134
-
135
-
136
-
137
-
138
-
139
-
140
-
141
-
142
-
143
-
144
-
145
-
146
-
147
-
148
-
149
-
150
-
151
-
152
-
153
-
154
-
155
-
156
-
157
-
158
-
159
-
160
-
161
-
162
-
163
-
164
-
165
-
166
-
167
-
168
-
169
-
170
-
171
-
172
-
173
-
174
-
175
-
176
-
177
-
178
-
179
-
180
-
181
-
182
-
183
-
184
-
185
-
186
-
187
-
188
-
189
-
190
-
191
-
192
-
193
-
194
-
195
-
196
-
197
-
198
-
199
-
200
-
201
-
202
-
203
-
204
-
205
-
206
-
207
-
208
-
209
-
210
-
211
-
212
-
213
-
214
-
215
-
216
-
217
-
218
-
219
-
220
-
221
-
222
-
223
-
224
 |
 |
