Sharp AL 1631 AL-1631 AL-1641CS Operation Manual - Page 23
Installing The Software - drive print
 |
UPC - 074000074651
View all Sharp AL 1631 manuals
Add to My Manuals
Save this manual to your list of manuals |
Page 23 highlights
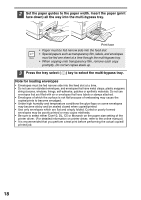
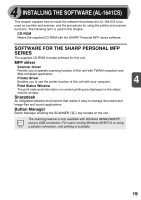
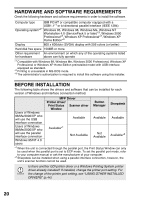
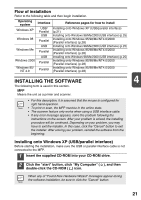
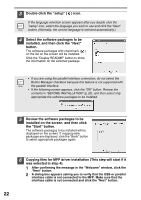
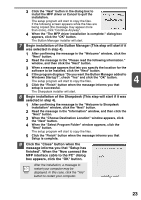
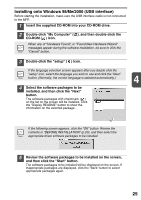
Flow of installation Refer to the following table and then begin installation. Operating system Windows XP Windows 98 Windows Me Windows 2000 Windows 95/ NT 4.0 Interface USB/ Parallel USB Parallel USB Parallel USB Parallel Parallel Reference pages for how to install Installing onto Windows XP (USB/parallel interface) (p.21) Installing onto Windows 98/Me/2000 (USB interface) (p.25) Installing onto Windows 95/98/Me/NT4.0/2000 (Parallel interface) (p.28) Installing onto Windows 98/Me/2000 (USB interface) (p.25) Installing onto Windows 95/98/Me/NT4.0/2000 (Parallel interface) (p.28) Installing onto Windows 98/Me/2000 (USB interface) (p.25) Installing onto Windows 95/98/Me/NT4.0/2000 (Parallel interface) (p.28) Installing onto Windows 95/98/Me/NT4.0/2000 (Parallel interface) (p.28) INSTALLING THE SOFTWARE 4 The following term is used in this section. MFP Means the unit as a printer and scanner. • For this description, it is assumed that the mouse is configured for right hand operation. • To print or scan, the MFP must be in the online state. • The scanner feature only works when using a USB interface cable. • If any error message appears, solve the problem following the instructions on the screen. After your problem is solved, the installing procedure will be continued. Depending on your problem, you may have to exit the installer. In this case, click the "Cancel" button to exit the installer. After solving your problem, reinstall the software from the beginning. Installing onto Windows XP (USB/parallel interface) Before starting the installation, make sure the USB or parallel interface cable is not connected to the MFP. 1 Insert the supplied CD-ROM into your CD-ROM drive. 2 Click the "start" button, click "My Computer" ( ), and then double-click the CD-ROM ( ) icon. When any of "Found New Hardware Wizard" messages appear during the software installation, be sure to click the "Cancel" button. 21
-
 1
1 -
2
-
3
-
4
-
5
-
6
-
7
-
8
-
9
-
10
-
11
-
12
-
13
-
14
-
15
-
16
-
17
-
 18
18 -
 19
19 -
 20
20 -
 21
21 -
 22
22 -
 23
23 -
 24
24 -
 25
25 -
 26
26 -
 27
27 -
 28
28 -
29
-
30
-
31
-
32
-
33
-
34
-
35
-
36
-
37
-
38
-
39
-
40
-
41
-
42
-
43
-
44
-
45
-
46
-
47
-
48
-
49
-
50
-
51
-
52
-
53
-
54
-
55
-
56
-
57
-
58
-
59
-
60
-
61
-
62
-
63
-
64
-
65
-
66
-
67
-
68
-
69
-
70
-
71
-
72
-
73
-
74
-
75
-
76
-
77
-
78
-
79
-
80
-
81
-
82
-
83
-
84
-
85
-
86
-
87
-
88
-
89
-
90
-
91
-
92
-
93
-
94
-
95
-
96
-
97
-
98
-
99
-
100
 |
 |