Sharp KB-0333K KB-0333K Operation Manual / Installation Instructions - Page 10
Operating
 |
View all Sharp KB-0333K manuals
Add to My Manuals
Save this manual to your list of manuals |
Page 10 highlights
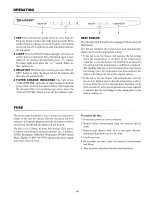
OPERATING 3 1 1 FAN There are four fan speeds from low (1) to high (4). Push any button to select one of the four fan speeds. Press another button to change fan speed. Push the same button to turn the fan off. A light above each fan button indicates the fan speed. 2 LIGHT Press the ON/OFF button and lights will come on at their previous light level. Press the button again to turn lights off. To increase the light level, press button. To reduce light level, press the button. There are three light levels. 3 DELAY OFF While the fan is running, press the "DELAY OFF" button to allow the fan to run for 10 minutes and then turn off automatically. 4 FILTER CHANGE INDICATOR The light above "CLEAN FILTER" will come on when it is time to clean the grease filters or check non-ducted filters. After replacing the cleaned filters (or installing new ones), press the "CLEAN FILTER" button to turn off the indicator light. 2 4 HEAT SENSOR Your Sharp Insight Range Hood is equipped with an advanced Heat Sensor. The Sensor monitors the temperature and automatically adjusts the fan to the appropriate setting. • If the fan is on, the Sensor will increase the fan setting when the temperature is elevated. If the temperature continues to rise, the Sensor will continue to increase the fan setting until the temperature is stabilized or reduced. The flashing light above the fan button shows the Sensor fan setting. Once the temperature has been reduced, the Sensor will change the fan to the original setting. • If the fan is off, the Sensor will automatically turn the fan on at its highest speed when the temperature is above normal. When this occurs, the light above fan button 4 will flash on and off. After the temperature has been reduced to normal, the fan will change to the setting prior to the Sensor coming on. FUSE The hood control contains a fuse to protect it from power surges. If the fuse has opened (blown), the green fan-level indicators will operate properly when the fan buttons/switches are pressed, but the fan and lights will not turn on. The fuse is a 5 x 20mm, 10 Amp, Fast-Acting, 125V (min.). Common manufacturer and part numbers are: Littlefuse, 217010; Bussmann, GMA10A; Wickmann, 1942100. Radio Shack, Digikey (1-800-344-4539), and most electronic supply stores have them in stock. To replace the fuse: 1. Disconnect power at service entrance. 2. Remove filters, bottom panel, light wire harness and air chute. 3. Remove and inspect fuse. If it is not open (blown), additional diagnostics need to be done. 4. Install new fuse. 5. Re-assemble air chute, light wire harness, bottom panel and filters. 6. Turn on power and check hood/control operation. 10
-
 1
1 -
2
-
3
-
4
-
 5
5 -
 6
6 -
 7
7 -
 8
8 -
 9
9 -
 10
10 -
 11
11 -
 12
12
 |
 |
