Sharp KB-0333KS KB-0333K Operation Manual / Installation Instructions - Page 7
Damper/Duct Connector, Pivot, top/back edge, Support Fin, Duct Knockouts, Plate, Metal, Strip,
 |
View all Sharp KB-0333KS manuals
Add to My Manuals
Save this manual to your list of manuals |
Page 7 highlights
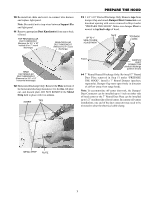
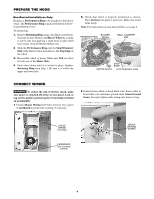
10 Re-install air chute and screw, re-connect wire harness and replace light panel. Note: Be careful not to trap wires between Support Fin and light panel. 11 Remove appropriate Duct Knockout(s) from top or back of hood. PREPARE THE HOOD 13 3 1⁄4" x 10" Ducted Discharge Only: Remove tape from damper flap and attach Damper/Duct Connector over knockout opening with screws removed in Step 4 under "PREPARE THE HOOD". Make sure damper Pivot is nearest to top/back edge of hood. 12 Horizontal Discharge Only: Remove the Plate in front of the horizontal discharge knockout. Cut the ties, lift plate out, and discard plate. DO NOT REMOVE the Metal Strip held in place with two screws. 14 7" Round Ducted Discharge Only: Re-install 7" Round Duct Plate removed in Step #1 under "PREPARE THE HOOD". Install a 7" Round Damper (purchase separately). Damper flap must open freely in direction of airflow (away from range hood). Note: To accommodate off-center ductwork, the Damper/ Duct Connector can be installed up to 1-inch on either side of hood center or the 7" Round Duct Plate can be installed up to 1⁄2" on either side of hood center. In extreme off-center installations, one end of the duct connector may need to be trimmed to clear the electrical cable clamp. 7
-
 1
1 -
 2
2 -
 3
3 -
 4
4 -
 5
5 -
 6
6 -
 7
7 -
 8
8 -
 9
9 -
 10
10 -
 11
11 -
 12
12
 |
 |
