Sharp MX-3111U MX-3111U Software Setup - Page 33
Changing to a Standard TCP/IP Port, Select [SC2 TCP/IP Port] and then click
 |
View all Sharp MX-3111U manuals
Add to My Manuals
Save this manual to your list of manuals |
Page 33 highlights
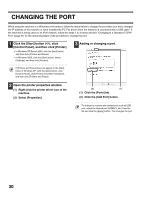
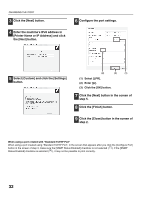
4 Select [SC2 TCP/IP Port] and then click the [New Port] button. CHANGING THE PORT 5 Create the new port. • The "SC2 TCP/IP Port" is added when the printer driver is installed using a "Custom installation" with "LPR Direct Print (Specify Address/Auto Search)" selected. • If the printer driver is installed using a "Custom installation" with "IPP" selected, the [SC-Print2005 Port] is added. If you need to change the printer port when the machine is connected to an intranet or a wide area network (WAN) using the IPP function, select [SC-Print2005 Port], click the [New Port] button, and follow the on-screen instructions to create the port again. (1) (2) (3) (4) (1) Enter the machine's IP address. ☞ Checking the IP address of the machine (page 7) (2) Make sure that [LPR] is selected. (3) Make sure that [lp] is entered. (4) Click the [OK] button. 6 Click the [Close] button in the screen of step 4. 7 Make sure the created printer port is selected in the printer properties window and then click the [Apply] button. X Changing to a Standard TCP/IP Port If the machine is being used on an IPv6 network, change the port to a port created using the operating system's "Standard TCP/IP Port". 1 Follow steps 1 to 3 of "CHANGING THE PORT" (page 30). 2 Select [Standard TCP/IP Port] and then click the [New Port] button. 31
-
 1
1 -
2
-
3
-
4
-
5
-
6
-
7
-
8
-
9
-
10
-
11
-
12
-
13
-
14
-
15
-
16
-
17
-
18
-
19
-
20
-
21
-
22
-
23
-
24
-
25
-
26
-
27
-
 28
28 -
 29
29 -
 30
30 -
 31
31 -
 32
32 -
 33
33 -
 34
34 -
 35
35 -
 36
36 -
 37
37 -
 38
38 -
39
-
40
-
41
-
42
-
43
-
44
-
45
-
46
 |
 |
