Sharp MX-M503N Quick Start Guide - Page 22
Changing the tray settings - admin password
 |
View all Sharp MX-M503N manuals
Add to My Manuals
Save this manual to your list of manuals |
Page 22 highlights
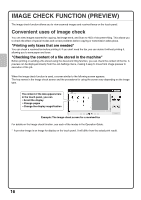
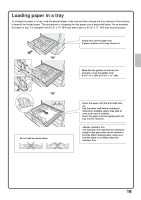
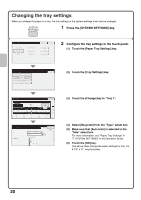
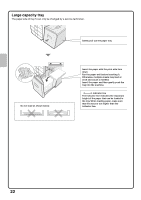
Changing the tray settings When you change the paper in a tray, the tray settings in the system settings must also be changed. SYSTEM SETTINGS 1 Press the [SYSTEM SETTINGS] key. System Settings Total Count Paper Tray Settings (1) Printer Condition Settings Default Settings Address Control Document Filing Control Admin Password Exit List Print (User) Fax Data Receive/Forward USB-Device Check 2 Configure the tray settings in the touch panel. (1) Touch the [Paper Tray Settings] key. System Settings Paper Tray Settings Back Tray Settings (2) Paper Type Registration Auto Tray Switching Custom Size Registration (Bypass) Tray Settings Type Size Fixed Paper Side Tray 1 Plain 8-1/2x14 Paper Property Disable Duplex Disable Staple Back Change (3) Disable Punch Copy Print Feeding Approved Job Fax I-Fax Doc. Filing System Settings Tray Settings Tray: Type: Size: Paper Property: Tray 1 Recycled 8-1/2x11 216x330(8 1/2x13) A3,A4,A4R,B4,B5,B5R, Print Copy I-Fax Fax Cancel OK (6) (4) (5) (2) Touch the [Tray Settings] key. (3) Touch the [Change] key in "Tray 1". (4) Select [Recycled] from the "Type" select box. (5) Make sure that [Auto-Inch] is selected in the "Size" select box. For more information, see "Paper Tray Settings" in "7. SYSTEM SETTINGS" in the Operation Guide. (6) Touch the [OK] key. The above steps change the paper settings for tray 1 to 8-1/2" x 11" recycled paper. 20
-
 1
1 -
2
-
3
-
4
-
5
-
6
-
7
-
8
-
9
-
10
-
11
-
12
-
13
-
14
-
15
-
16
-
 17
17 -
 18
18 -
 19
19 -
 20
20 -
 21
21 -
 22
22 -
 23
23 -
 24
24 -
 25
25 -
 26
26 -
 27
27 -
28
-
29
-
30
-
31
-
32
-
33
-
34
-
35
-
36
-
37
-
38
-
39
-
40
-
41
-
42
-
43
-
44
-
45
-
46
-
47
-
48
-
49
-
50
-
51
-
52
-
53
-
54
-
55
-
56
-
57
-
58
-
59
-
60
-
61
-
62
-
63
-
64
-
65
-
66
-
67
-
68
-
69
-
70
-
71
-
72
-
73
-
74
-
75
-
76
-
77
-
78
-
79
-
80
-
81
-
82
-
83
-
84
-
85
-
86
-
87
-
88
-
89
-
90
-
91
-
92
-
93
-
94
-
95
-
96
-
97
-
98
-
99
-
100
-
101
-
102
-
103
-
104
-
105
-
106
-
107
-
108
-
109
-
110
-
111
-
112
-
113
-
114
-
115
-
116
 |
 |