Sharp PG M20X PG-M20X Operation Manual - Page 29
Connecting to a Monitor, Watching Images on, Both the Projector and, a Monitor, Using INPUT 1 Terminal - digital projector
 |
UPC - 074000358355
View all Sharp PG M20X manuals
Add to My Manuals
Save this manual to your list of manuals |
Page 29 highlights
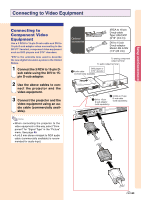
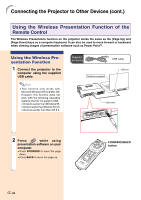
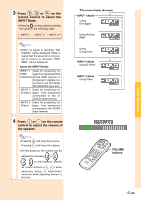
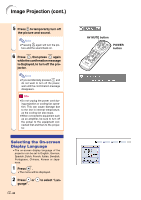
Connecting to a Monitor Setup and Connections Watching Images on Both the Projector and a Monitor You can display computer images on both the projector and a separate monitor using an RGB monitor loop-out adaptor and an RGB cable. 1 Connect the projector to the computer and monitor using an RGB monitor loop-out adaptor (sold separately) and an RGB cable (commercially available). Optional accessory To RGB input port Monitor RGB cable (commercially available) 1 RGB monitor loop-out adaptor (sold separately) RGB monitor loop-out adaptor Type: AN-A1MY (7.9" (20 cm)) 2 In the "Options(1)" menu, se- lect "Monitor Out" and then "Yes (Y cable)". • If "Disable" is selected, the projected image will be dimmer. This does not indicate a malfunction. For details, see page 58. Note • When using an RGB monitor loop-out adaptor (sold separately), make sure that the cable is connected to the monitor. • Analog RGB signals as well as Component signals can be output to the monitor. Black: to the monitor Blue: to the computer Notebook computer To RGB output port Info • Only analog RGB/Component signals entered into the DVI port can be output. Signals from equipment connected to the DVI digital port cannot be output. Using INPUT 1 Terminal with the Terminal Cover Attached to the Projector The INPUT 1 terminal can be used with the terminal cover folded as shown in the illustration. -25
-
 1
1 -
2
-
3
-
4
-
5
-
6
-
7
-
8
-
9
-
10
-
11
-
12
-
13
-
14
-
15
-
16
-
17
-
18
-
19
-
20
-
21
-
22
-
23
-
 24
24 -
 25
25 -
 26
26 -
 27
27 -
 28
28 -
 29
29 -
 30
30 -
 31
31 -
 32
32 -
 33
33 -
 34
34 -
35
-
36
-
37
-
38
-
39
-
40
-
41
-
42
-
43
-
44
-
45
-
46
-
47
-
48
-
49
-
50
-
51
-
52
-
53
-
54
-
55
-
56
-
57
-
58
-
59
-
60
-
61
-
62
-
63
-
64
-
65
-
66
-
67
-
68
-
69
-
70
-
71
-
72
-
73
-
74
-
75
-
76
-
77
-
78
-
79
-
80
-
81
-
82
-
83
-
84
-
85
-
86
 |
 |
