Sharp PN-E471 PN-TPC1 Signage Controller User Guide - Page 6
Mounting PN-TPC1 on Sharp PN-series Displays, Before beginning, Items needed, Attach the mounting
 |
UPC - 074000046955
View all Sharp PN-E471 manuals
Add to My Manuals
Save this manual to your list of manuals |
Page 6 highlights
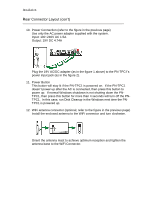
Installation Mounting PN-TPC1 on Sharp PN-series Displays 1. Before beginning Make sure to turn off the monitor and remove the AC power. 2. Items needed Sharp PN series Professional Monitor PN-TPC1 Mounting Plate AC Power Adapter 4 x M4 (0.7x10mm) screws 2 x M3 (0.5x5 mm) Philips Screw Driver 3. Attach the mounting plate There are 8 holes on the mounting plate, but only use 4 holes to match the monitor's mounting holes depending on the monitor model. The mounting plate is attached to PNE421 in Figure 2. Secure the mounting plate to the monitor with four included M4 screws. Figure 1 Figure 2
-
 1
1 -
 2
2 -
 3
3 -
 4
4 -
 5
5 -
 6
6 -
 7
7 -
 8
8 -
 9
9 -
 10
10 -
 11
11 -
 12
12 -
13
 |
 |

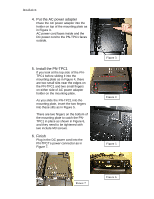
Installation
Mounting PN-TPC1 on Sharp PN-series Displays
1. Before beginning
Make sure to turn off the monitor and remove the AC power.
2. Items needed
Sharp PN series Professional Monitor
PN-TPC1
Mounting Plate
AC Power Adapter
4 x M4 (0.7x10mm) screws
2 x M3 (0.5x5 mm)
Philips Screw Driver
3. Attach the mounting plate
There are 8 holes on the mounting
plate, but only use 4 holes to match
the monitor’s mounting holes
depending on the monitor model.
The mounting plate is attached to PN-
E421 in Figure 2.
Secure the mounting plate to the
monitor with four included M4 screws.
Figure 1
Figure 2