Sharp PN-L602B PN-TPC2W7A Quick Start Guide - Page 10
Rear Connector Layout con't
 |
View all Sharp PN-L602B manuals
Add to My Manuals
Save this manual to your list of manuals |
Page 10 highlights
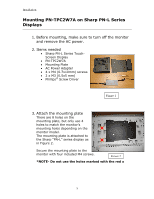
Installation Rear Connector Layout (con't) 1. Power Connection (refer to the Rear Connector Layout on pg. 8) Use only the AC power adapter supplied with the system. Input: 100~240V AC 1.3A Output: 12V DC 7A Plug the 12V AC/DC adapter (as in the figure 1 above) to the PNTPC2W7A's power input jack (as in the figure 2). 2. Power Button This button will stay lit if the PN-TPC2W7A is powered on. If the PN-TPC2W7A doesn't power up after the AC is connected, then press this button to power up. If normal Windows shutdown is not shutting down the PN-TPC2W7A, then press this button for more than 4 seconds will turn off the PN-TPC2W7A. In this case, run Disk Cleanup in Windows next time the PN-TPC2W7A is powered up. 9
-
 1
1 -
2
-
3
-
4
-
 5
5 -
 6
6 -
 7
7 -
 8
8 -
 9
9 -
 10
10 -
 11
11 -
 12
12 -
 13
13
 |
 |

Installation
9
Rear Connector Layout (con’t)
1.
Power Connection (refer to the Rear Connector Layout on pg. 8)
Use only the AC power adapter supplied with the system.
Input: 100~240V AC 1.3A
Output: 12V DC 7A
Plug the 12V AC/DC adapter (as in the figure 1 above) to the PN-
TPC2W7A
’s power input jack (as in the figure 2).
2.
Power Button
This button will stay lit if the PN-TPC2W7A is powered on.
If the
PN-TPC2W7A
doesn’t power u
p after the AC is connected, then
press this button to power up.
If normal Windows shutdown is
not shutting down the PN-TPC2W7A, then press this button for
more than 4 seconds will turn off the PN-TPC2W7A.
In this case,
run Disk Cleanup in Windows next time the PN-TPC2W7A is
powered up.