Sharp PN-L802B PN-TPC2W7A Quick Start Guide - Page 6
Mounting PN-TPC2W7A on Sharp PN-L Series, Displays
 |
View all Sharp PN-L802B manuals
Add to My Manuals
Save this manual to your list of manuals |
Page 6 highlights
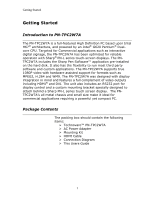
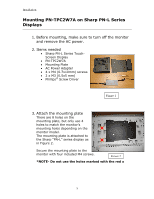
Installation Mounting PN-TPC2W7A on Sharp PN-L Series Displays 1. Before mounting, make sure to turn off the monitor and remove the AC power. 2. Items needed Sharp PN-L Series TouchScreen Display PN-TPC2W7A Mounting Plate AC Power Adapter 4 x M4 (0.7x10mm) screws 2 x M3 (0.5x5 mm) Phillips® Screw Driver Figure 1 3. Attach the mounting plate There are 8 holes on the mounting plate, but only use 4 holes to match the monitor's mounting holes depending on the monitor model. The mounting plate is attached to the Sharp "PN-L" series display as in Figure 2. Secure the mounting plate to the monitor with four included M4 screws. Figure 2 *NOTE- Do not use the holes marked with the red x 5
-
 1
1 -
 2
2 -
 3
3 -
 4
4 -
 5
5 -
 6
6 -
 7
7 -
 8
8 -
 9
9 -
 10
10 -
 11
11 -
 12
12 -
13
 |
 |

Installation
5
Mounting PN-TPC2W7A on Sharp PN-L Series
Displays
1.
Before mounting, make sure to turn off the monitor
and remove the AC power.
2.
Items needed
Sharp PN-L Series Touch-
Screen Display
PN-TPC2W7A
Mounting Plate
AC Power Adapter
4 x M4 (0.7x10mm) screws
2 x M3 (0.5x5 mm)
Phillips
®
Screw Driver
3.
Attach the mounting plate
There are 8 holes on the
mounting plate, but only use 4
holes to match the monitor’s
mounting holes depending on the
monitor model.
The mounting plate is attached to
the
Sharp “PN
-L
” series display
as
in Figure 2.
Secure the mounting plate to the
monitor with four included M4 screws.
*NOTE- Do not use the holes marked with the red x
Figure 1
Figure 2