Singer 1 One Plus Instruction Manual 2 - Page 56
Decorative Patterns, Continuous Patterns, Sewing On A Button - size clothing
 |
View all Singer 1 One Plus manuals
Add to My Manuals
Save this manual to your list of manuals |
Page 56 highlights
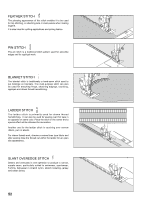
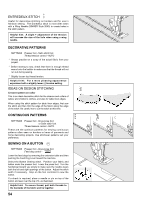
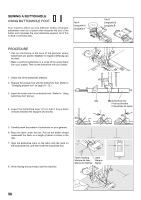
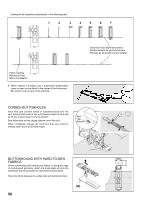
ENTREDEUX STITCH Useful for decorative stitching on borders and for use in heirloom sewing. The Entredeux stitch is most often sewn with a Wing Needle (SINGER Style 2040) to create holes in the stitch pattern. Helpful hint: A slight + adjustment of the tension will increase the size of the hole when using a wing needle. DECORATIVE PATTERNS SETTINGS :Presser foot - Satin stitch foot :Thread tension control - AUTO * Always practice on a scrap of the actual fabric from your project. * Before starting to sew, check that there is enough thread wound onto the bobbin to make sure that the thread will not run out during sewing. * Slightly loosen top thread tension. Helpful hint: For a more pleasing appearance experiment with a slightly lower (-) tension setting. IDEAS ON DESIGN STITCHING Crescent pattern on collar This is an ideal decorative stitch for the sleeves and collars of ladies' and children's clothes, and also for table linen edges. When using this stitch pattern for table linen edges, first sew the stitch and then trim the edge of the fabric along the edge of the stitch. Be careful not to cut the stitch at this time. CONTINUOUS PATTERNS SETTINGS :Presser foot - All-purpose foot or Satin stitch foot :Thread tension control - AUTO These are the optimum patterns for sewing continuous patterns often seen on borders or hems of garments and home decorating projects. Use whichever patterns suit your preference. SEWING ON A BUTTON SETTINGS :Presser foot - All-purpose foot :Feed dog control - Lower the feed dogs by removing the extension table and then pushing the Feed Dog Lever toward the machine. Select the Button Sewing stitch. Position your fabric and button under the presser foot. Lower the press foot. Turn the handwheel toward you slowly to make sure the needle clears both the left and right openings of the button. Adjust the stitch width if necessary. Step on the foot controller to sew the button. If a shank is required, place a needle or pin on top of the button and sew over the top of it, as illustrated. Helpful hint: To secure thread, pull both threads to the backside of the fabric and tie together. 54
-
 1
1 -
2
-
3
-
4
-
5
-
6
-
7
-
8
-
9
-
10
-
11
-
12
-
13
-
14
-
15
-
16
-
17
-
18
-
19
-
20
-
21
-
22
-
23
-
24
-
25
-
26
-
27
-
28
-
29
-
30
-
31
-
32
-
33
-
34
-
35
-
36
-
37
-
38
-
39
-
40
-
41
-
42
-
43
-
44
-
45
-
46
-
47
-
48
-
49
-
50
-
 51
51 -
 52
52 -
 53
53 -
 54
54 -
 55
55 -
 56
56 -
 57
57 -
 58
58 -
 59
59 -
 60
60 -
 61
61 -
62
-
63
-
64
-
65
-
66
-
67
-
68
-
69
-
70
-
71
-
72
 |
 |
