Singer 1 One Instruction Manual 40
Singer 1 One Manual
 |
View all Singer 1 One manuals
Add to My Manuals
Save this manual to your list of manuals |
Singer 1 One manual content summary:
- Singer 1 One | Instruction Manual 40 - Page 1
1 4U 46B Operator's Guide MME V SINGER - Singer 1 One | Instruction Manual 40 - Page 2
for proper use and optimum service. To get the most out of your sewing machine, read the entire operator's manual before attempting to operate the machine sewing machine when considered necessary without notification or obligation. * A Trademark of THE SINGER COMPANY Copyright©1989SINGER SEWING - Singer 1 One | Instruction Manual 40 - Page 3
stitch length 21 11. How to adjust overedge seam width 21 12. How to do rolled hemming 22 13. Free arm sewing (tubular work) 25 14. Seam guide lines 25 15. Edge guide 25 16. Three-thread flatlock stitch 26 17. Two-thread flatlock stitch 26 18. Two or three-thread blindstitching 27 - Singer 1 One | Instruction Manual 40 - Page 4
thread. Also, a 3.5mm and 5.7mm flatlock width can be obtained by changing the needle position.* 1-needle 3-thread stitch is used for 15 sewing narrow rolled hems or 18 ornamental edges. Also, a 3.5mm and 5.7mm wrapped overlock seam width can be obtained by changing the needle position - Singer 1 One | Instruction Manual 40 - Page 5
ideal for medium to heavy weight stretchy fabrics such as double knits and swim wear. *Depending on the needle position used, this machine can sew 2-thread and 3-thread standard width 3.5mm overedge and a 5.7mm wide overedge seams. Also, for overedging heavyweight fabrics, the seam width can be - Singer 1 One | Instruction Manual 40 - Page 6
higher number and (-) means looser tension or lower number. The tension settings shown on this page as well as throughout the operator's manual are suggested guides. Adjust thread tensions to suit the fabric and size of thread used. For best results make tension adjustments in small increments of no - Singer 1 One | Instruction Manual 40 - Page 7
3. Principal parts Thread guide holder Left hand looper thread tension dial Right hand looper thread tension dial Pressure regulating screw Right needle thread tension dial Left needle thread tension - Singer 1 One | Instruction Manual 40 - Page 8
4. Preparation for sewing Connect the machine plug to the electrical receptacle of your the speed, press the speed controller. The harder you press, the faster the machine will sew. To stop the machine from sewing, remove your foot from the speed controller. Caution: • Be sure that the electrical - Singer 1 One | Instruction Manual 40 - Page 9
holder Thread guide holder Thread guide Extend the thread guide holder as far as possible and set the thread guides so that they are located right above the spool pins. Place the thread on the spool stand as shown above. mi Spool stand • How to insert the needles Use Singer needles Cat. No - Singer 1 One | Instruction Manual 40 - Page 10
57/ O SINGER 0 Push the cover to the right as far as it will go and 0 Pull cover down toward you. * Be sure looper cover is closed when sewing. • How to remove cylinder cover To replace cover ml 0 Tab A II Throat plate 0 While pulling the cylinder cover to the left, (2) Lift cover upward and - Singer 1 One | Instruction Manual 40 - Page 11
the needle eye, cut the thread and pass it through the needle eye. (5) Return tension dials to reference numbers. • Chain off and test sew I SINGER 14,, Tie knot al I SINGER Yy [71) ri When the machine is completely threaded, turn the hand wheel toward you 2 or 3 turns while holding the 4 threads - Singer 1 One | Instruction Manual 40 - Page 12
6. How to sew two-thread overlock and overedge The 2-thread overlock and overedge is sewn with one needle, one looper and a spreader. (1) Convert right looper into spreader The right looper used in this machine can be easily converted into spreader. • Spreader Horn 1. Remove right - Singer 1 One | Instruction Manual 40 - Page 13
, thread the looper thread hole (1) from front to back. 1 Place the thread over the top of the right looper and hold the thread while initially sewing. 11 - Singer 1 One | Instruction Manual 40 - Page 14
(3a) Thread the right needle for standard 3.5mm stitch width Os • To thread the right needle Thread right needle thread in the order (ID to O as shown.. (Green thread path) For easy thread- , ing of needle 10 set movable knife in non-operating position. While holding thread with finger wrap - Singer 1 One | Instruction Manual 40 - Page 15
cannot be obtained. Topside Left looper thread Underside Set each tension dial to settings shown below and test sew on a sample of your fabric. • When using right needle for sewing normal width overedge seams, be sure to remove left needle. Fabric Light weight Medium weight Heavy weight Blue - Singer 1 One | Instruction Manual 40 - Page 16
weight Medium weight Heavy weight Blue Tension Dial Green Orange Yellow 0.5 Spreader 5.5 1.0 Spreader 5.5 1.5 Spreader 6.5 • When using left needle for sewing wide overedge seams, bu sure to remove right needle. Fabric Light weight Medium weight Heavy weight Blue 0.5 0.5 1.0 Tension Dial Green - Singer 1 One | Instruction Manual 40 - Page 17
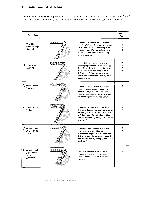
7. How to sew three-thread standard overlock, flatlock and wrapped edge overlock The 3-thread standard overlock, flatlock and wrapped edge is sewn with one needle and two loopers. (1) Thread the right looper. Open looper cover. Thread the right looper in the order (1) to ® as indicated in the figure - Singer 1 One | Instruction Manual 40 - Page 18
be obtained. Needle thread Left looper thread Topside Underside Set each tension dial to settings shown below and test sew on a sample of your fabric. • When using right needle for sewing normal width overedge seams, be sure to remove left needle. Fabric Light weight Medium weight Heavy weight - Singer 1 One | Instruction Manual 40 - Page 19
be obtained. Needle thread Left looper thread Underside Set each tension dial to settings shown below and test sew on a sample of your fabric. • When using right needle for sewing normal width overedge seams, be sure to remove left needle. Fabric Light weight Medium weight Heavy weight Blue - Singer 1 One | Instruction Manual 40 - Page 20
are correctly threaded otherwise proper tension cannot be obtained. Set each tension dial to settings shown below and test sew on a sample of your fabric. • When using right needle for sewing normal width overedge seams, be sure to remove left needle. Fabric Light weight Medium weight Heavy weight - Singer 1 One | Instruction Manual 40 - Page 21
8. How to sew three-thread ultra-stretch mock safety stitch The 3-thread ultra-stretch is sewn with two needles, one looper and a spreader. (1) Convert right looper Underside Set each tension dial to setting shown below and test sew on a sample of your fabric. Left needle thread tension dial - Singer 1 One | Instruction Manual 40 - Page 22
9. How to sew four-thread ultra-stretch mock safety stitch The 4-thread ultra-stretch is sewn ) Left looper thread tension dial (yellow) Set each tension dial to settings shown below and test sew on a sample of your fabric. Fabric Light weight Medium weight Heavy weight Blue 1.5 2.0 2.5 Tension - Singer 1 One | Instruction Manual 40 - Page 23
Overedge seam width of this machine is set to 3.5 mm for normal sewing with right needle and 5.7 mm with left needle however it can be increased heavy weight fabrics with right needle and 7.2 mm with left needle as instructed below. (1) Before making the adjustment, be sure that the power line plug - Singer 1 One | Instruction Manual 40 - Page 24
page 32) • Rolled hemming is done by rolling the fabric and overedging (seam width 1.5mm), and is not suited for heavy or stiff fabrics. Needle: Singer Cat. No. 2054 (#10), #14. Thread: A variety of thread combinations can be used for rolled hemming. Stitch length adjustment (See page 21) For rolled - Singer 1 One | Instruction Manual 40 - Page 25
tension, set the dials as follows from the standard thread tension dial settings. a. Turn the right looper thread tension dial (orange) one half graduation toward the (7 ) mark. b. Turn the left looper thread tension dial (yellow) 3 graduations toward the (+) mark. Slight adjustment will give - Singer 1 One | Instruction Manual 40 - Page 26
, a better stitch quality can be obtained by pulling the fabric lightly in the forward direction to give slight tension to the fabric. • When starting to sew, hold chained off thread end lightly to prevent it from being sewn into the seam. • The minimum overedge seam width that can be obtained for - Singer 1 One | Instruction Manual 40 - Page 27
onto the free arm and sew. 14. Seam guide lines Use seam guide lines on looper cover to guide (optional parts) For ornamental and blind (overedge) stitching, use of the edge guide attachment is very convenient. Attach edge guide as shown in figure. 5/8" SINGER b 0 le Washer Edge guide Edge guide - Singer 1 One | Instruction Manual 40 - Page 28
: If heavy thread such as pearl cotton is used in the right looper, you should skip the 2nd thread guide ® as shown on page 15. 1. Set thread tensions to normal sewing condition for 1 needle, 3 thread overedge stitch and make a test sample. (See page 16) Needle thread (green dial) • When making - Singer 1 One | Instruction Manual 40 - Page 29
Ordinary overedge throat plate Set tensions to normal sewing condition for 1 needle, 3 thread, overlock guide and place soft fold along edge of hem guide. Stitch making sure needle barely catches the fold. Adjust hem guide if necessary. An optional blind hem foot is available from your Singer - Singer 1 One | Instruction Manual 40 - Page 30
guide. • Adjust edge guide so that the stitches will just overcast the edge of the fold as shown in the sketch. • Lower the foot and sew. When stitching is completed, press pin tuck to lay flat on one • After securing with 2-3 stitches, continue sewing, allowing fabric to feed through machine while - Singer 1 One | Instruction Manual 40 - Page 31
corners Outside corner (-- -, Cutting line = 2cm 2cm A 1. Cut out approximately 2cm from the corner in line with the overedge seam edge. 2. Sew to point A, one stitch beyond edge of fabric and stop machine. 3. Raise needle and presser foot. 4. Pull fabric to the rear of machine just enough - Singer 1 One | Instruction Manual 40 - Page 32
the following steps, however if there are any difficulties experienced, call your Singer representative to make the adjustment. (1) Be sure that the power pressure of this machine is preadjusted at the factory to suit the sewing of medium weight fabrics. It may become necessary to adjust the - Singer 1 One | Instruction Manual 40 - Page 33
to make adjustment Whenever sewing difficulty is encountered, Do not pull the fabric by hand. Use hand only to guide the fabric. • Tighten screw firmly. When the thread breaks. • 7). • Thread machine correctly (page 11, 12, 15) • Use Singer Cat. 2054, #14. • Increase presser foot pressure (page 30 - Singer 1 One | Instruction Manual 40 - Page 34
#80 - #90 Tetron #60 - #80 Spun #60 - #80 Tetron #60 - #80 Cotton #60 - #80 Spun #60 - #80 Tetron #50 - #60 Wooley nylon Wooley tetron Needle Singer Cat. No. 2054 (#10), #14 #14 #14 (#10), #14 #14 #14 32 - Singer 1 One | Instruction Manual 40 - Page 35
hemming throat plate 6. Hex-head wrench 1 29. Specification Item Sewing speed Stitch length (feed amount) Overedge stitch width Needle bar stroke 3.5 - 7.2mm (standard 3.5mm) 27mm 5mm Rolled hemming Singer Cat. No. 2054 (#10), #14 Ordinary overedge Singer Cat. No. 2054 (#10), #14 4 width 257mm x - Singer 1 One | Instruction Manual 40 - Page 36
Form U3895 (489) Part No. 379230-002 Printed in Japan
-
 1
1 -
 2
2 -
 3
3 -
 4
4 -
 5
5 -
 6
6 -
 7
7 -
8
-
9
-
10
-
11
-
12
-
13
-
14
-
15
-
16
-
17
-
18
-
19
-
20
-
21
-
22
-
23
-
24
-
25
-
26
-
27
-
28
-
29
-
30
-
31
-
32
-
33
-
34
-
35
-
36
 |
 |

1
4U
46B
Operator's
Guide
MM
E
V
SINGER