Singer 7469Q Confidence Quilter Instruction Manual - Page 48
Multi-stitch Zigzag, Shell Stitch, Fagoting
 |
View all Singer 7469Q Confidence Quilter manuals
Add to My Manuals
Save this manual to your list of manuals |
Page 48 highlights
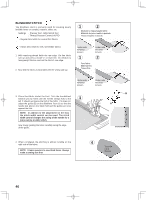
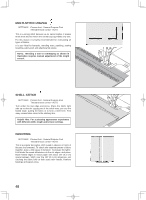
MULTI-STITCH ZIGZAG SETTINGS :Presser foot - General Purpose Foot :Thread tension control - AUTO This is a strong stitch because as its name implies, it makes three short stitches where the normal zig-zag makes only one. For this reason it is highly recommended for overcasting all types of fabrics. It is also ideal for bartacks, mending tears, patching, sewing towelling, patch-work and attaching flat elastic. NOTE: Mending a tear or overedging as shown in illustration requires manual adjustment of the length control. SHELL STITCH SETTINGS :Presser foot - General Purpose Foot :Thread tension control - AUTO Turn under the raw edge and press. Place the fabric right side up so that the zigzag part of the stitch sews just over the folded edge, pulling the fabric in to form a shell hem. Trim away excess fabric close to the stitching line. Helpful Hint: For a pleasing appearance experiment with different width, length and tension settings. FAGOTING SETTINGS :Presser foot - General Purpose Foot :Thread tension control - AUTO This is a popular decorative stitch (used in sleeves or fronts of blouses and dresses). To attach two separate pieces of fabric together, leave a little space in between. To prepare the fabric: Fold under the seam allowances on the cut edges, and press. Baste folded edges to tissue paper with about 1/8" (0.3 cm) space between. Stitch over the 1/8" (0.3 cm) allowance, just catching the fabric fold on both sides with needle. Remove bastings and paper; press. 48
-
 1
1 -
2
-
3
-
4
-
5
-
6
-
7
-
8
-
9
-
10
-
11
-
12
-
13
-
14
-
15
-
16
-
17
-
18
-
19
-
20
-
21
-
22
-
23
-
24
-
25
-
26
-
27
-
28
-
29
-
30
-
31
-
32
-
33
-
34
-
35
-
36
-
37
-
38
-
39
-
40
-
41
-
42
-
 43
43 -
 44
44 -
 45
45 -
 46
46 -
 47
47 -
 48
48 -
 49
49 -
 50
50 -
 51
51 -
 52
52 -
 53
53 -
54
-
55
-
56
-
57
-
58
-
59
-
60
-
61
-
62
-
63
-
64
-
65
-
66
-
67
-
68
-
69
-
70
-
71
-
72
-
73
-
74
-
75
-
76
-
77
-
78
-
79
-
80
-
81
-
82
 |
 |
