Singer 7640 CONFIDENCE Instruction Manual and Troubleshooting Guide - Page 7
About Your Machine
 |
View all Singer 7640 CONFIDENCE manuals
Add to My Manuals
Save this manual to your list of manuals |
Page 7 highlights
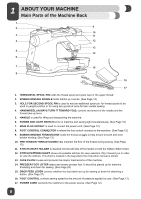
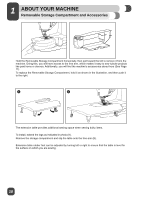
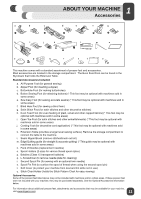
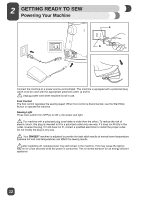
1 ABOUT YOUR MACHINE Main Parts of the Machine Front 1. THREAD TENSION DIAL allows you to select just the right tension for your stitch, thread and fabric. (See Page 19) 2. THREAD TAKE-UP LEVER controls the Àow of the upper thread while sewing. (See Page 15) 3. OPERATION BUTTONS control the needle up/down and Start/Stop functions, as well as the reverse function. (See Page 20) 4. THREAD CUTTER is conveniently located for trimming thread ends at the end of sewing. 5. NEEDLE THREADER LEVER is used to engage the automatic needle threader. (See Page 16) 6. PRESSER FOOT holds fabric against feed teeth, drawing fabric under the foot for you as you sew. (See Page 29) 7. NEEDLE PLATE has guidelines to help you keep seams straight. (See Page 9) 8. REMOVABLE STORAGE COMPARTMENT provides Àat surface for sewing, storage for accessories, and provides access to the free arm. (See Page 10) 9. BOBBIN WINDING STOPPER determines when bobbin is full and disengages automatically. (See Page 13) 10. SPEED CONTROL ADJUSTMENT LEVER controls the speed at which the machine sews when using the Foot Control or the manual Start/Stop Button. (See Page 20) 11. LCD SCREEN visually displays the stitch number, the stitch length or the stitch width depending on what Mode you have selected (See Page 20) 12. FUNCTION BUTTONS control the stitch width and the stitch length, as well as the pattern memory for alpha and numerical stitches. (See Page 21 and 22) 13. PATTERN ADJUSTMENT BUTTONS control the selection of the stitch patterns. The left button controls the left digit and the right button controls the right digit. (See Page 20 and 22) 14. BOBBIN holds the thread that forms the stitching that appears on the bottom side of the fabric. (See Page 14) 7
-
 1
1 -
 2
2 -
 3
3 -
 4
4 -
 5
5 -
 6
6 -
 7
7 -
 8
8 -
 9
9 -
 10
10 -
 11
11 -
 12
12 -
13
-
14
-
15
-
16
-
17
-
18
-
19
-
20
-
21
-
22
-
23
-
24
-
25
-
26
-
27
-
28
-
29
-
30
-
31
-
32
-
33
-
34
-
35
-
36
-
37
-
38
-
39
-
40
-
41
-
42
-
43
-
44
-
45
-
46
-
47
-
48
-
49
-
50
-
51
-
52
-
53
-
54
-
55
-
56
-
57
-
58
-
59
-
60
-
61
-
62
-
63
-
64
-
65
-
66
-
67
-
68
-
69
-
70
-
71
-
72
-
73
-
74
-
75
-
76
-
77
-
78
-
79
-
80
-
81
-
82
-
83
-
84
-
85
-
86
-
87
-
88
-
89
-
90
-
91
-
92
-
93
-
94
-
95
-
96
-
97
-
98
-
99
-
100
-
101
-
102
-
103
-
104
-
105
-
106
-
107
-
108
-
109
-
110
-
111
-
112
-
113
-
114
-
115
-
116
-
117
-
118
-
119
-
120
 |
 |
