Singer 8280 Instruction Manual
Singer 8280 Manual
 |
View all Singer 8280 manuals
Add to My Manuals
Save this manual to your list of manuals |
Singer 8280 manual content summary:
- Singer 8280 | Instruction Manual - Page 1
- Singer 8280 | Instruction Manual - Page 2
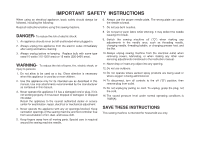
area, such as threading needle, changing needle, threading bobbin, or changing presser foot, and the like. 10. Always unplug sewing machine from the electrical outlet when removing covers, lubricating, or when making any other user servicing adjustments mentioned in the instruction manual. 11. Never - Singer 8280 | Instruction Manual - Page 3
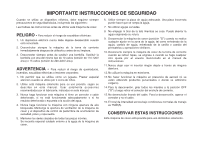
ventilación de la máquina de coser y el dispositivo de control de pedal libre de acumulacion de suciedad, polvo y ropa suelta. 5. se engrase o cuando se haga cualquier otro ajuste por el usuario mencionado en el manual de instrucciones. 11. Nunca dejar caer ni insertar ningún objeto a través - Singer 8280 | Instruction Manual - Page 4
instruction book, step by step, seated at your machine. To ensure that you are always provided with the most modern sewing capabilities, the manufacturer reserves the right to change the appearance, design or accessories of this sewing machine when considered necessary. SINGER este manual de - Singer 8280 | Instruction Manual - Page 5
List of contents Principal parts of the Machine...2/3 Accessories ...4 Installing the snap-in sewing table ...5 Connecting machine to power source...6 Changing the bulb ...8 Two-step presser foot lifter/ Adjusting presser foot pressure...9 Attaching the presser foot holder ...10 Winding the bobbin - Singer 8280 | Instruction Manual - Page 6
Indice Detalles de la máquina...2/3 Accesorios...4 Instalación de la mesa de coser convertible ...5 Conexión de la máquina a la fuente de alimentación eléctrica ...7 Cambio de la bombilla...8 Elevador del prensatelas de dos tiempos/ Ajuste de la presión del prensatelas ...9 Montaje del - Singer 8280 | Instruction Manual - Page 7
Principal parts of the machine 1. Thread tension dial 2. Presser foot pressure adjustment 3. Thread take-up lever 8 4. Thread cutter 5. Presser foot 1 9 6. Needle plate 7. Removable sewing table/ accessory storage 8. Reverse sewing lever 9. Bobbin stopper 2 10 10. Stitch length dial - Singer 8280 | Instruction Manual - Page 8
parts of the machine 12. Horizontal spool pin 13. Bobbin winder 14. Handwheel 12 17 15. Power and light switch 13 16. Main plug socket 18 17. Bobbin thread guide 18. Upper thread guide 19 19. Face plate 20. Handle 14 20 21. Presser foot lever 22. Foot speed control 23. Power cord - Singer 8280 | Instruction Manual - Page 9
All purpose foot b. Zipper foot c. Buttonhole foot d. Button sewing foot e. L-screwdriver f. Seam ripper/ brush g. Oil bottle h. Pack of needles I. Bobbin (3x) j. Seam guide k. Darning plate l. Spool holder Optional accessories (2) (These 6 accessories are not supplied with this machine; they are - Singer 8280 | Instruction Manual - Page 10
table horizontal, and push it in the direction of the arrow. (1) The inside of the snap-in sewing table can be utilized as an accessory box. To open, lift up at the point of the arrow. (2) Instalación de la mesa de coser convertible 1 Mantenga horizontal la mesa de coser convertible y - Singer 8280 | Instruction Manual - Page 11
(2) Attention: Unplug power cord when machine is not in use. Foot control A The foot control pedal regulates the sewing speed. (3) Attention: Consult a qualified electrician if in doubt as to connect machine to power source. Unplug power cord when machine is not in use. The foot control must be - Singer 8280 | Instruction Manual - Page 12
tiene dudas en cuanto a la conexión de la máquina a la alimentación principal. Desenchufe el cable de alimentación cuando la máquina no esté en uso. El control de pedal debe utilizarse con la máquina mediante 4C-316B (tensión de 110-120V área)/ 4C-326G (tensión de 230V área)/ 4C-316C o 4C-326C (220 - Singer 8280 | Instruction Manual - Page 13
Changing the bulb Disconnect the machine from the power supply by removing the plug from the main socket! Replace bulb with same type rated 10 watts (110-120V area) or 15 watts (220-240V area). - Remove the screw (A) as illustrated. (1) - Remove the face plate (B). - Unscrew the bulb and install a - Singer 8280 | Instruction Manual - Page 14
Two-step presser foot lifter When sewing several layers or thick fabrics, the presser foot can be raised to a high rise position for easy positioning of the work. (A) Adjusting presser foot pressure A The presser foot pressure of the machine has been pre-set and requires no particular readjustment - Singer 8280 | Instruction Manual - Page 15
foot (f) will engage automatically. Removing the presser foot Raise the presser foot. (3) Raise the lever (e) and the foot disengages. Attaching the seam guide Attach the seam guide (g) in the slot as illustrated. Adjust according to need for hems, pleats, etc. (4) Attention: Turn power switch - Singer 8280 | Instruction Manual - Page 16
- Hold thread end (6). - Step on foot control pedal (7). - Cut thread (8). - Press bobbin to left (9) and remove. Please Note: When the bobbin winder spindle is in "bobbin winding" position, the machine will not sew and the hand wheel will not turn. To start sewing, push the bobbin winder spindle - Singer 8280 | Instruction Manual - Page 17
hand. Insert the bobbin so that the thread runs in a clockwise direction (arrow) (3). - Pull the thread through the slit and under the finger (4). - Hold the bobbin case by the hinged latch (5). - Insert it into the shuttle (6). Attention: Turn power switch to off ("O") before inserting or removing - Singer 8280 | Instruction Manual - Page 18
as far up as it will go. Attention: Turn power switch to off ("O") before inserting or removing the needle. Needles must be in perfect condition. (2) Problems can occur with: A.Bent needles B.Blunt needles C.Damaged points Colocación y cambio de agujas 1 Cambie la aguja preiódicamente, sobre - Singer 8280 | Instruction Manual - Page 19
correctly as by not doing so several sewing problems could result. - Start by raising the needle to its highest point (1), and also raise the presser foot to release the tension discs. Note: For safety, it is strongly suggested you turn off the power before threading. - Lift up the spool pin. Place - Singer 8280 | Instruction Manual - Page 20
hacia arriba en el canal izquierdo (4). Durante este proceso, es de utilidad sujetar el hilo entre el carrete y el guía-hilo (3). 76 - En la parte superior de este movimiento, pase el hilo desde la derecha a izquierda a través del ojo ranurado de la palanca de arrollamiento y luego hacia debajo de - Singer 8280 | Instruction Manual - Page 21
the bottom side of fabric. Lower thread tension To test the bobbin thread tension, remove the bobbin case and bobbin and hold it by suspending it by the thread. Jerk it once or twice. If the tension is 1 correct, the thread will unwind by about an inch or two. If the tension is too tight, it does - Singer 8280 | Instruction Manual - Page 22
Tensión del hilo Tensión del hilo superior Adjuste de la tensión del hilo básica: "4" Para aumentar la tensión, girar el disco al siguiente número más alto. Para reducir la tensión, girar el disco al siguiente número más bajo. A. Tensión normal del hilo para cosido de puntos rectos. B. Tensión - Singer 8280 | Instruction Manual - Page 23
to raise the bobbin thread, check to make sure the thread is not trapped by the hinged cover or the Removable Sewing Table. Gently pull on the upper thread to bring the bobbin thread up through the needle plate hole (2). Lay both threads to the back under the presser foot. (3) Elevación del hilo - Singer 8280 | Instruction Manual - Page 24
A machine will sew forwards again. (1) Removing the work Turn the handwheel counterclockwise to bring the thread take up lever to its highest position, raise the presser foot and remove work behind the needle and presser foot. (2) Cutting the thread Pull the threads behind the presser foot. Guide - Singer 8280 | Instruction Manual - Page 25
fabrics, some leathers and vinyls. Heavy duty thread, carpet thread. (Use heavy foot pressure-large numbers.) IMPORTANT: Match needle size to thread size and weight of fabric. NEEDLE, FABRIC SELECTION NEEDLES EXPLANATION SINGER 2020 Standard sharp needles. Sizes range thin to large. 9 (70) to - Singer 8280 | Instruction Manual - Page 26
majores resultados. Use siempre el mismo hilo en el las partes superior e inferior. 18(110) Tejidos de lana cardada al peso del la tela. SELECCIÓN DE AGUJA Y DE TELA AGUJAS EXPLICACION TIPO DE TEJIDO SINGER 2020 Agujas de afilado normal. Telas de tejido normal - lana. Algodón, seda, etc. - Singer 8280 | Instruction Manual - Page 27
of the patterns shown on the stitch selection panel, select the pattern with the stitch selector dial. Adjust the stitch length with the control dials according to the result desired. a. Reverse lever b. Stitch length dial c. Pattern selector dial ¿Cómo seleccionar su dibujo? Para punto recto de - Singer 8280 | Instruction Manual - Page 28
stitch set length at "1" or "2". For gathering set stitch length to "4". For twin needle stitching, set needle at middle needle position. Thread left spool of thread in left needle and right spool of thread in right needle. Punto recto y doble aguja Gire el disco selector de la puntada, de modo que - Singer 8280 | Instruction Manual - Page 29
Zigzag stitching Turn the pattern selector dial so that the stitch display shows "zig-zag" " ". Turning the pattern selector dial will increase or decrease the zig zag width. (1) Function of stitch length dial while zigzag The density of zigzag stitches increase as the setting of stitch length dial - Singer 8280 | Instruction Manual - Page 30
of the hem extending about 5 mm. (1/5") to the right side of the folded fabric. Start to sew slowly on the fold, making sure the needle touches slightly the folded top to catch one or two fabric threads (2). Unfold the fabric when hemming is completed and press. Dobladillo/ Punto de lencería Para - Singer 8280 | Instruction Manual - Page 31
presser foot to button sewing foot. Position the work under the foot. Place the button on the marked position, lower the foot. Adjust stitch width to " " and sew a few securing stitches. Set the stitch width to number "3" - "5". Turn the handwheel to check that the needle en la parte superior del - Singer 8280 | Instruction Manual - Page 32
middle. Tips: - Slightly reducing upper thread tension will produce better results. - Use a backing for fine or stretchy fabrics. - It is advisable to use heavy thread or cord for stretch or knit fabrics. - The zig-zag should sew over the heavy thread or cord. (5) 10 2 5 1 2 34 43 4 1 3 2 27 - Singer 8280 | Instruction Manual - Page 33
Cómo coser ojales en 4 pasos Preparación 1. Quite el pie prensatelas multiuso y meta el pie prensatelas para hacer ojales. 2. Mida el diámetro y el espesor del botón y añada 0.3 cm (1/8") para hilvanes; Señala el tamaño del ojal en la tela. 3. Coloque la tela debajo del pie prensatelas de modo que - Singer 8280 | Instruction Manual - Page 34
on which side of the foot you are going to sew. (1) To sew past the zipper pull, lower the needle into the fabric, raise the presser foot and push the zipper pull behind the presser foot. Lower the foot and continue to sew. It is also possible to sew a length of cord into a bias strip to form - Singer 8280 | Instruction Manual - Page 35
sew over the center and then overlap on both sides. Depending on the type of fabric and damage, sew should be approximately 1/4 to 1/2 of an inch long. Set stitch to zigzag and stitch over Esta función se usa para asegurar la parte de arriba de los pliegues, así como las aberturas de los - Singer 8280 | Instruction Manual - Page 36
* The darning foot is an optional accessory not included with your machine. (1) Install the darning plate (2) and Remove the presser foot clamp. (3) Attach the darning foot to the presser foot holder. The lever (a) should be behind the needle clamp screw (b). Press the darning foot on firmly from - Singer 8280 | Instruction Manual - Page 37
0 Decorative stitches Set the machine as illustrated. Turn the stitch length dial to suit the fabric and application. Shell stitch (A) For decorative edges. Suitable for edges on sheer, fine and - Singer 8280 | Instruction Manual - Page 38
and blindstitch applique Position applique piece on background fabric. Align needle so that it pierces background fabric along the outside edge if the applique. Lower presser foot. If using a blindhem foot, align the lip of the blindhem foot guide so that it sits directly under the edge of the - Singer 8280 | Instruction Manual - Page 39
functions * The Quilting foot is an optional accessory not included with your machine. Stippling is free motion quilting where you hoop the fabric and guide it by hand, allowing you to stitch in any direction. For template quilting transfer a design from a template (plastic stencil) to your fabric - Singer 8280 | Instruction Manual - Page 40
Mending Machine Preparation: - Pattern: Multi - stitch Zigzag - Stitch width: Largest 4.5mm - Stitch length: Fine (0.5 - 1.0) Sewing Instructions: Position a piece of fabric directly beneath the tear in your fabric. Align the center of the foot with the center of the tear. Stitchacross, - Singer 8280 | Instruction Manual - Page 41
Staystitching Machine Preparation: - Pattern: Straight Stitch - Stitch length: 1.5mm (fine) Sewing Instructions: Staystitching is used to reinforce curves such as armholes, seams in stretch fabrics and other areas to prevent stretching. Stay stitch along the edge of the area 1/4 of an inch from the - Singer 8280 | Instruction Manual - Page 42
PinTucks Machine Preparation: - Pattern: Straight - Stitch Length: 2 - 3 Sewing Instructions: To mark pintucks in your fabric, either pull a thread to mark the fold or mark with chalk or marking pencil. Fold and press wrong sides together on pulled thread line or marked lines. Stitch 1/8 of an inch - Singer 8280 | Instruction Manual - Page 43
by backstitching and then continue to sew the length required. When seam is complete, raise the needle to it's highest, raise the presser foot and pull the upper and lower threads to the back of the foot. Cut your thread ends leaving a minimum 6 inches of thread. Repeat this procedure once again at - Singer 8280 | Instruction Manual - Page 44
projects. With a marking pencil, draw a design on your fabric. Lay the cord under the center opening of your foot and zigzag over the cord so that the needle falls just to the right and left of the decorative cord. As you sew, follow the lines of your design. Acumulado Preparación de la máquina - Singer 8280 | Instruction Manual - Page 45
in the left position. Replace the hook (5). Replace the hook race cover and snap back the two hook retaining arms. Insert he bobbin case and bobbin and replace the stitch plate. Important: Fabric fluff and threads must be removed regularly. Your machine should be serviced at regular intervals. 7 40 - Singer 8280 | Instruction Manual - Page 46
Mantenimiento de la máquina Atención: Antes de la limpieza desconectar la máquina quitando el enchufe de la red eléctrica. Quitar la placa de la aguja Girar el volante hasta que la aguja este en el punto más alto. Abrir la tapa con charnela y sacar el tornillo de la placa de aguja por el - Singer 8280 | Instruction Manual - Page 47
Lubricate as described 2. Clean the hook and feed dog as described in the instructions 3. Only use good quality sewing machine oil 4. Replace the needle Remove the upper thread and bobbin case, turn the handwheel backwards and forwards by hand and remove the thread remains Lubricate as described in - Singer 8280 | Instruction Manual - Page 48
Eliminación de averías Problema El hilo superior se rompe Causa 1.La máquina está mal enhebrada. 2La tensión del hilo es demasiado fuerte 3.El hilo es demasiado grueso para la aguja 4.La aguja no está colocada correctamente 5.El hilo se ha enredado en el portabobinas 6.La aguja está torcida o - Singer 8280 | Instruction Manual - Page 49
- Singer 8280 | Instruction Manual - Page 50
021V880101( ) Feb/05 SINGER 8280(8280)
-
 1
1 -
 2
2 -
 3
3 -
 4
4 -
 5
5 -
 6
6 -
 7
7 -
8
-
9
-
10
-
11
-
12
-
13
-
14
-
15
-
16
-
17
-
18
-
19
-
20
-
21
-
22
-
23
-
24
-
25
-
26
-
27
-
28
-
29
-
30
-
31
-
32
-
33
-
34
-
35
-
36
-
37
-
38
-
39
-
40
-
41
-
42
-
43
-
44
-
45
-
46
-
47
-
48
-
49
-
50
 |
 |
