Singer Heavy Duty 6380 HD6380 Stitch Applications Guide - Page 2
English - m manual
 |
View all Singer Heavy Duty 6380 manuals
Add to My Manuals
Save this manual to your list of manuals |
Page 2 highlights
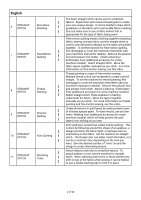
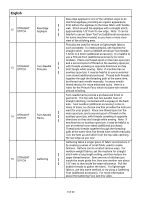
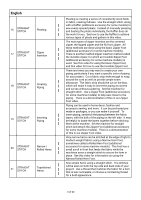
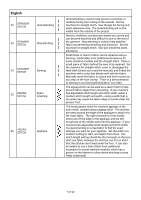
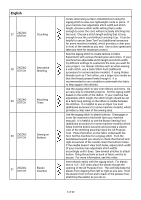
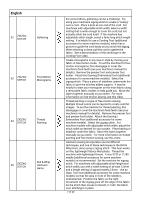
English 6 STRAIGHT STITCH Decorative Stitching 7 STRAIGHT STITCH Free-Motion Quilting 8 STRAIGHT STITCH Thread Painting 9 STRAIGHT STITCH Channel Quilting 10 STRAIGHT STITCH Echo Quilting 11 STRAIGHT STITCH Attaching Trims The basic straight stitch can be used to embellish fabrics. Experiment with various thread types to create your own unique design. It can be helpful to draw stitch guidelines on the fabric with a removable fabric marking tool, but make sure to use a fabric marker that is appropriate for the type of fabric being sewn. Free-motion quilting means stitching together a backing fabric, batting, and top fabric, and the straight stitch is used to sew decorative designs as the layers are quilted together. To set the machine for free-motion quilting, first disengage or cover the machine's feed teeth (see your machine's manual for details). Remove the presser foot and presser foot holder. Attach a Darning / Embroidery Foot (additional accessory for some machine models). Select straight stitch. Move the fabric layers together manually as you stitch. For more information on free-motion sewing, see this video. Thread painting is a type of free-motion sewing. Multiple thread colors can be layered to create colorful images. To set the machine for thread painting, first disengage or cover the machine's feed teeth (see your machine's manual for details). Remove the presser foot and presser foot holder. Attach a Darning / Embroidery Foot (additional accessory for some machine models). Select straight stitch. Place stabilizer or batting underneath the fabric. Move the layers together manually as you stitch. For more information on thread painting and free-motion sewing, see this video. Create dimension in quilt layers by sewing several rows of stitches spaced apart. For best results, use an Even Feed / Walking Foot (additional accessory for some machine models), which will help prevent the quilt layers from shifting as you sew. Echo quilting is sometimes called 'outline quilting'. This is done by following around the shape of an applique, a design printed in the fabric itself, or perhaps even an embroidery on the fabric. Set the machine for straight stitch. The thread color can either match the fabric, or it can be a contrast color, depending on the look you want. Sew the desired number of "rows" around the design to create interesting texture. Attach ribbons and trims to embellish fabrics. To attach aribbon or trim, set the machine for straight stitch. When stitching wider trims or those that tend to shift on top of the fabric while sewing, it can be helpful to use a fusible basting tape to hold it in place. 2 of 23
-
 1
1 -
 2
2 -
 3
3 -
 4
4 -
 5
5 -
 6
6 -
 7
7 -
 8
8 -
9
-
10
-
11
-
12
-
13
-
14
-
15
-
16
-
17
-
18
-
19
-
20
-
21
-
22
-
23
 |
 |
