Singer M1000 Mending Machine Accessory User Guide - Page 17
Piping Foot
 |
View all Singer M1000 Mending Machine manuals
Add to My Manuals
Save this manual to your list of manuals |
Page 17 highlights
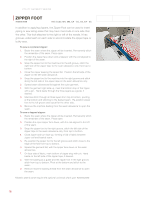
PIPING FOOT #250041596 M/C Code: CD The Piping Foot is used to insert packaged piping into seams and edges for a tailored finish. For specialty piping, cord can be covered with fabric. The clear view allows you to see your stitching and piping placement and to see the first row of stitching and adjust your needle position appropriately to stitch next to the original row. 1. Snap the Piping Foot onto the machine. 2. Select the straight stitch with average stitch length. 3. Position one layer of fabric face side up, place piping on top and the other layer of fabric face down. 4. Check that all three layers are aligned with the edges even on the right side of the foot and the piping in the groove of the foot. 5. Sew a few stitches to check the stitch placement. The needle position may need to be adjusted to ensure the stitching is butted against the cord in the piping. To Make Custom Piping: 1. Snap the Piping Foot onto the machine. 2. Select the straight stitch with average stitch length. 3. Position the cording into the center of the bias fabric strip with the face side out. 4. Place under the Piping Foot with the fold and cording to the left and the raw edges to the right. 5. Sew a few stitches to check the stitch placement. The needle position may need to be adjusted to ensure the stitching is butted against the cord in the piping. UTILITY GARMENT SEWING 17
-
 1
1 -
2
-
3
-
4
-
5
-
6
-
7
-
8
-
9
-
10
-
11
-
 12
12 -
 13
13 -
 14
14 -
 15
15 -
 16
16 -
 17
17 -
 18
18 -
 19
19 -
 20
20 -
 21
21 -
 22
22 -
23
-
24
-
25
-
26
-
27
-
28
-
29
-
30
-
31
-
32
-
33
-
34
-
35
-
36
-
37
-
38
-
39
-
40
-
41
-
42
-
43
-
44
-
45
-
46
-
47
-
48
-
49
-
50
-
51
-
52
-
53
-
54
-
55
-
56
-
57
-
58
-
59
-
60
-
61
-
62
-
63
-
64
-
65
-
66
-
67
-
68
-
69
-
70
-
71
-
72
 |
 |
