Singer One Instruction Manual 15 - Page 32
dialyellow
 |
View all Singer One manuals
Add to My Manuals
Save this manual to your list of manuals |
Page 32 highlights
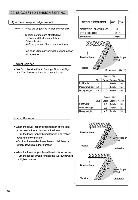
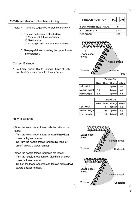
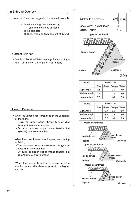
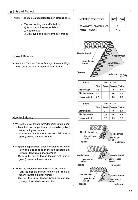
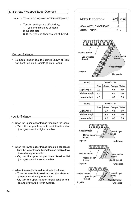
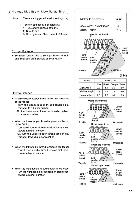
2) 2-Thread standard rolled hem stitching Note: These are suggested tension settings only. Tension settings are effected by: 1) Type and thickness of fabric 2) Needle size 3) Size, type and fiber content of thread * See page26 to converting the upper looper into spreader. Correct Balance • Set Each Tension Dial to Settings Shown at Right and Test Sew on a Sample of Your Fabric How to Balance NEEDLE POSITION oro co SEAM WIDTH FINGER KNOB STITCH LENGTH SPREADER S 2- 4 USE Lower looper thread Needle thr iad Topside Underside (503) Tension Dial Light weigt Medium weight Heavy weight Blue 0 0.5 1.0 Green Orange Yellow Spreader 5.0 Spreader 6.0 Spreader 6.5 Tension Dial Light weigt Blue Green Orange Yellow 0 Spreader 5.0 Medium weight 0.5 Spreader 6.0 Heavy weight 1.0 Spreader 6.5 • When the lower looper thread is botton side of the fabric. - Turn the lower looper thread tension dial(yellow) toward a higher number. - Or, turn the needle thread tension dial (blue or green) toward a lower number. • When the needle thread tension is too loose: - Turn the needle thread tension dial (blue on green) toward a lower number. - Or, turn the lower looper thread tension dial (yellow) toward a lower number. Lower looper thread Topside Lower looper thread Topside Needl= thread Underside Nee\e thread Underside 31
-
 1
1 -
2
-
3
-
4
-
5
-
6
-
7
-
8
-
9
-
10
-
11
-
12
-
13
-
14
-
15
-
16
-
17
-
18
-
19
-
20
-
21
-
22
-
23
-
24
-
25
-
26
-
 27
27 -
 28
28 -
 29
29 -
 30
30 -
 31
31 -
 32
32 -
 33
33 -
 34
34 -
 35
35 -
 36
36 -
 37
37 -
38
-
39
-
40
-
41
-
42
-
43
-
44
-
45
-
46
-
47
-
48
-
49
-
50
-
51
-
52
-
53
 |
 |
